|
|

Joined:
June 2012
Posts: 2303
Location: Lake Forest, CA | Here's a common problem we all have with the Ovation A/E pick-ups: String dents. 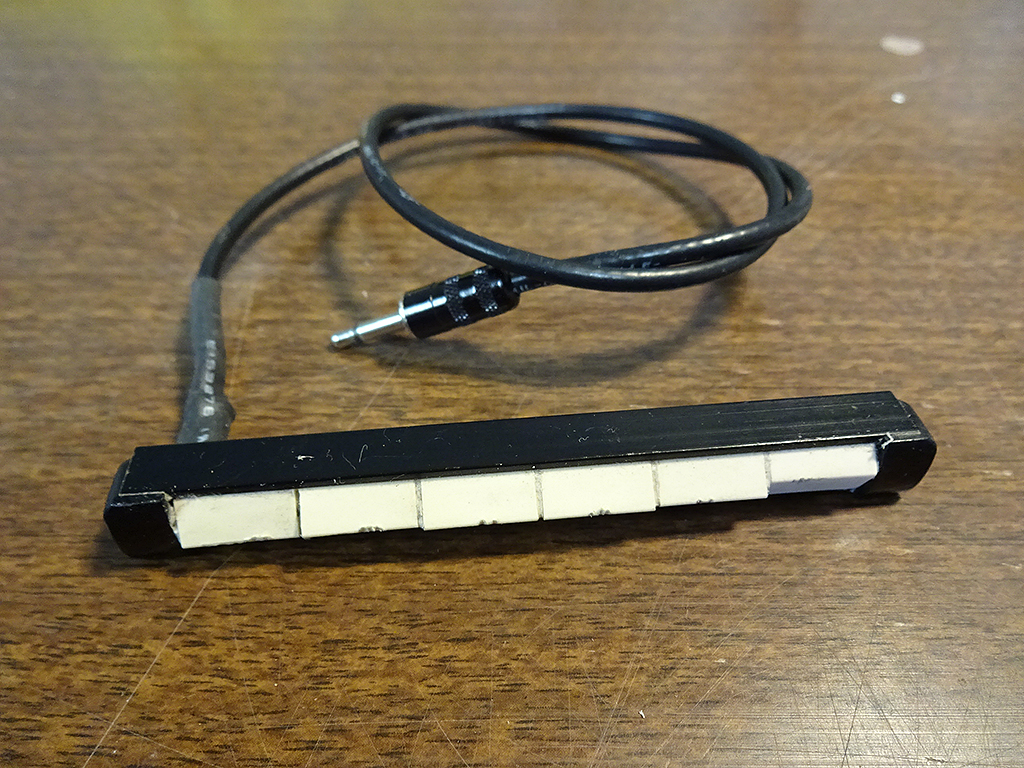
I've found that this is really easy to fix so the saddle portion of the pick-up is like brand-new again.
First, you'll need to contact John Budny at the MS to ask him to send you some of these. This is the plastic saddle portion of the saddle/pick-up. 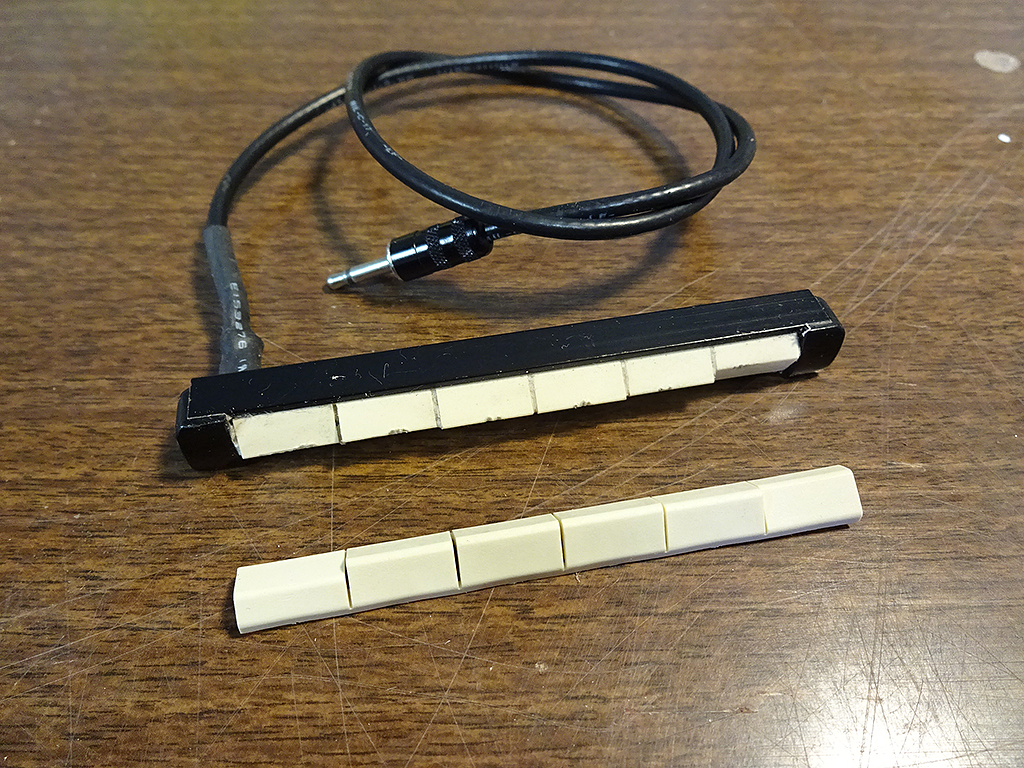

In this thread I'll show how I replace the old saddle with these new ones. It's really easy.
Step 1: Use an Xacto blade to gently pry the old saddle out of the pick-up. 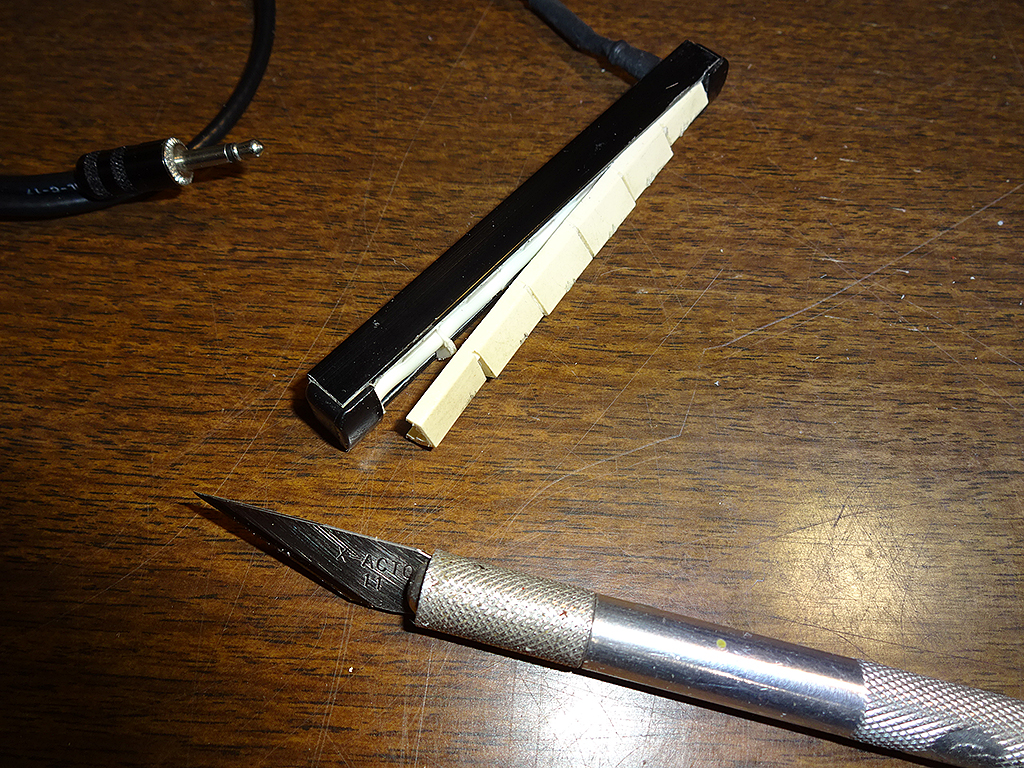
You want to start at one end and insert the edge of the blade into the space between the end of the saddle and the black plastic filler piece, then pry it out peeling the saddle away from the inside of the pick-up.
The saddle is glued to the pick-up with what looks like white silicone caulking which has just enough grip on the plastic saddle to keep it in place, but not so much that it takes a Herculean effort to separate the two.
In fact, the fit is so good that you could pry the old one out, pop a new one into place, then string it up and play it.
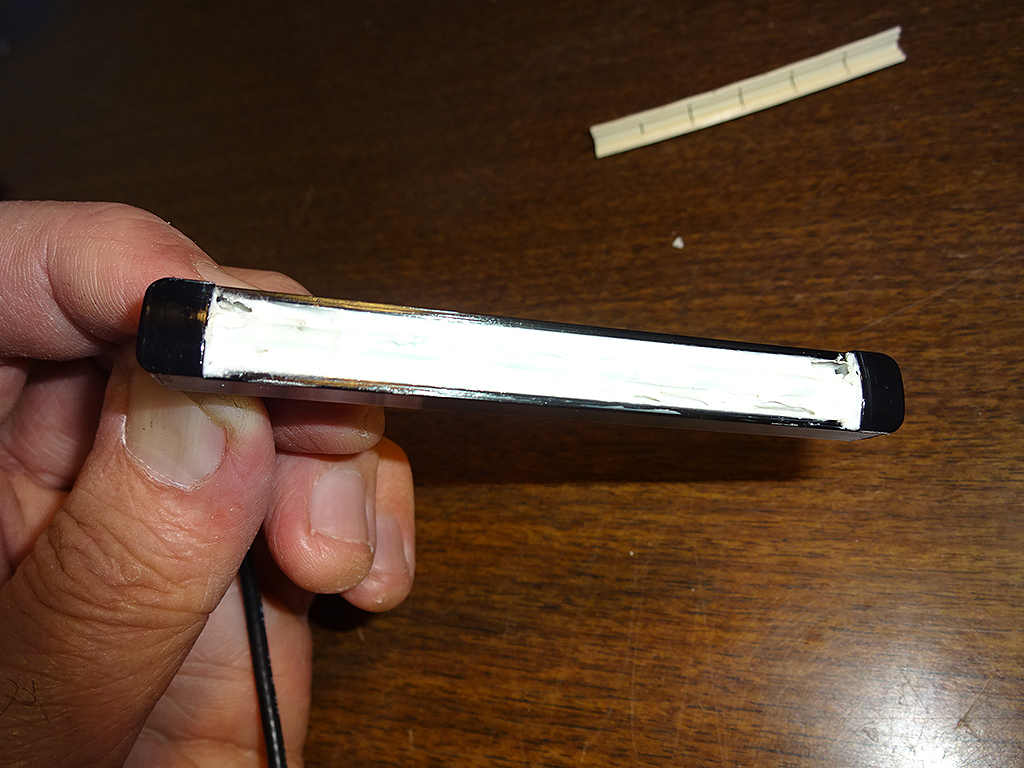
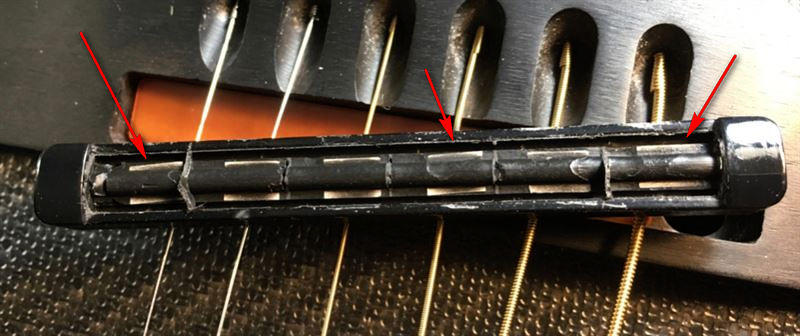
Once the saddle is out of the pick-up, this is what you'll see. The gold-ish pieces are the actual piezo crystals.
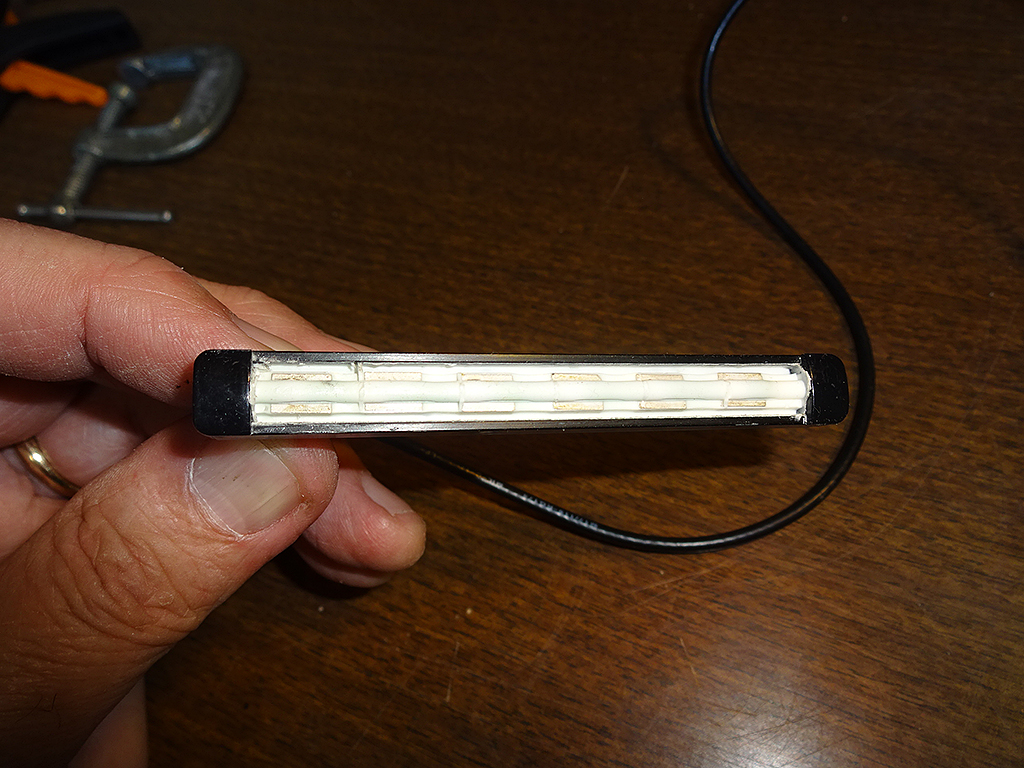
DO NOT ATTEMPT TO REMOVE ANY OF THE WHITE SILICONE. The wires connecting the crystals are very delicate and you are almost guaranteed to pop a crystal off its mount as you peel the silicone off it. It's not necessary to remove any silicone as you'll soon see. 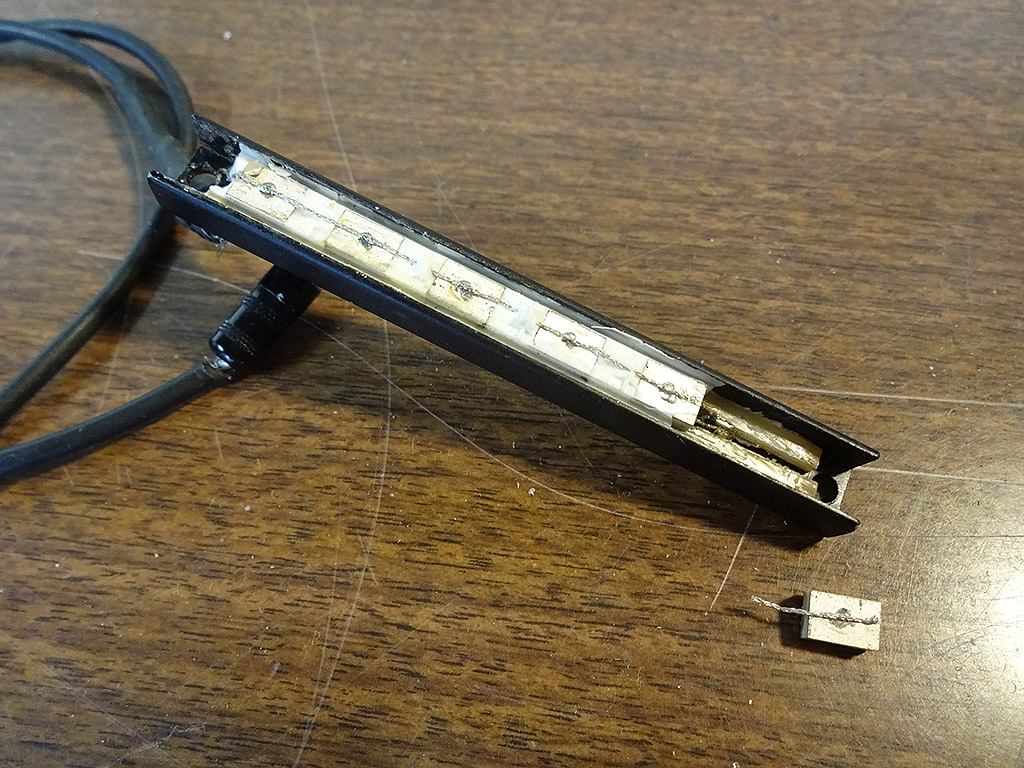
Spread some white silicone across the top of the old silicone. Make sure to get an even layer across the whole pick-up.
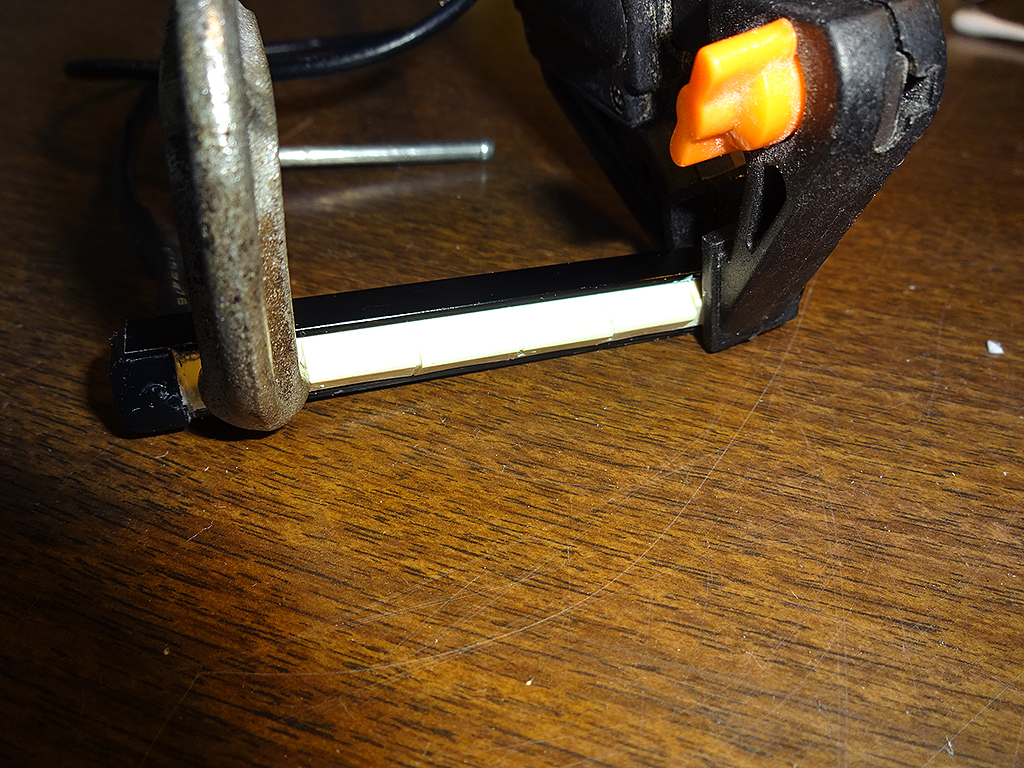
Push the new saddle down into the pick-up. Wipe up any excess that squeezes out, then lightly clamp the pick-up at both ends. All you're doing with the clamps is to keep the saddle firmly squeezed against the tops of the crystals, so you don't want to apply too much pressure. Now just leave it to sit overnight.
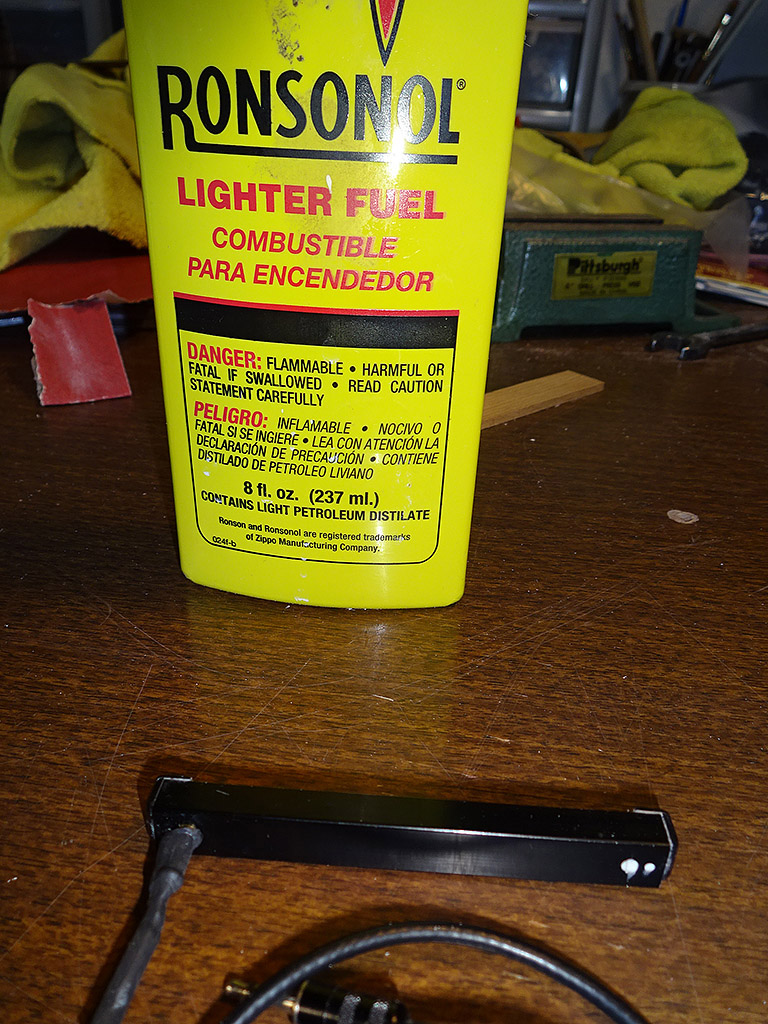
In order to make sure the bottom of the pick-up makes even contact with the floor of the slot in the bridge, I use some naptha to remove the mfr label.
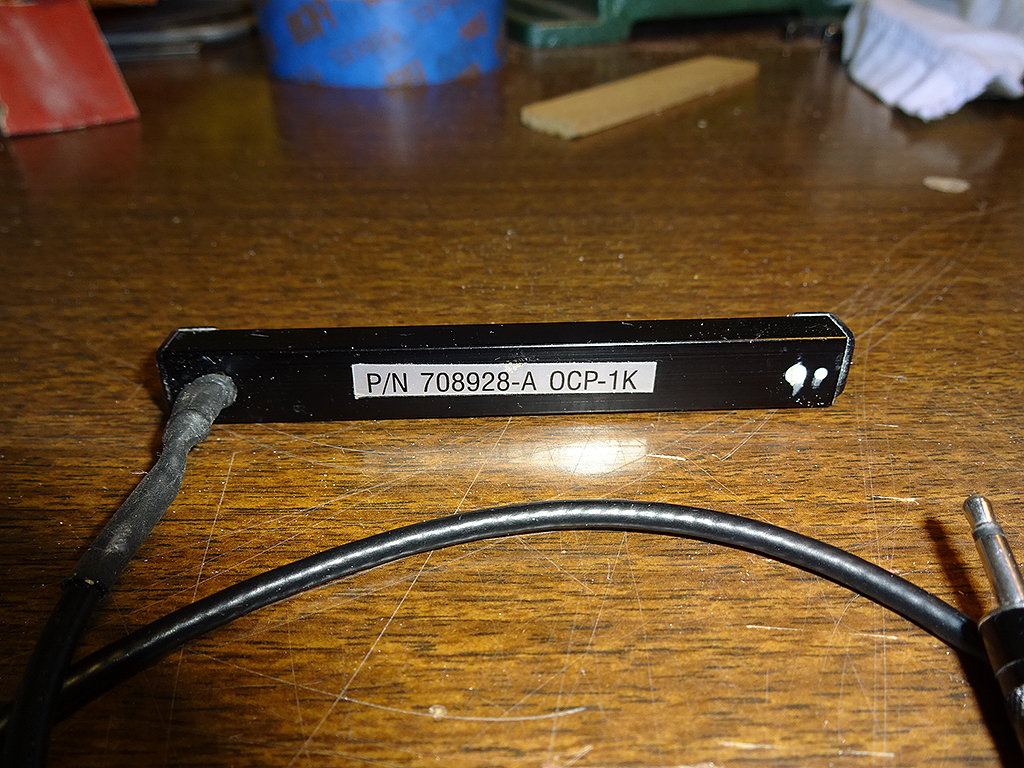
The pick-up is ready to be put back into service. I put rebuilt pick-ups on Daren's 1528 and Ken's 1612. By all accounts they're working just dandy. Did I mention that the saddles come in white, and black?  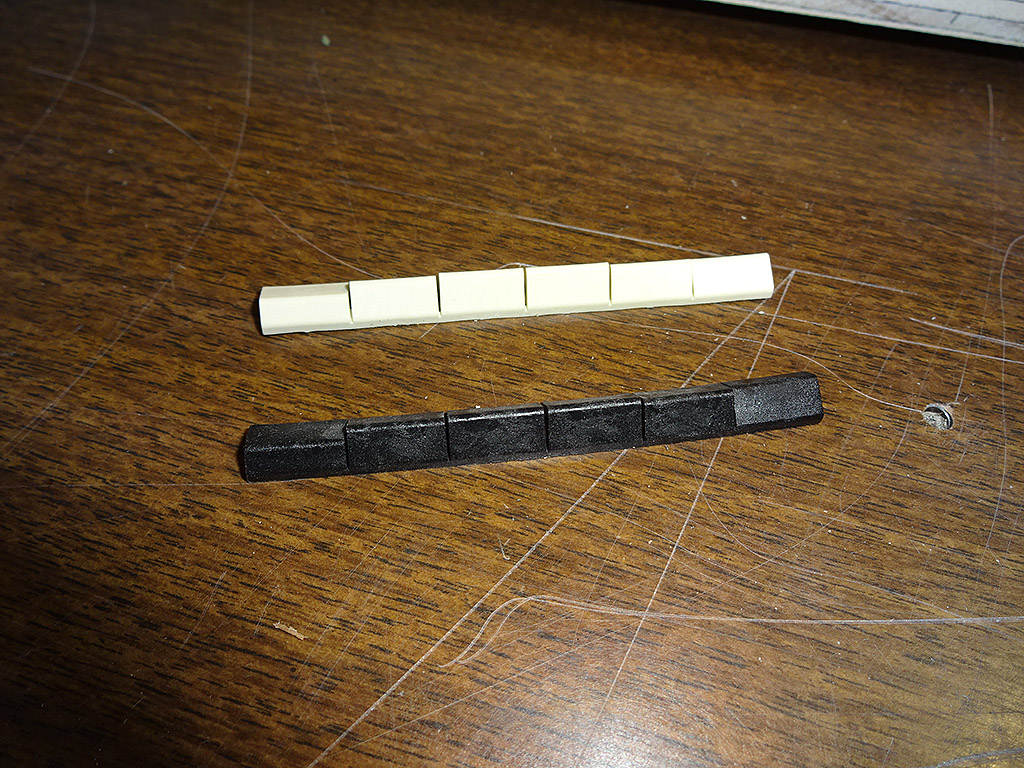
Edited by DanSavage 2017-08-11 8:30 PM
|
|
| |
|
Joined:
September 2006
Posts: 10777
Location: Keepin' It Weird in Portland, OR | Kewel
|
|
| |
|

Joined:
October 2012
Posts: 1018
Location: Yokohama, Japan | Old Man Arthur - 2017-08-11 10:29 AM
Kewel
+1! You did that for my 1612 too, didn't you? I must say, it is very effective indeed, and an excellent way to salvage a perfectly good OCP-1K! These little tidbits are just so helpful! Thanks Dan! |
|
| |
|
Joined:
June 2012
Posts: 2303
Location: Lake Forest, CA | arumako - 2017-08-11 6:42 PM
Old Man Arthur - 2017-08-11 10:29 AM
Kewel
+1! You did that for my 1612 too, didn't you? I must say, it is very effective indeed, and an excellent way to salvage a perfectly good OCP-1K! These little tidbits are just so helpful! Thanks Dan!
Yes. In fact, that's your pick-up in the photos.
Well, except for the one with the broken piezo. I'm going to fix that and get it back into service. Someday.
You're welcome!
Edited by DanSavage 2017-08-11 8:47 PM
|
|
| |
|
Joined:
December 2015
Posts: 287
Location: Katmandu | I find the silicon step to be unnecessary. My preowned Ovation Legend came with a rather loose saddle anyway which I could slide off to either side of the pickup unit. I'm not sure that's the way the come these days. The black pins on either side I could also easily lift up. The saddle will be firmly in place whether or not you use silicon as in-between sandwich filler. |
|
| |
|
Joined:
June 2012
Posts: 2303
Location: Lake Forest, CA | The saddles are usually glued into place, not loose like yours. In addition to attaching the saddle to the pick-up, I think the silicone also protects the wires connecting the crystals.
Yep, you could omit the silicone when replacing the saddle. Once the strings are brought up to tension, the saddle isn't going anywhere. I'll probably keep using it, just because that's how the MS does it.
Edited by DanSavage 2017-08-13 7:42 PM
|
|
| |
|
Joined:
June 2012
Posts: 2303
Location: Lake Forest, CA | Okay...
So...
Here's another problem with the OCP-1K -- poor intonation, especially at the low E and A strings.
Luckily, there is a solution -- 3D printing. First, a little back story.
After completing my 1778T(orrefied), also known as my Frankenvation, I was pleasantly surprised that the intonation was nearly perfect across all six strings. This is a result of the slanted-slot bridge (thank you, Beal!) and a compensated saddle.
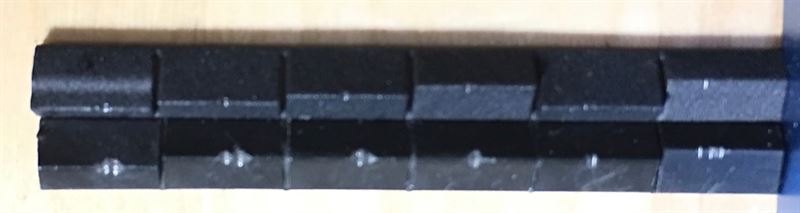
Below is a photo showing the difference in the saddle breaks between the OCP-1K and the later slimline saddle. Generally, the Ovation steel string guitars have a scale of 25.25". This places the front of the bridge at 25" from the back of the nut. So, both of the bridges would be glued to the same place on the top. As you can see there is a significant difference in the saddle breaks on the two bridges. 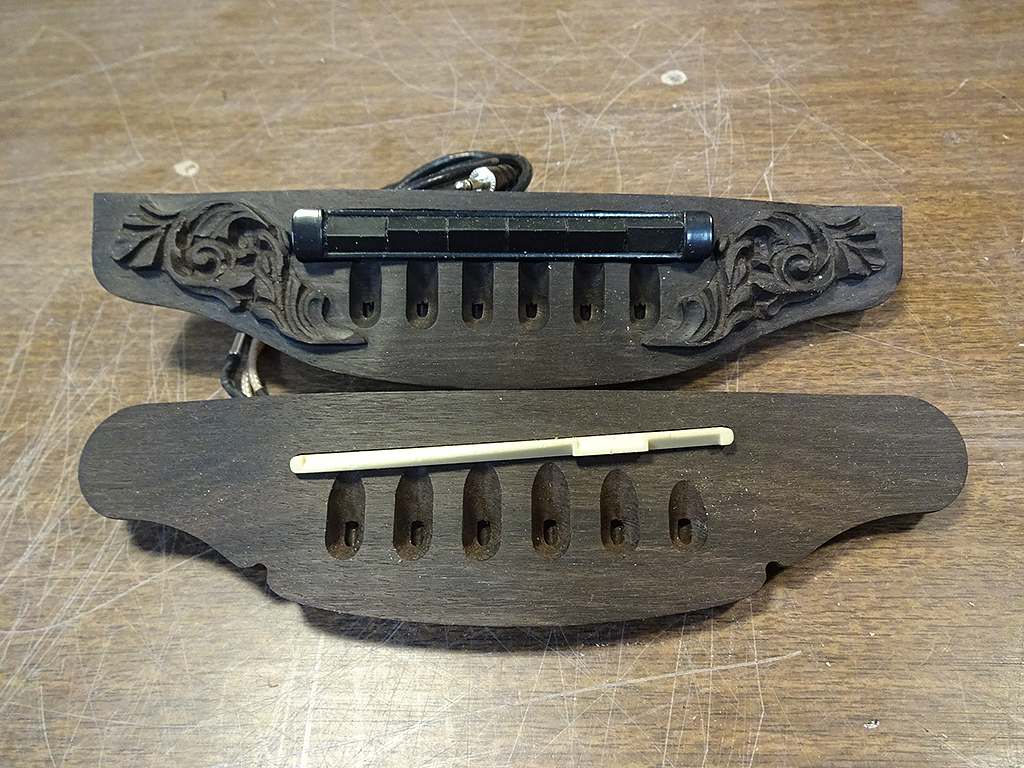 I measured the distance from the front of the bridge to the saddle break for each string on the slimline saddle, then designed a replacement OCP-1K saddle that placed the saddle breaks as close as possible to the slimline saddle. I was able to relocated all of the strings except the low E to the same distance as the slimline. Here's a table showing the measured differences. What this shows is that the low E and A is out of tonation by over an 1/8", which is a bunch. =O | Slimline | | E | A | D | G | B | e | | .56" | .50" | .43" | .40" | .46" | .33" | | OCP-1K | | .38" | .35" | .35" | .35" | .35" | .29" | | Difference | | .18" | .15" | .08" | .05" | .11" | .04" |
And, here's the 3D model of new, compensated saddle. The low E is closest to the camera. 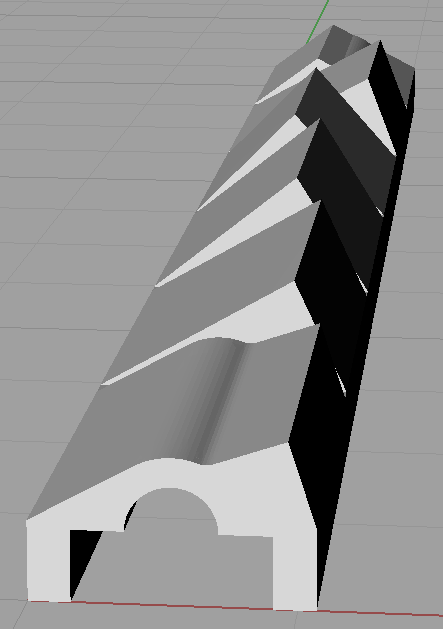
I sent the file off to the 3D printers and got them back today. I ordered a copy using two different printing materials. Both are nylon. The white, already installed in the pick-up, is a little lower resolution and a little courser surface. The black, sitting on the desk next to the original Ovation saddle, is higher resolution with a smoother surface. 
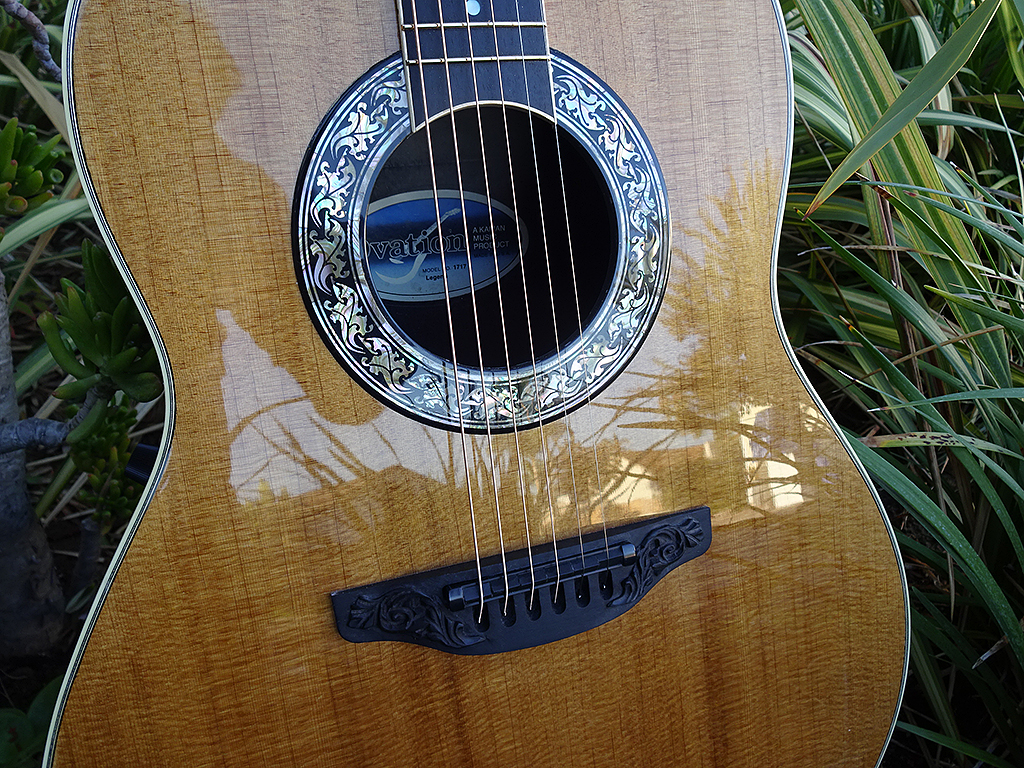
I installed the new compensated saddle into my Book Elite and I can report that this experiment is a smashing success! The guitar now plays in tune up and down the neck on all the strings, just like my Frankenvation and I couldn't be more thrilled. The low E is a few cents out at the 12th fret, but that is very, very minor. I'm going to play this saddle for a few days, then swap it out for the black one so I can hear if there's any difference to the white one. 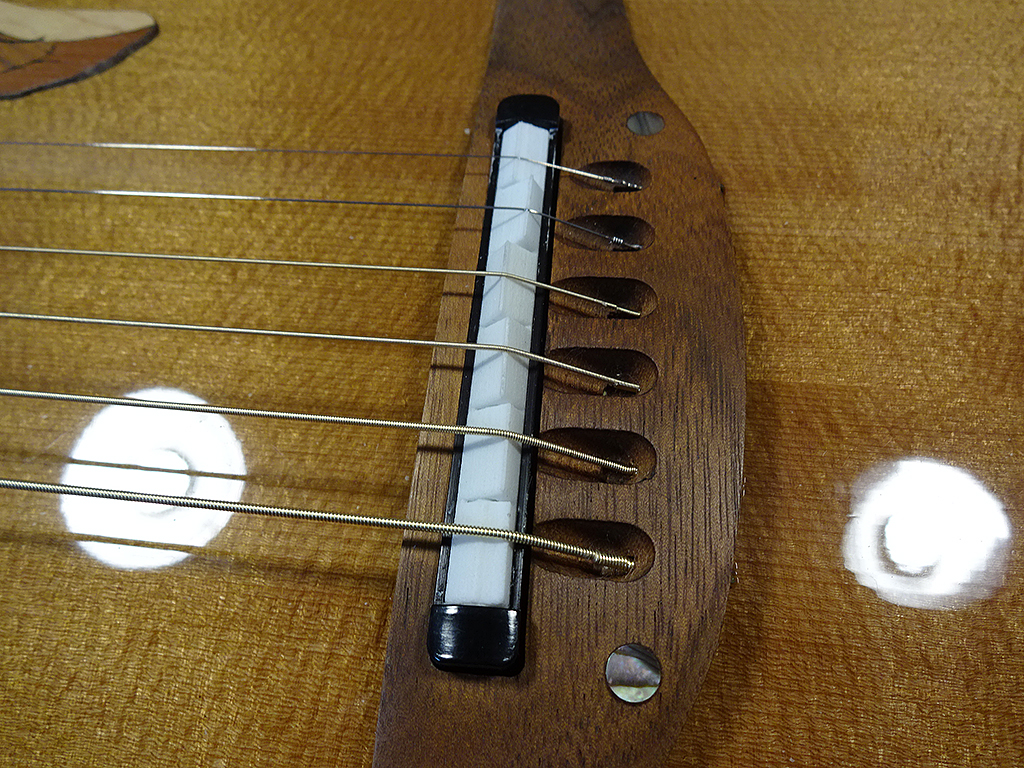
Edited by DanSavage 2019-01-18 1:43 AM
|
|
| |
|
Joined:
February 2016
Posts: 1769
Location: When?? | Dan, I'm thankful that guys like you were busy inside earning tech merit badges when guys like me were out smoking in the parking lot, because without you we'd all be lost today! Duct tape and bailing wire will only get us just so far.
About the two materials for each saddle-- does a higher surface resolution also mean a higher density throughout the entire piece than on the lower resolution copy? If so, I'd think there would be a difference when you switch. Maybe not so much to the open ear, but definitely a technically measurable difference.
Edited by Love O Fair 2019-01-18 10:18 AM
|
|
| |
|
Joined:
December 2016
Posts: 128
| Shut up and take my money! Where do I sign up?! JK!
I'm looking forward to hearing the result of your testing. If you need another lucky test subject, I happen to have a Custom Ultra... Heh heh! |
|
| |
|
Joined:
June 2012
Posts: 2303
Location: Lake Forest, CA | Love O Fair - 2019-01-18 8:17 AM
About the two materials for each saddle-- does a higher surface resolution also mean a higher density throughout the entire piece than on the lower resolution copy? If so, I'd think there would be a difference when you switch. Maybe not so much to the open ear, but definitely a technically measurable difference.
Not really. They are just two different formulations of nylon powder. The white powder produces a slightly rougher finish, but it's just as strong as the black. The black just ends up being smoother after printing.
In this particular application, the surface texture doesn't affect the performance of the part in any way.
If you'd like more details, visit the following pages:Versatile Plastic - Also known as Strong and Flexible, Nylon Plastic, PA12, Polyamide (white) Professional Plastic - Also know as HP Nylon Plastic, Nylon Plastic, PA12, Polyamide (black)
Edited by DanSavage 2019-01-18 11:49 AM
|
|
| |
|
Joined:
June 2012
Posts: 2303
Location: Lake Forest, CA | DarenSavage - 2019-01-18 8:19 AM
Shut up and take my money! Where do I sign up?! JK!
I'm looking forward to hearing the result of your testing. If you need another lucky test subject, I happen to have a Custom Ultra... Heh heh!
Ha ha!
I'll probably change out the saddle tomorrow. I've been playing the Book Elite and I think I've got a pretty good idea of how it sounds.
Afterward I'll make the models saleable and you can order one directly from Shapeways.
I did plug it in and all six strings sound fine through the amp. I was concerned that the low E might not be pushing down hard enough on the piezo to get a good signal, but that is not the case. It sounds as strong as the other five strings.
Edited by DanSavage 2019-01-18 11:53 AM
|
|
| |
|
Joined:
October 2012
Posts: 1018
Location: Yokohama, Japan | DarenSavage - 2019-01-18 12:19 AM
Shut up and take my money! Where do I sign up?!
+1!
Dan, you the man! Can I get some shipped to Japan?
How does the nylon material sound compared to bone or TUSQ? |
|
| |
|

Joined:
October 2005
Posts: 4025
Location: Utah | Ok, I'm in. I have to tune my low E strings flat so that the fretted G is in tune with the 3rd string. Fixing the intonation would be welcome. |
|
| |
|
Joined:
February 2014
Posts: 699
Location: moline,illinois | Dan that's really great work,I'm surprised Ovation has this kind of issue with all the tech that they put into there designs,I know on electric guitars you can adjust the saddles to correct intonation cool to see that a different saddle design will do the same for acoustics,
Have you ever put any O's on a strobe tuner to see how the intonation registers I'm thinking I need to get a Strobe and check some of my guitars to see how far there off.
You should order a couple dozen and mark the price up reasonably you deserve to profit from your ingenuity and I'd buy a couple at least 
Edited by 2wheeldrummer 2019-01-18 9:12 PM
|
|
| |
|
Joined:
June 2012
Posts: 2303
Location: Lake Forest, CA | Okay... So... I couldn't wait until this weekend to try out the black saddle and I'm glad I swapped it out. 
Al,
As you postulated, the smoother surface of the black translates into a denser final product. The tonal qualities of the black material is closer to the OEM plastic than the white. I'm making the white available for sale for those who want a white saddle. It still sounds really good, just slightly muted compared to the black.
Ken,
Yes, I believe that Shapeways will ship to Japan. If not, let me know and I will!
WRT to durability, the fused nylon is pretty tough. The black sounds closer to the OEM plastic than the white. I was curious how deep the string dents would be in the white and they don't look any worse than the OEM plastic. FlySig,
Yeah, the intonation problem you're describing with the low-E is completley fixed with this saddle. And, not just the low-E, but also the A and B strings as well. Kevin,
Ovation was aware of the problem, which is what lead to the slanted slimline bridge with compensated saddle. (Thanks you, Beal!) I can't say why they didn't apply the same sort of fix to the OCP-1K. Yes, as a matter of fact, I did put these on a strobe tuner and even videotaped the resultes. See below. :D So, how does the new saddle sound compared to the OEM saddle? Here's a couple of video clips. The first is of my 50th Anniversary Custom Legend with the stock saddle. The second is the black compensated saddle. I'm using a Peterson strobe tuner. When the strobe rotates to the right, the pitch is sharp, to the left, flat. Intonation Demo of Stock Ovation OCP-1K Saddle Intonation Demo of 3D-Printed, Compensated, Ovation OCP-1K Saddle For those who want to order their owm, you can visit my Shapeways.com page. Ovation OCP-1K Fully-Compensated Saddle
Edited by DanSavage 2019-01-19 1:12 AM
|
|
| |
|
Joined:
June 2012
Posts: 2303
Location: Lake Forest, CA | I ordered one each for my 50th Anniversary and my 1655. I'll eventually replace all my OCP-1K saddles, but these two are currently in rotation, so they're the next in line. |
|
| |
|
Joined:
June 2012
Posts: 2303
Location: Lake Forest, CA | Lots of views. No replies. No orders. Hmmm...
I suspect that not many here are familiar with the current state of 3D printing. Perhaps an explanation is in order. I'm sure many are wondering why such a small part costs so much.
There are currently two levels of 3D printers. The home variety, which utilize FDM technology and and the professional level which includes SLS, SLA, etc. The main difference is the resolution and final print quality, or print resolution. FDM printing is basically, a hot-glue gun hooked up to a 3D CNC machine. It melts a string of plastic and 'draws' the parts, layer by layer. FDM is very low resolution and structurally, pretty weak.
Professional 3D printing uses either powder, or polymer liquid, which fuses each layer together to create a part that is as homogeneous as a commercially-produced, molded part.
While the home FDM printers can be bought for a few hundred dollars, professional-level printers such as those used by Shapeways run into the hundreds-of-thousands of dollars and are beyond the reach of the average modeler.
Shapeways.com is a professional 3D printing service bureau that offers modelers, such as myself, the ability to 3D print just about any model, using just about any material, including, nylon, hi-def plastic, wax, (lost wax casting) aluminum, bronze, brass, stainless steel, gold, and even platinum. Not gold- or platinum-plated, but solid gold or platinum. In addition to printing the parts, Shapeways also ships the part to the customer.
Naturally, this comes at a price. The lion's share of the price of these parts is what Shapeways charges to print & ship the part. I've marked the prices up a little bit, but I'm not retiring to the islands.
There are other 3D printing bureaus, but none are as cheap as Shapeways, nor do they offer as many material choices.
Edited by DanSavage 2019-01-19 9:38 PM
|
|
| |
|
Joined:
February 2014
Posts: 699
Location: moline,illinois | Dan,cool demos and excellent explanation.I personally don't consider the price to be that high for a custom 3D printed item of high quality,I only know a little about 3D printing so it was educational to realize the differences in quality and materials available.
You said your going to get a custom saddle for a 1655 is that a 12 string custom balladeer and would that be a longer saddle/different part my 12 string saddles are wider that my standard 6 strings and I have quite a few 12 strings so I be would interested in that part also,I plan on ordering some just hadn't decided on how many/which guitars to start with,once again thanks for your work
I just ordered 4 so when they get here in Feb I'll get to check them out in person.
Edited by 2wheeldrummer 2019-01-19 11:12 PM
|
|
| |
|
Joined:
October 2005
Posts: 4025
Location: Utah | I need to survey what I need before ordering. Out of town for a few days, but will be doing this for sure for at least the Adamas 2080. Not sure about the 1537, it seems to have benefitted from a slightly heavier 6th string. The Adamas Viper seems to be excellent for intonation but I'll mess with it some later this week.
I've messed with trying to mill a bone saddle but didn't have the right tools for success. Also have been toying with making a compensated nut a la Buzz Feiten that extends slightly over the fretboard. |
|
| |
|
Joined:
February 2016
Posts: 1769
Location: When?? | Thank you for the informative description, Dan. I was not aware of such a wide difference between the "home" and "pro" printers. I've only seen what I assume are the pro level ones since I thought they all used powders or polymer liquid; though with varying levels of tooling precision it in the process, hence varying degrees of equipment cost. As for the cheaper, "hot glue" style, I can see how the fusion would not complete near as well in merely drawn out, stacked layers. I'm a bit lost, though, on how the process of lost wax casting and 3D printing would have anything to do with the other. Or are you referring to the 3D printer simply making the original wax piece that is then placed into a traditional casting mold? I guess that's where Google comes in handy. For what you have there in saddles, if I had a model that needs that type of saddle I would definitely go for the higher resolution black one. |
|
| |
|
Joined:
June 2012
Posts: 2303
Location: Lake Forest, CA | 2wheeldrummer - 2019-01-19 8:59 PM
Dan,cool demos and excellent explanation.I personally don't consider the price to be that high for a custom 3D printed item of high quality,I only know a little about 3D printing so it was educational to realize the differences in quality and materials available.
You said your going to get a custom saddle for a 1655 is that a 12 string custom balladeer and would that be a longer saddle/different part my 12 string saddles are wider that my standard 6 strings and I have quite a few 12 strings so I be would interested in that part also,I plan on ordering some just hadn't decided on how many/which guitars to start with,once again thanks for your work
I just ordered 4 so when they get here in Feb I'll get to check them out in person.
Hey Kevin,
Thanks! Yep. It's pretty cheap when you consider that a Tusq XL saddle costs $13.65.
Yes, the 1655 is a 12-string. Nope. It uses the OCP-1K pick-up, so this part will drop right in. I just verified that the saddle is the same. OCP-1K = OCP-1K = OCP-1K...
Thanks! I'm looking forward to trying this out on my 1655. Like I wrote, I'm going to eventually replace all my saddles. Please report back once you get yours installed. I'd love to get your feedback.
Also, if you have any questions about swapping out the saddles, feel free to ask them here.
Dan
|
|
| |
|
Joined:
June 2012
Posts: 2303
Location: Lake Forest, CA | FlySig - 2019-01-19 9:10 PM
I need to survey what I need before ordering. Out of town for a few days, but will be doing this for sure for at least the Adamas 2080. Not sure about the 1537, it seems to have benefitted from a slightly heavier 6th string. The Adamas Viper seems to be excellent for intonation but I'll mess with it some later this week.
I've messed with trying to mill a bone saddle but didn't have the right tools for success. Also have been toying with making a compensated nut a la Buzz Feiten that extends slightly over the fretboard.
No problemo. I understand completely. One of the cool things about this saddle is that you can pull the original saddle, try this one and if you don't like it, swap back in the original and still have the sound you're used to hearing. I doubt you'll want to do that once you've heard it, but stranger things have happened. LOL!
Yep. Before the advent of high-quality 3D printing, the only option available was making replacement parts by hand, like you tried or commissioning a machinist to make the parts for you. 3D printing has revolutionized short-run manufacturing.
Yeah, no. In this case, there's no need to go to such measures, such as a compensated nut. It is such a pleasure to play an in-tune Ovation. You can't really appreciate the bracing until you've heard it play in tune. I know it sounds like an exaggeration, but it really makes a difference in how the guitar sounds. |
|
| |
|
Joined:
June 2012
Posts: 2303
Location: Lake Forest, CA | Love O Fair - 2019-01-19 9:42 PM
Thank you for the informative description, Dan. I was not aware of such a wide difference between the "home" and "pro" printers. I've only seen what I assume are the pro level ones since I thought they all used powders or polymer liquid; though with varying levels of tooling precision it in the process, hence varying degrees of equipment cost. As for the cheaper, "hot glue" style, I can see how the fusion would not complete near as well in merely drawn out, stacked layers. I'm a bit lost, though, on how the process of lost wax casting and 3D printing would have anything to do with the other. Or are you referring to the 3D printer simply making the original wax piece that is then placed into a traditional casting mold? I guess that's where Google comes in handy. For what you have there in saddles, if I had a model that needs that type of saddle I would definitely go for the higher resolution black one. Hi Al, You're welcome. Yes, you're correct. I checked Shapeways again and I don't see wax as an available printing material. They may have dropped it. You're correct. You would upload a file and they would 3D print it in wax. You would then use that model to cast a part in the traditional way. Dan |
|
| |
|
Joined:
December 2003
Posts: 13983
Location: Upper Left USA | Dan,
Great work!
Ordered two and I am guessing I'll be back for more. |
|
| |
|
Joined:
June 2012
Posts: 2303
Location: Lake Forest, CA | Thanks!
I know what you mean. I just ordered two more myself and realized that I probably need to order a couple more. |
|
| |
|
Joined:
May 2008
Posts: 1553
Location: Indiana | Very familiar with Shapeways from my modeling groups. Let me figure out how many I need.... For someone who isn't a "collector", I seem to have quite a few that could benefit from your OCD. Thanks Dan. |
|
| |
|
Joined:
June 2012
Posts: 2303
Location: Lake Forest, CA | Thanks, Jonmark.
Yeah, I know what you mean. I keep remembering guitars that I want to fix, so I need to order a few more of these, myself. In fact, I 'discovered' a BFLG 1617 in my attic a couple of weeks ago that I cannot, for the life of me, recall when/where I bought it or how much I paid. Sad commentary...
Now that my jaunt through saddle-improvement-land is complete I can get back to your parlor. I finished pulling the top off mine yesterday and I'm going to start on yours tomorrow. I'll be posting a new thread in a couple of days.
Dan |
|
| |
|
Joined:
February 2013
Posts: 176
Location: Cologne/Germany | I appreciate this work! Since living in Germany, it is and was not that easy to get replacement parts. Bought two complete pick-ups while Fender shut down the factory first. Was told it was the last package replacement parts to Europe..... During DW, I ordered two of the original saddles. My local shop ordered them from the european distributeur.
Problem: they were not straight but had a bow, more than yours on the photos in this thread. So I couldn‘t get them in...
Another reason to get yours. Regarding quality, I guess we all want the black ones, but have to cope with the changing look....
Shipping to Germany is reasonable.
The price is fine for me. The OEM wasn‘t much cheaper.... |
|
| |
|
Joined:
June 2012
Posts: 2303
Location: Lake Forest, CA | Hi Georg,
Thanks! Yes, some parts are now, and will, in the future only become harder to find & buy.
I know what you mean. Having a black saddle in the walnut bridge on my Book Elite looks a little out of place. But, having the guitar play in tune makes it worthwhile to me. Besides, I never look at the saddle while I'm playing. LOL!
The black saddles do look better on the ebony bridges. I recently ordered some parts from Germany and shipping from there to here is equally reasonable. |
|
| |
|
Joined:
February 2014
Posts: 699
Location: moline,illinois | DanSavage - 2019-01-21 12:35 PM
The black saddles do look better on the ebony bridges.
One of the things I liked about these was the option for a black saddle I think they'll look great on my custom legends with ebony bridges as well as other guitars with black bridges,although as I think on this I'm going to have to get some black/Tusq nuts for them also so I can get a black/stealth theme on the guitar..always one more thing to buy LOL
Edited by 2wheeldrummer 2019-01-21 7:36 PM
|
|
| |
|
Joined:
September 2006
Posts: 10777
Location: Keepin' It Weird in Portland, OR | DanSavage - 2019-01-19 7:30 PM
Lots of views. No replies. No orders. Hmmm...
I just ordered two.
Just cuz...
I would rather Have them and Not Need them...
You never know. I've got a few Black guitars. 
Edited by Old Man Arthur 2019-01-21 11:47 PM
|
|
| |
|
Joined:
June 2012
Posts: 2303
Location: Lake Forest, CA | 2wheeldrummer - 2019-01-21 5:35 PM
One of the things I liked about these was the option for a black saddle I think they'll look great on my custom legends with ebony bridges as well as other guitars with black bridges,although as I think on this I'm going to have to get some black/Tusq nuts for them also so I can get a black/stealth theme on the guitar..always one more thing to buy LOL
Same here. I know what you mean.
Yes, they do look great. Here's a preview of what to expect.
Edited by DanSavage 2019-01-21 11:44 PM
|
|
| |
|
Joined:
June 2012
Posts: 2303
Location: Lake Forest, CA | Old Man Arthur - 2019-01-21 9:27 PM
I just ordered two.
Just cuz...
I would rather Have them and Not Need them...
You never know.
Thanks! You won't be disappointed. They're really easy to replace and once you've tried one, I suspect you'll be wanting to upgrade all your other guitars. Just like me! LOL!
Hey! That's my motto, too! |
|
| |
|
Joined:
December 2016
Posts: 128
| I just ordered my two saddles! Gotta support my brah and if it makes the Custom Ultra sound better, it's a win-win for me! |
|
| |
|
Joined:
June 2012
Posts: 2303
Location: Lake Forest, CA | Thanks, Pal! I appreciate it.
Yeah. Not only will your Custom Ultra sound better, but so will Darth Ovation. |
|
| |
|
Joined:
June 2012
Posts: 2303
Location: Lake Forest, CA | I thought I'd share the latest development of the new OCP-1K saddle.
I received an inquiry on the FB Ovation Collectors forum about whether the new saddle would work on a lefty O.
I replied that it would not, but offered to created a left-handed saddle, which I did.
Here's the link to the lefty saddle.
Ovation OCP-1K Fully-Compensated Saddle (Left-Hand) |
|
| |
|
Joined:
December 2016
Posts: 128
| DanSavage - 2019-01-23 11:41 AM
Thanks, Pal! I appreciate it.
Yeah. Not only will your Custom Ultra sound better, but so will Darth Ovation.
That makes it a win-win-win situation. Oo-rah! |
|
| |
|
Joined:
June 2012
Posts: 2303
Location: Lake Forest, CA | DarenSavage - 2019-01-23 11:07 AM
That makes it a win-win-win situation. Oo-rah!
You're gonna like it. :D |
|
| |
|
Joined:
October 2014
Posts: 267
| I have a 1979 Country Artist 1624 that has pretty deep wear slots in its saddle. These probably won't work but I thought I'd ask. If not, do you know if replacements are still available from Ovation or elsewhere or if a superglue/baking soda repair would work? |
|
| |
|
Joined:
June 2012
Posts: 2303
Location: Lake Forest, CA | I can't see any reason why these wouldn't work with a 1624.
That has the OCP-1K and this replacement saddle is designed to work with all OCP-1K pick-ups.
I'm not sure if replacements are available. You'd have to contact the factory.
Yes, baking soda/superglue will fix the grooves, but it won't fix the intonation. |
|
| |
|
Joined:
October 2014
Posts: 267
| Thanks, I just ordered one for my 1624.
Edited by BCam 2019-01-25 10:59 AM
|
|
| |
|
Joined:
June 2012
Posts: 2303
Location: Lake Forest, CA | BCam - 2019-01-25 8:51 AM
Thanks, I just ordered one for my 1624. Because of your inquiry I pulled my 1624 down from storage and swapped out the saddle. 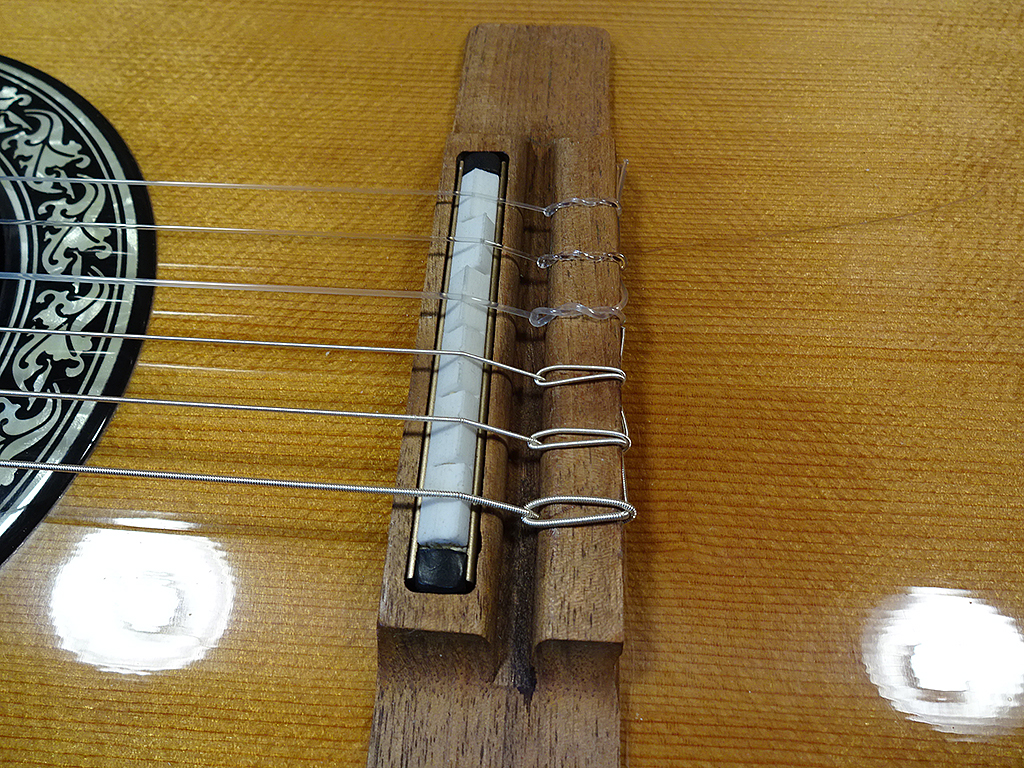
In a word, it sounds fantastic. Not only does it fix the intonation of this guitar, but the white nylon actually improves the tone. More sustain across all six strings and clearer notes. I haven't tried the black on the nylon string guitars, but based upon my experience with the steel strings I know that it will only make a guitar like a 1624 sound even better. Here's a comparison between the OEM saddle and my fully-compensated saddle. The OEM has some sort of weird Takemine staggered saddle action going on. Some strings intonated sort-of correctly, others didn't. It was like the guitar was slightly out of tune. What a difference the compensated saddle makes! 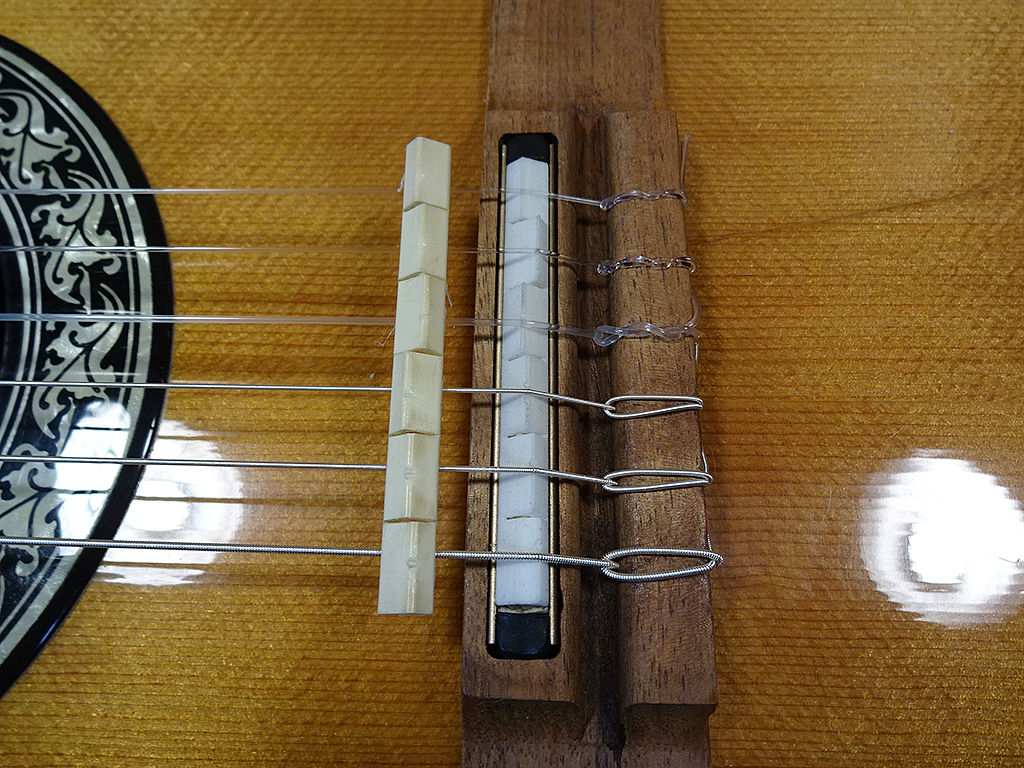
|
|
| |
|
Joined:
February 2016
Posts: 1769
Location: When?? | Whoa wait.. go back. Just when I thought I'd mastered all the half-slap-makeshift rigging concoctions. Super glue and baking soda? Intriguing. What does it do? How? |
|
| |
|
Joined:
June 2012
Posts: 2303
Location: Lake Forest, CA | CA and baking soda is a trick used to fill things like nut slots.
Let's say you're setting the nut action and you accidentally file the slot too deep.
To fix, you add some dry baking soda to the slot and tamp it down a little. Then, hit it with small drop of CA and it will dry instantly and turn the baking soda filler rock-hard. Next, file the slot again.
Personally, I prefer using unbleached bone dust instead of baking soda as it matches the color of the nut better than the stark white of the baking soda. |
|
| |
|
Joined:
October 2014
Posts: 267
| The physical difference between the OEM 1624 saddle and the new one is pretty significant. I can't wait to get mine. I picked up my 1624 a few months ago and it's pretty much become my favorite guitar, and that's with the old, worn saddle. I'm wondering if I'm going to need a black nut and black tuning knobs to round things out.
I like your bone dust approach.
Edited by BCam 2019-01-26 10:39 AM
|
|
| |
|
Joined:
February 2016
Posts: 1769
Location: When?? | Good info. Thanks, Dan. |
|
| |
|
Joined:
June 2012
Posts: 2303
Location: Lake Forest, CA | BCam - 2019-01-25 8:51 AM
Thanks, I just ordered one for my 1624.
Hi Bob,
I looked again at the 1624 saddle and realized it doesn't have any radius to it.
Let me make a new model and I'll send it to you free of charge.
Please PM your snail-mail address to me.
Dan |
|
| |
|
Joined:
December 2016
Posts: 128
| Got a notice from Shapeways that my saddles shipped. Whoo hoo!
Daren |
|
| |
|
Joined:
September 2006
Posts: 10777
Location: Keepin' It Weird in Portland, OR | Mine arrived today.
I have not installed them in anything.
But it is good to have spares.
|
|
| |
|
Joined:
June 2012
Posts: 2303
Location: Lake Forest, CA | DarenSavage - 2019-01-31 5:35 PM
Got a notice from Shapeways that my saddles shipped. Whoo hoo!
Daren
I'm sure you're counting the days, just like me. |
|
| |
|
Joined:
June 2012
Posts: 2303
Location: Lake Forest, CA | Old Man Arthur - 2019-02-01 6:28 PM
Mine arrived today.
I have not installed them in anything.
But it is good to have spares.
Good show.
I changed out the saddle on my 50th Anniversary CL a couple of days ago. I'm going to change out the saddle on my 1655 this weekend. |
|
| |
|
Joined:
June 2012
Posts: 2303
Location: Lake Forest, CA | Here's the latest arrow in my quiver.
It's an AnyCubic Photon 3D resin printer. It's a very high resolution 3D printer that prints parts out of a vat of UV-curable resin.
I bought it to prototype parts so I don't have to wait three weeks for a part to try it out. 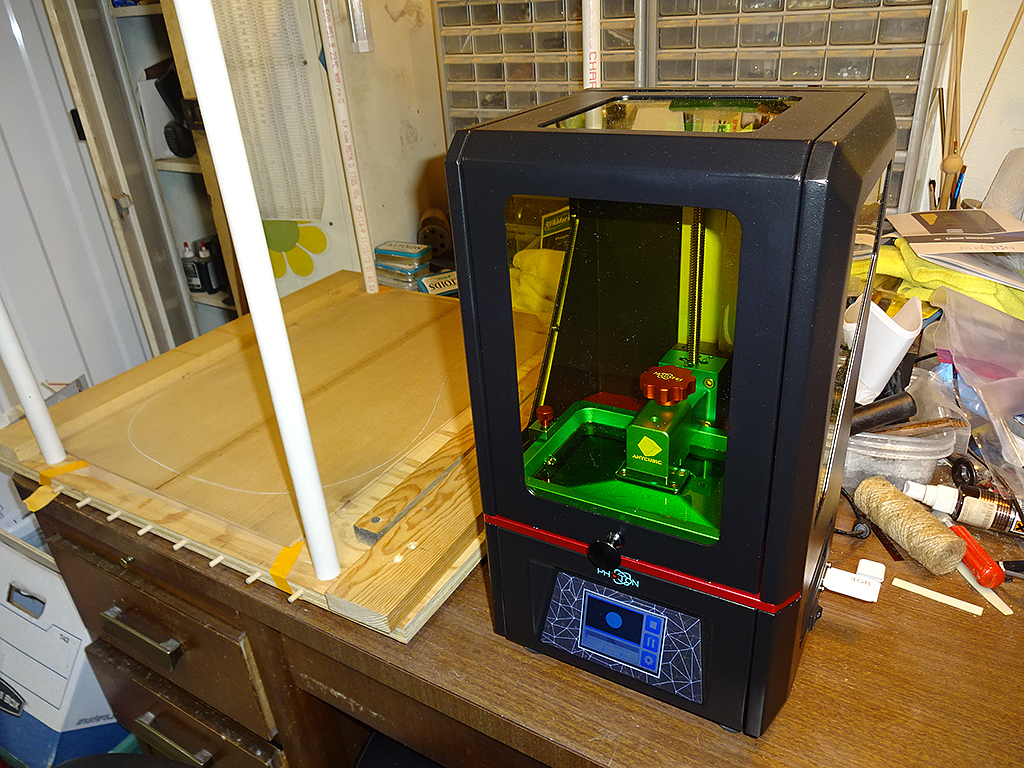
And, here's some of the first parts I printed. The cool thing I didn't realize is that I can print parts using colored resin, too.
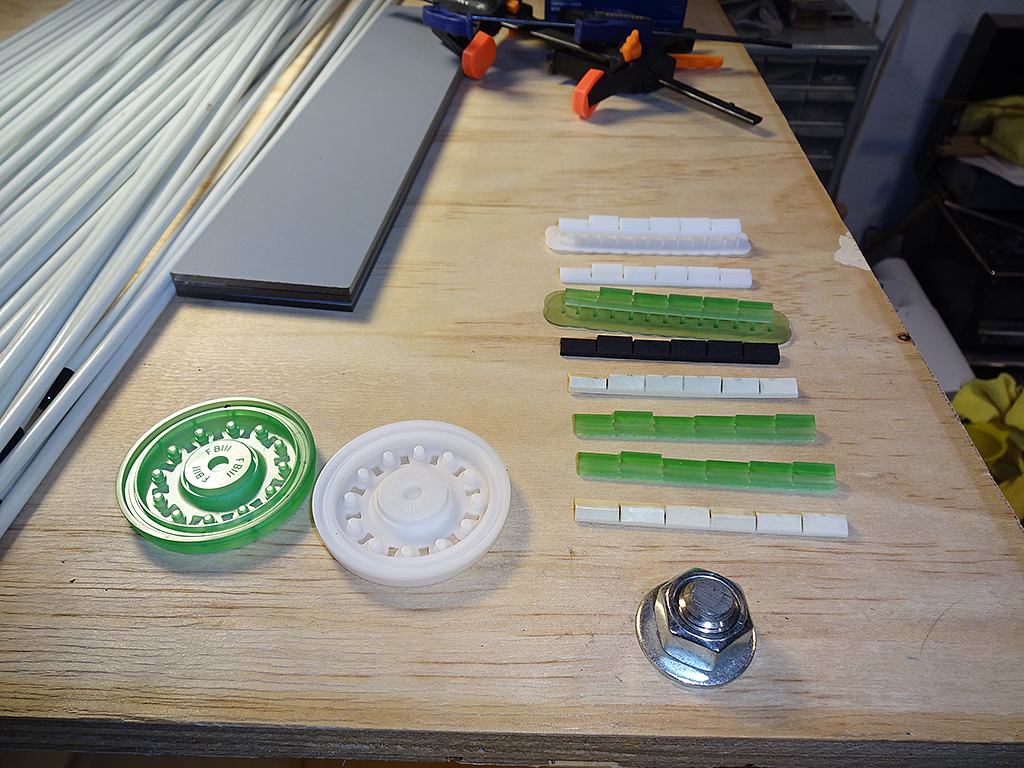
On the left are two F-111 hub caps that I designed when I was still flying model airplanes. The one on the left is printed from translucent green resin. The one on the right is printed using white resin. I also bought grey and black resin.
On the right is a stack of saddles. In front is the stock 1624 saddle. Behind it are two prototype nylon string saddles that have the same compensation as the steel string, but no radius. I'll be putting these on my 1624 and 1613. If they work, I'll upload the saddle to Shapeways so it's available for sale.
Behind the nylon saddles is the OEM steel string saddle, and the Shapeways black, translucent green and two white saddles.
|
|
| |
|
Joined:
May 2008
Posts: 1553
Location: Indiana |  |
|
| |
|
Joined:
June 2012
Posts: 2303
Location: Lake Forest, CA | Jonmark Stone - 2019-02-02 8:12 AM
You mentioned earlier that you were familiar with Shapeways from your modeling group.
What sort of modeling are you into? |
|
| |
|
Joined:
February 2014
Posts: 699
Location: moline,illinois | DanSavage - 2019-02-02 9:55 AM
Here's the latest arrow in my quiver.
It's an AnyCubic Photon 3D resin printer. It's a very high resolution 3D printer that prints parts out of a vat of UV-curable resin.
I bought it to prototype parts so I don't have to wait three weeks for a part to try it out.
Very cool Dan,Charlie Kaman would love the use of space age tech for ovations IMHO
Is the resin for your printer the same quality/hardness as what Shapeways uses.
So are we going to see custom order "Savage" parts available in different colors now maybe get a bigger model and you could 3D print your own bowls
|
|
| |
|
Joined:
June 2012
Posts: 2303
Location: Lake Forest, CA | 2wheeldrummer - 2019-02-02 9:24 AM Is the resin for your printer the same quality/hardness as what Shapeways uses. So are we going to see custom order "Savage" parts available in different colors now maybe get a bigger model and you could 3D print your own bowls
Thanks!
The saddes from Shapeways are printed using a different material and process. (Selective Laser Sintering - SLS)
The SLS printing uses nylon powder which is fused together, layer by layer using a laser. The end result is a part that is pretty tough. It's flexible and reasonably hard.Here's a YouTube video that discusses SLS printing process. https://www.youtube.com/watch?v=IrFYt3uUdrI
The resin parts (SLA/DLP) aren't as durable as SLS parts. They end up being harder, but they are more brittle. This pretty much limits their usefulness to either prototype parts, or decorative pieces.
I probably won't be selling parts. I bought this printer primarily to produce prototype parts.
This will allow me to make sure the parts work as designed without having to wait 3 weeks or so to get prototype parts printed by Shapeways.
Ha ha! That's funny. I don't need to 3D print bowls. I already made a deep bowl mold and a parlor bowl mold so I could lay-up fiberglass bowls.
Not to mention how much time it would take to 3D print a bowl. Something as large as a bowl would take a couple of days to print.
The parts seen in the photos took about 45 minutes to print.
Edited by DanSavage 2019-02-02 12:19 PM
|
|
| |
|
Joined:
June 2012
Posts: 2303
Location: Lake Forest, CA | I thought I'd share the results from my latest saddle changes.
I put a full-compensated saddle on my 1655 12-string. I'm happy to report that it benefited from this update.
I also created a prototype of this fully-compensated saddle with no radius for the nylon string guitars such as the 1613 and 1624. Again, both these guitars now play in tune.
I've made these saddles available on my Shapeways page. Same material options and price as the steel-string guitar saddles.
Ovation OCP-1K Nylon Fully-Compensated Saddle |
|
| |
|
Joined:
October 2012
Posts: 1018
Location: Yokohama, Japan | Hey Dan! Thanks for taking the time and effort to make these available to us! They do ship to Japan! I finally got my allowance, and placed my order for 3 each (standard shipping = $29.99 for my whole order)! Can't wait to try them out. Woohoo!
Edited by arumako 2019-02-07 8:43 AM
|
|
| |
|
Joined:
June 2012
Posts: 2303
Location: Lake Forest, CA | Hi Ken,
You're very welcome. You won't be disappointed.
I've already swapped out five of my guitar saddles -- three steel and two nylon.
Like I keep saying, it's so nice to be able to play these guitars in tune.
|
|
| |
|
Joined:
October 2005
Posts: 4025
Location: Utah | Question about applying more silicone. Does it raise the new saddle up off the piezo crystals at all? That would mute the tone a bit, or a lot. Might it make sense to dissolve out the old silicone before applying new silicone? |
|
| |
|
Joined:
June 2012
Posts: 2303
Location: Lake Forest, CA | FlySig - 2019-02-09 9:06 AM
Question about applying more silicone. Does it raise the new saddle up off the piezo crystals at all? That would mute the tone a bit, or a lot. Might it make sense to dissolve out the old silicone before applying new silicone?
After replacing five saddles I've found the silicone is optional.
If you do apply more silicone, just press the saddle down until it comes into full-contact with the piezos. The excess silicone will squeeze out. At that point you wipe away the excess.
Personally, I wouldn't mess with the old silicone other than to use a pair of tweezers remove any 'flanges' that squeezed out between the sections of the old saddle. Doing anything to the silicone runs the risk of breaking the delicate wires connecting the piezos. |
|
| |
|
Joined:
June 2012
Posts: 2303
Location: Lake Forest, CA | For those who've yet to receive and/or swap out their saddles I made a short video that demonstrates how to swap the saddle.
Swapping out an Ovation OCP-1K Saddle...
|
|
| |
|
Joined:
October 2005
Posts: 4025
Location: Utah | Good results so far with replacement saddles. Peeling off the original plastic saddle really is easy, and the new saddle completely solves the low E intonation problem.
1) No discernible tonal difference with the white saddle in the 1537 compared to the factory original. It dropped right in easily after removing the original saddle.
2) The stereo pickup in the 1537 has an interestingly different construction with copper tape along the top surface rather than soldered wires. Being stereo, there must be 2 wires on the bottom of the piezos. This is a late Fender era replacement, not the 1983 original.
http://www.ovationfanclub.com/megabbs/photos/get-photo.asp?photoid=...
3) The black replacement saddle for the 2080 is not sitting totally flush at the 6th string. The saddle is .011" longer than the original, and there is an excess of RTV/silicone inside the pickup. With some filing of the saddle and trimming of the silicone it fits laterally but is still not flush at the 6th string. I believe there is still some excess silicone, and possibly the silicone is off center along the piezos. It trims off very easily with an X-Acto knife. Acoustically it sounds normal but plugged in there is almost no signal from the low E string. With a bit more careful trimming of the silicone I think this is going to work fine.
http://www.ovationfanclub.com/megabbs/photos/get-photo.asp?photoid=...
http://www.ovationfanclub.com/megabbs/photos/get-photo.asp?photoid=...
4) I would love to have an off-white color that looks like unbleached aged bone rather than the bright white.
5) When retuning the strings, eyeball their position carefully over the new saddle so that they are properly spaced. Once up to pitch they will create a small notch in the saddle, so spend the few seconds to get it right.
6) Someday I'll figure out how to post pictures on this forum so that they display. Jeez. |
|
| |
|
Joined:
June 2012
Posts: 2303
Location: Lake Forest, CA | FlySig - 2019-02-09 6:01 PM
Good results so far with replacement saddles. Peeling off the original plastic saddle really is easy, and the new saddle completely solves the low E intonation problem.
1) No discernible tonal difference with the white saddle in the 1537 compared to the factory original. It dropped right in easily after removing the original saddle.
Great news!
FlySig - 2019-02-09 6:01 PM
2) The stereo pickup in the 1537 has an interestingly different construction with copper tape along the top surface rather than soldered wires. Being stereo, there must be 2 wires on the bottom of the piezos. This is a late Fender era replacement, not the 1983 original.
http://www.ovationfanclub.com/megabbs/photos/get-photo.asp?photoid=7282
That's interesting. I've never seen the inside of a stereo pickup.
FlySig - 2019-02-09 6:01 PM
3) The black replacement saddle for the 2080 is not sitting totally flush at the 6th string. The saddle is .011" longer than the original, and there is an excess of RTV/silicone inside the pickup. With some filing of the saddle and trimming of the silicone it fits laterally but is still not flush at the 6th string. I believe there is still some excess silicone, and possibly the silicone is off center along the piezos. It trims off very easily with an X-Acto knife. Acoustically it sounds normal but plugged in there is almost no signal from the low E string. With a bit more careful trimming of the silicone I think this is going to work fine.
http://www.ovationfanclub.com/megabbs/photos/get-photo.asp?photoid=7283
http://www.ovationfanclub.com/megabbs/photos/get-photo.asp?photoid=7284
Have you been able to compare the old saddle to the new one to determine if they are identical? How does the old one fit into the pick-up?Given that the new one shares idential dimensions with the OEM, there must be a reason why it's not settling into place.
FlySig - 2019-02-09 6:01 PM
4) I would love to have an off-white color that looks like unbleached aged bone rather than the bright white.
I've still got one white nylon saddle I got from Shapeways. I've had good luck antiquing other plastic stuff with Rit dye. I'll give it a try and let you know how it works.
FlySig - 2019-02-09 6:01 PM
5) When retuning the strings, eyeball their position carefully over the new saddle so that they are properly spaced. Once up to pitch they will create a small notch in the saddle, so spend the few seconds to get it right.
I agree and have done the same myself when tuning up my strings on the new saddles.
FlySig - 2019-02-09 6:01 PM
6) Someday I'll figure out how to post pictures on this forum so that they display. Jeez.
1) Open a new tab in your browser. You should have two tabs open -- one for the comments and the other, images. In the comments tab, click the Use Rich Text Editor button. 2) View the image in a browser. Right-click on the image, then select Copy Image Location from the pop-up menu. This will store the URL into the clipboard. 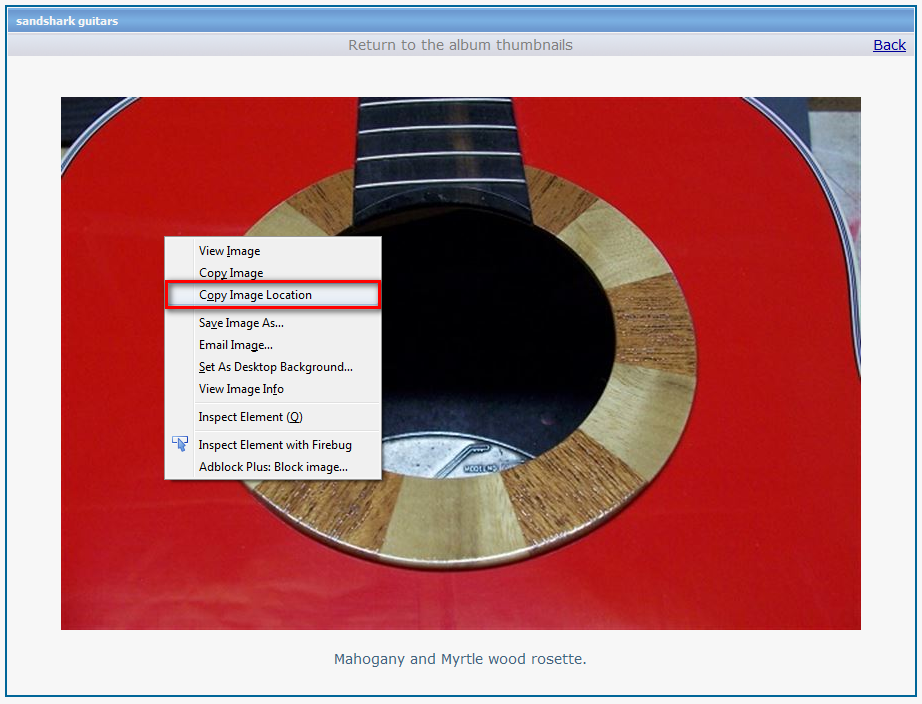
3) Click on the Insert/Edit icon. 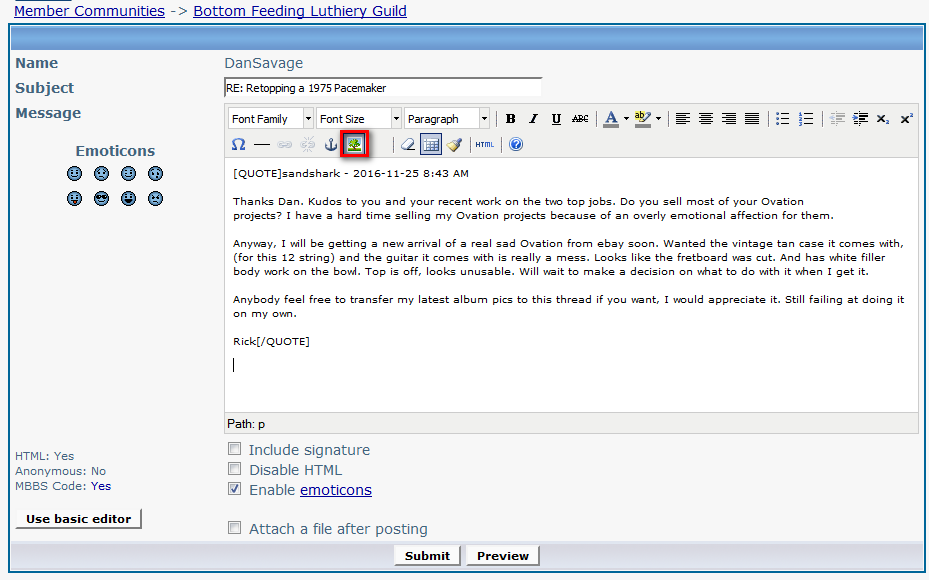
4) This will bring up the Insert/Edit Image pop-up dialog box. 5) Paste the URL from from the clipboard into the Image URL textbox. Click the Insert button. 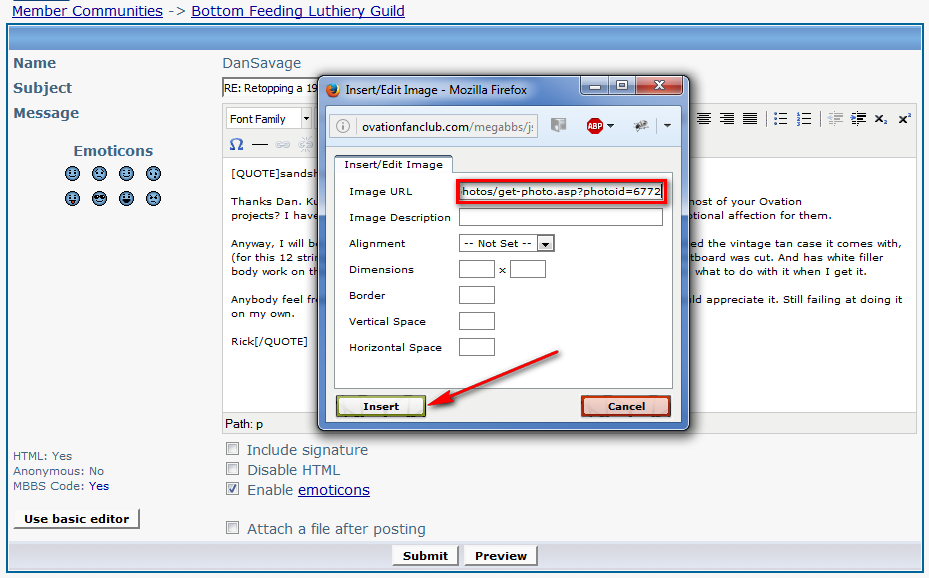
Voila! Your image has been inserted. 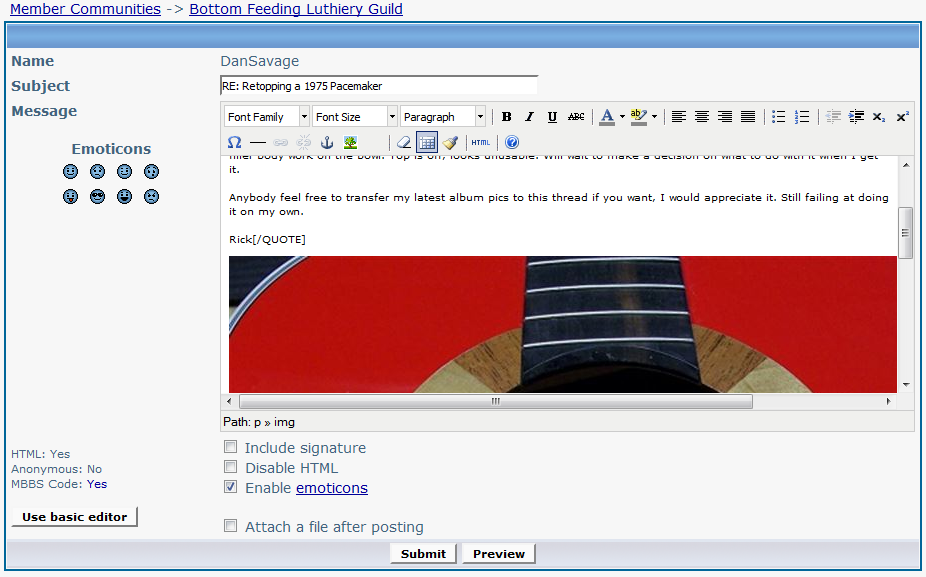
Edited by DanSavage 2019-02-10 10:02 AM
|
|
| |
|
Joined:
October 2005
Posts: 4025
Location: Utah | DanSavage - 2019-02-10 9:00 AM />Have you been able to compare the old saddle to the new one to determine if they are identical? How does the old one fit into the pick-up? Given that the new one shares idential dimensions with the OEM, there must be a reason why it's not settling into place.
The length of the new saddle is .011" longer than the OEM saddle. Upon first installation it bowed upwards because it was too short for the available space. The OEM white saddle from the 1537 is the same length as the black saddle from the 2080. There was definitely a lot of silicone inside the pickup assembly, including at the ends. Even with trimming it out, the saddle was still just a titch too long. It was easy enough to file a little off of the ends.
However, the front edge at the 6th string is still sitting proud. I expect the problem is too much silicone inside the pickup assembly. The cavity is totally full of the stuff. The bead across the low E piezo crystal appears a bit crooked by eyeball. Later today I will take it apart and carefully remove more silicone as well as compare the two saddles.
New saddle on top, OEM saddle below. The right edge of each is against a straight edge.
Thanks for the help with photos. This forum is the only space I have difficulty posting photos on. |
|
| |
|
Joined:
May 2008
Posts: 1553
Location: Indiana | Thanks for the video, Dan. It confirmed what I've suspected about several of my O's... that they have individual saddles.
Haven't placed an order yet. Got a plate full of projects between setting up my new recording space and modding a couple of mics.
Like the idea of antiquing these white ones. Not sure I'd care for the black on any of mine other than the -5 Adamas.
Great work you're doing. Carry on. |
|
| |
|
Joined:
June 2012
Posts: 2303
Location: Lake Forest, CA | That's weird. I just checked my black saddles and they're the exact same length as the OEM saddle.
For your black one, make sure to sand a little off each end so the slots are between the piezo crystals.
Looking at the inside of the pick-up a couple of the piezos are crooked and the low-E looks like it might be off-center. Even so, this shouldn't prevent the saddle from fully seating.
The amount of silicone looks normal.
Is the profile (cross-section) the same between the OEM and new saddle? Specifically the low-E.
Try putting the saddle in backwards to see if the problem is with the saddle or the pick-up.
|
|
| |
|
Joined:
June 2012
Posts: 2303
Location: Lake Forest, CA | I did a quick antique stain job on the Shapeways white nylon saddle using Rit dye. The top one is the OEM. The middle is the dyed Shapeways nylon saddle. The bottom one is a saddle I 3D printed here. I used the hot-water dying method using a weak mixture of liquid Rit dye Golden Yellow and Taupe. Per the package recommendations I also added a little bit of white vinegar. 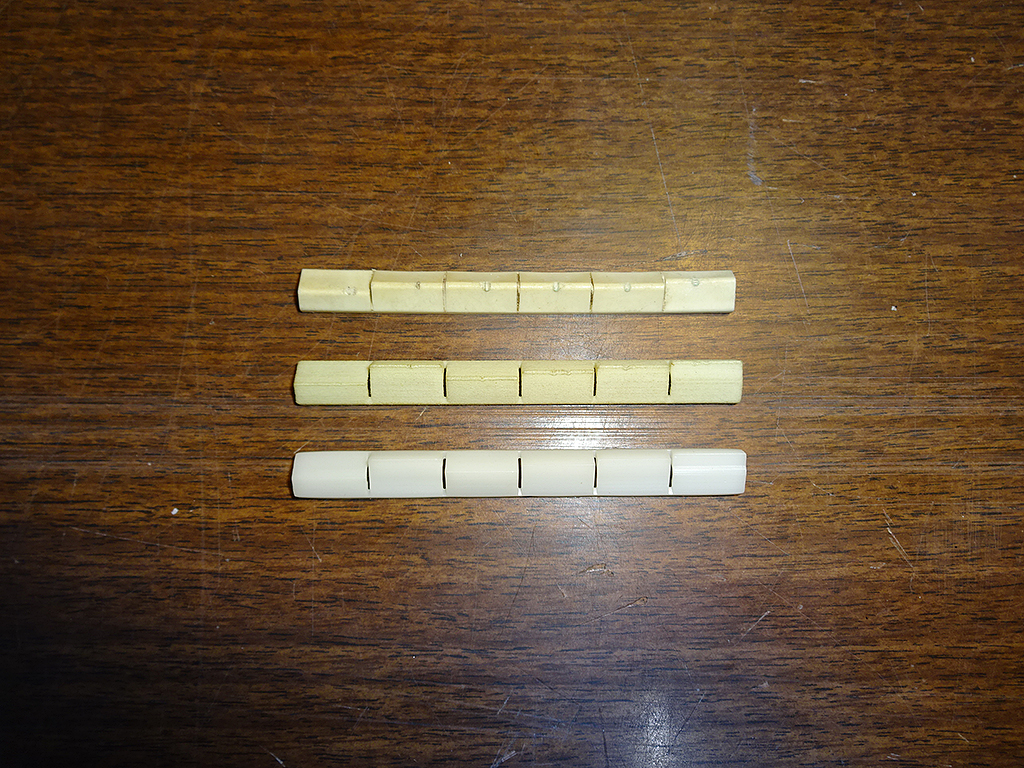
|
|
| |
|
Joined:
May 2008
Posts: 1553
Location: Indiana | That looks great. Just like a 40 year old nicotine stained pup. |
|
| |
|
Joined:
June 2012
Posts: 2303
Location: Lake Forest, CA | Jonmark Stone - 2019-02-10 10:42 AM
That looks great. Just like a 40 year old nicotine stained pup.
It does look more like the OEM saddle.
I personally like the sound of the black better, so that's probably what I'm going to keep putting on mine. Well, except for the 1624 and 1613 that both have translucent green saddles. (prototypes)
|
|
| |
|
Joined:
June 2012
Posts: 2303
Location: Lake Forest, CA | FlySig,
Do me a favor. Compare the length of the black and white saddles and let me know if the black is longer than the white.
Even though the black will be shorter than the white because it's been sanded, the slots on both should all line up.
If Shapeways is sending out different size parts, I'd like to know that so that I can address it with their tech support. |
|
| |
|
Joined:
October 2005
Posts: 4025
Location: Utah | By eyeball I can't see any difference in the length of the new black vs new white as they are installed by comparing them to an old saddle held next to them. Not very precise. I can pull the saddles off at the next string change which will be next week or so. The new black saddle measured out at 1.766", whereas the original black saddle was 1.755". I did not measure the new white saddle before installation.
The inside distance between endcaps on the saddle assembly is quite different between the two guitars. The black one on the Adamas (2008) is right around 1.763", whereas the white one on the 1537 (stereo, 2014) is 1.785". I can imagine the assembly process results in a lot of variation in that dimension.
The black saddle assembly was chock full of silicone. Squeeze out filled every spare space. With some careful scraping and picking out, the new saddle now sits flush and works perfectly. It did need to be shortened ever so slightly initially, but the dead low E piezo was due to all the silicone inside the assembly. There was quite a bit down in the longitudinal channels that could have been jacking the new saddle up, or it could have been the center ridge of material on top of the piezos being too tall. The material was very easy to trim out with an X-Acto knife and good lighting. |
|
| |
|
Joined:
June 2012
Posts: 2303
Location: Lake Forest, CA | FlySig - 2019-02-10 2:21 PM
By eyeball I can't see any difference in the length of the new black vs new white as they are installed by comparing them to an old saddle held next to them. Not very precise. I can pull the saddles off at the next string change which will be next week or so. The new black saddle measured out at 1.766", whereas the original black saddle was 1.755". I did not measure the new white saddle before installation.
The inside distance between endcaps on the saddle assembly is quite different between the two guitars. The black one on the Adamas (2008) is right around 1.763", whereas the white one on the 1537 (stereo, 2014) is 1.785". I can imagine the assembly process results in a lot of variation in that dimension.
The black saddle assembly was chock full of silicone. Squeeze out filled every spare space. With some careful scraping and picking out, the new saddle now sits flush and works perfectly. It did need to be shortened ever so slightly initially, but the dead low E piezo was due to all the silicone inside the assembly. There was quite a bit down in the longitudinal channels that could have been jacking the new saddle up, or it could have been the center ridge of material on top of the piezos being too tall. The material was very easy to trim out with an X-Acto knife and good lighting.
Phew! I'm really happy to hear that you got it working on your 2080.
WRT your measurements, I'm sure you mean 2.### and not 1.### as the 3D printed saddles are, as designed, 2.75" long.
I've got 3 black saddles installed. I ordered the first one with the white one I antiqued. Then, I ordered two more black ones on a separate order.
I measured the saddles and the space between the pick-ups using my digital calipers.
Saddles: 2 - 2.75", 1 - 2.76"
Pick-ups: 2 - 2.78", 1 - 2.8"
I also tested three different spare pick-ups and the space between the end pins was 2.78". I'm sure I could keep testing guitars, but I would probably find that these are all about the same distance.
It looks like the black saddle you ordered was probably marginally larger, like one of mine. But, your space between the end pins on the pick-up was the same distance, which explains the interference fit on length.
You're the first one who's reported a problem with the saddle being too long. Those who have got theirs report that it just drops right in.
I'm just glad you were able to make it work without too much hassle.
|
|
| |
|
Joined:
October 2005
Posts: 4025
Location: Utah | DanSavage - 2019-02-10 4:09 PM
WRT your measurements, I'm sure you mean 2.### and not 1.### as the 3D printed saddles are, as designed, 2.75" long.
Yeah, thats what I get for going by memory! |
|
| |
|
Joined:
June 2012
Posts: 2303
Location: Lake Forest, CA | FlySig - 2019-02-10 3:43 PM
Yeah, thats what I get for going by memory!
Like I say, the main thing is that it works now.
BTW, what do you think about how it sounds?
Dan |
|
| |
|
Joined:
October 2005
Posts: 4025
Location: Utah | On the 1537 I detect no difference in tone. That's the white saddle. The black saddle in the Adamas 2080 sounds the same to me, maybe a bit more clarity on the B and E strings. The strings are at their end of life so it is difficult to say for sure on the Adamas, but it sounds the same or better tone wise.
The intonation is vastly improved. I haven't put a tuner to it to check it precisely, but it sounds great. I used to tune the B string ever so slightly flat, and the low E string about 1/8th step flat so that it would play in tune when fretted. For different keys I would sometimes tune it differently from that. And with a capo I always had to flat the 6th string. No more. I tuned both guitars right on pitch with open strings and they sound in tune with all the different songs I usually play.
|
|
| |
|
Joined:
June 2012
Posts: 2303
Location: Lake Forest, CA | FlySig - 2019-02-10 5:57 PM
On the 1537 I detect no difference in tone. That's the white saddle. The black saddle in the Adamas 2080 sounds the same to me, maybe a bit more clarity on the B and E strings. The strings are at their end of life so it is difficult to say for sure on the Adamas, but it sounds the same or better tone wise.
The intonation is vastly improved. I haven't put a tuner to it to check it precisely, but it sounds great. I used to tune the B string ever so slightly flat, and the low E string about 1/8th step flat so that it would play in tune when fretted. For different keys I would sometimes tune it differently from that. And with a capo I always had to flat the 6th string. No more. I tuned both guitars right on pitch with open strings and they sound in tune with all the different songs I usually play.
It sounds like your impressions are the same as mine.
Enjoy! |
|
| |
|
Joined:
October 2014
Posts: 267
| Thanks for the video, it's going to be a big help once my saddle arrives. I probably would have tried to pull out the excess silicone. |
|
| |
|
Joined:
December 2016
Posts: 128
| I installed my new saddle this morning. Wow! What a difference it makes. I'll upgrade Darth Ovation this afternoon. |
|
| |
|
Joined:
June 2012
Posts: 2303
Location: Lake Forest, CA | Congratulations! |
|
| |
|
Joined:
May 2008
Posts: 1553
Location: Indiana | Just ordered 3.
Now you can send your kids to college. |
|
| |
|
Joined:
June 2012
Posts: 2303
Location: Lake Forest, CA | Jonmark Stone - 2019-02-17 1:46 PM
Just ordered 3.
Now you can send your kids to college.
Thanks!
Pffft... They're on their own. I'm retiring to the islands.
Woo hoo! |
|
| |
|
Joined:
October 2014
Posts: 267
| I received the black saddle for my 1624 Country Artist and just finished installing it. I like the way the black looks. I can't say that I detect a noticeable difference in tone. At first I was disappointed in the intonation, until I discovered I'd installed the new saddle backwards! Intonation is within 0 to 5 "cents" at frets 3, 5, 7 and 12 except for the G string, which is +10 at the 7th and +15 at the 12th. It was the worst string with the old saddle as well and, overall, the numbers were somewhat better with the new saddle. I noted that finger position/pressure could result in 2.5 cents variation from test to test. I confess that I don't know what's good or bad in terms of cents but my ear isn't sensitive to detect anything objectionable. In any case, I don't spend that much time beyond the 5th fret anyway. My strings are still settling in after being loosened so I'll check again in a day or so.
In general, the G, B and high E, purely nylon, strings had the highest variation. I'm wondering if this has something to do with the new saddle having been designed for steel strings aside from the elimination of the radius.
|
|
| |
|
Joined:
October 2014
Posts: 267
| I re-checked the intonation on my Country Artist now that my strings have re-settled in. The results are much better now. I just checked the 12th fret and all strings are within 0 to 5 "cents" except the high E which shifts between +5 and +10 depending on my finger position. In any case it's nothing I'm going to ever notice. This guitar was a CL purchase last summer and I haven't touched the set-up.
I really like the look of the black saddle. Thanks for doing this. |
|
| |
|
Joined:
March 2019
Posts: 26
Location: Cass County, Texas | From: Your Shapeways order is now on its way!
2 x Ovation OCP-1K Fully-Compensated Saddle in Black Professional Plastic
Dan, your video will be a big help. I have some repair work to do when I install one of them. The other will be a spare.
My Ovation is a "1759", 1995 version (sr# 498575), with a natural finish.
I picked it up last year at a local pawn shop along with its hardshell case. It needs some work, especially where the top has split (came unglued?), exactly where the matched sides meet.
Will update when I finish the repair in about 2 weeks. (I am slow)
Edited by Tom The Piddler 2019-03-21 12:38 PM
|
|
| |
|
Joined:
September 2005
Posts: 138
Location: Birmingham, AL | Really cool stuff. The black would look great on my black guitar. May have to get a couple of these..... |
|
| |
|

Joined:
September 2005
Posts: 3618
Location: GATLINBURG TENNESSEE :) | ‘Guess I’m a little late in chiming in on this thread (cancer treatment recovery and a stroke), but I also just picked up a couple of these. They seem to be doing great. Thanks for your idea and all the work you put into following through on it. |
|
| |
|
Joined:
February 2022
Posts: 11
| Just ordered a couple of these saddles to try out. I've got a 2771STR that could use better intonation. Intonation is usually somewhat dependent on string gauge. Dan or anyone else, just curious what strings you'd used when getting good results with this bridge?
Vince, you've logged into the forum recently, so I hope that means you're doing well!
|
|
| |
