Posted 2018-07-06 9:17 PM (#544350) Subject: Nakao 5986 20th Anniversary "Japan Market only" USA O
Joined: October 2012 Posts: 1072
Location: Yokohama, Japan
Hello BFLG, Had to pull an "all nighter" with some intermittent "waiting" time so, I worked on my 5986 during the intermittency - thought I'd share my repairs while we all wait with baited breath for Dan's completion of his historical Harry Chapin rebuild. Thanks for viewing and helping identify this very unusual guitar at my thread in the "General Posting Forum" here:
Alas, my limited resources here in Japan wrought very little additional information about these rare instruments; but knowing this is a full-on authentic USA O is more than enough to demand my best repair efforts. Here are the specs again in review:
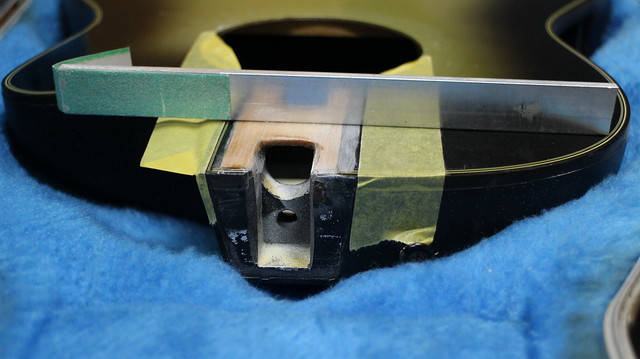
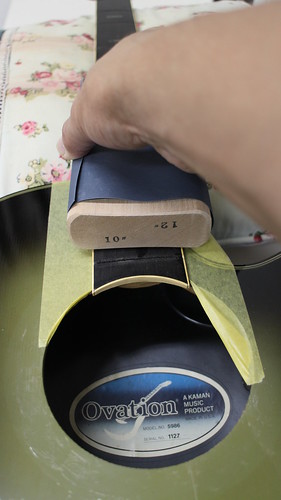
Initial inspection reveals that this AAA Sitka Spruce sound board is quite resonant. Unfortunately, the unfinished section under the fret board extension was very dry and brittle - very much in risk of splintering. The first thing was to seal the area with Pacer's Z-Poxy Filling Resin (this stuff is an amazing filler/finish). Basically, the area was taped-up to create a reservoir where the epoxy would settle and dry. Then the area was flattened down with 60-grit sand paper.
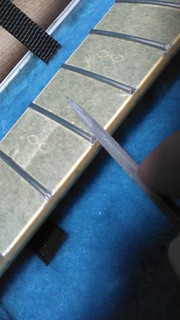
Complete flatness is essential, and proper leveling can help the neck to set with a perfect neck angle with minimal hassle. Like many vintage Os, this one needed a neck reset, but instead of shaving the neck heel and having a slightly angled fret board extension, by flatening this area with the appropriate incline, the neck can be aligned perfectly (there is enough play in the bolt hole to allow a small adjustment of this nature). To ensure perfect flatness the whole area was grided lightly with pencil...
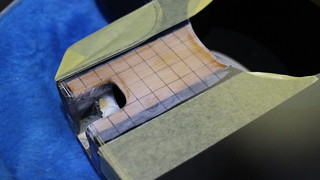
Almost there...checking the flatness after griding helps me to see small mounds and bumps that would compromise the flat/even surface that is absolutely necessary for the extension to sit properly. Not sure if you can see it, but the above photo on the right shows a wee-bit of a mound in the right center-to-rear area. Just flatten that area out and we should be good to go...
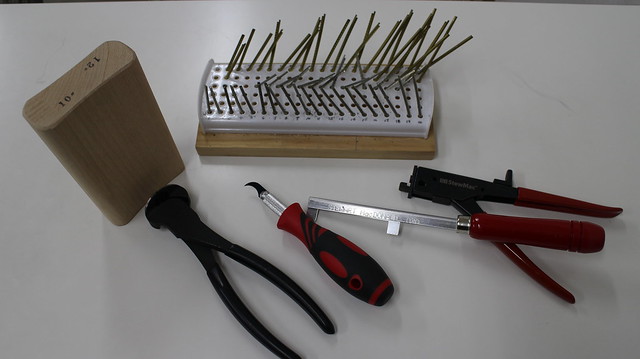
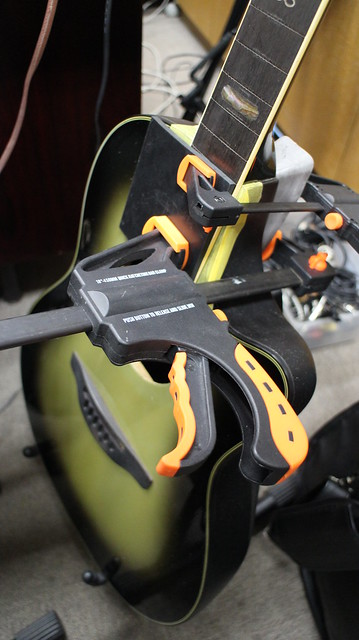
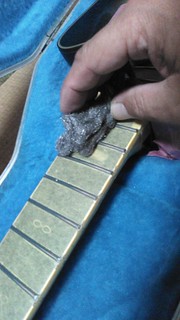
Proceeded to remove the frets from the fret board before gluing the neck back into position. The neck was bolted to the body to ensure that fret removal pressure on the extension wouldn't crack the extension. Dan gave me some great advice about the right fretting tools to use. My Stewmac order for the Fret Tang Nipper, Refret Saw, and Slot Cleaning Tool took over one-year to be fulfilled (the Nipper was on back order for the longest time). They arrived just in time to save me some hassle for this project...
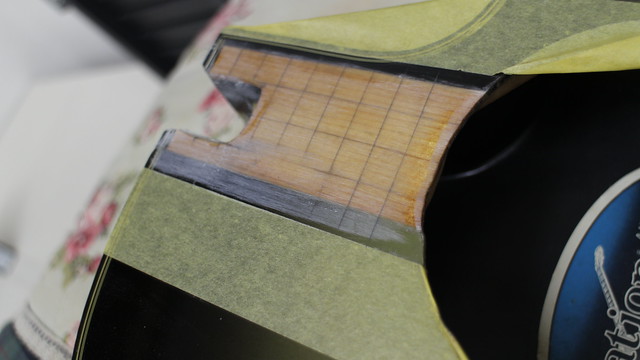
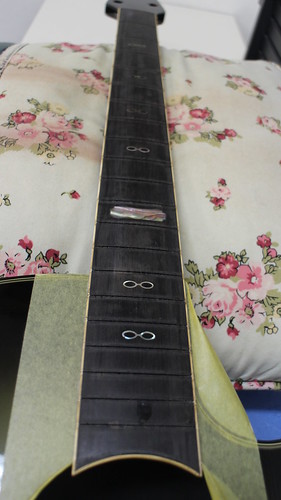
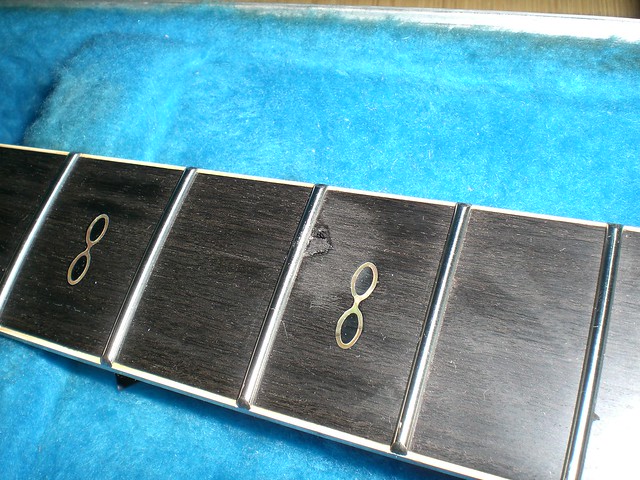
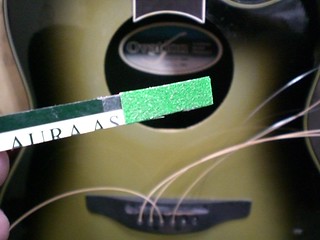
Removal of the frets revealed the slightly uneven surface of the fret board. This kind of wood movement is to be expected on a 30 year-old guitar, but to get the instrument back in to tip-top condition, the fret board will need to be re-surfaced with my sanding blocks. These cool blocks are radiused to 12" on one-side and 10" on the other side. All steel string Os are 10" radius...
The picture above/right shows the fret board after a few passes with the sanding block. It's pretty clear that over the years, this fret board has become quite uneven. Once re-surfaced the sheen of the ebony fret board was like new! Verified flatness, neck angle and proceeded to glue the neck into position. For low load areas like this, where polyurethane/epoxy finish meets ebony, I've really grown fond of Pacer's 30-minute Z-Poxy.
Upon closer inspection, this guitar is going to need a complete refret; so, once the glue dries, the refret will begin. When the refret is done, the rosette will be cleaned up and installed. Then buff the finish and I'm done! Thanks for letting me share BFLG and have a great weekend!
Posted 2018-07-08 11:17 PM (#544383 - in reply to #544358) Subject: Re: Nakao 5986 20th Anniversary "Japan Market only" USA O
Joined: October 2012 Posts: 1072
Location: Yokohama, Japan
Jonmark Stone - 2018-07-07 1:09 AM
StewMac ought to arrange a BFLG discount.
Nice work Ken.
Thanks Jonmark Stone! It was really strange...the order was placed on May 2017. The item was on 30 days back order. In August I called and sent an e-mail follow-up to which a customer service guy named - naw, no need to mention names - responded with
"Thank you for contacting us. We anticipate having the Fret Tang Nippers available to ship in about a week. We are currently inspecting them in our warehouse before we send them out."
The back order status changed to "1-3 days" to ship. I thanked them for the follow-up via e-mail, and the part never shipped. Back order status returned to 30+ days (maybe a quality control issue?) with no additional follow-up. The item finally shipped one-year after the order, got stuck in customs and finally arrived 13 months later! Just really glad that I won't have to hand-file fret tangs anymore starting from this project! YES!
DanSavage - 2018-07-06 11:41 PM
You're turning into a BFLG rock star!
Yikes Dan! I didn't realize the BFLG was so closely associated with rock-n-roll stardom... LOL! Actually, I am quite content to live in the shadow of the great Luthier (and my self-proclaimed BFLG Mentor) the triumphant master of torrefication... Mr. Da... well, you know who I'm talking about...
Actually, when I click the OFC on my browser, I have it set to display new threads, and some days the BFLG goes without any entry for days...kinda miss when (not so long ago) when FlySig, MWoody, seesquare, DetlefMichel, and others used to post practically daily. At this point, my monotonous projects like neck resets and the like are the only projects making any progress; so kinda feel bad to just repeat stuff that's already been visited. Figured the uniqueness of the 5986 might make it an acceptable post... Lol. I must say, I have and am learning so much from the BFLG builds; so, wanna keep the enthusiasm going in whatever way I can...
Can't wait to see and hear Harry Chapin's 1613 completed!
Posted 2018-07-09 9:57 PM (#544395 - in reply to #544350) Subject: RE: Nakao 5986 20th Anniversary "Japan Market only" USA O
Joined: October 2012 Posts: 1072
Location: Yokohama, Japan
Moving right along...
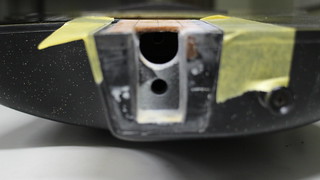
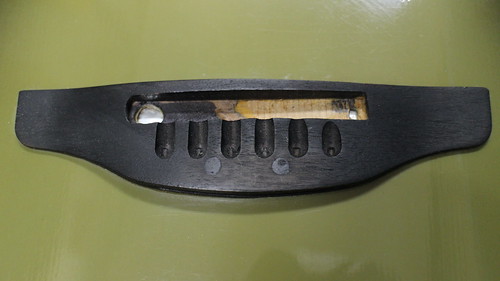
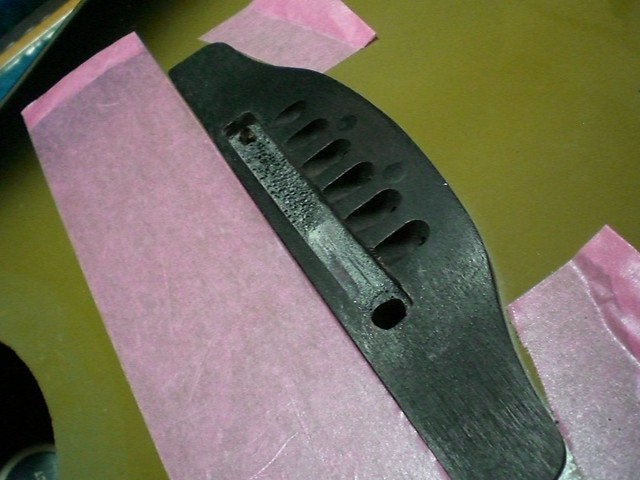
Two more detail areas that need attention are the bridge saddle slot and the rosette. Many repair shops including the Mothership route the bridge saddle slot deeper in lieu of performing a neck reset. It's less time consuming and efficient. The procedure usually works well unless the route becomes too deep. In this particular case, the sound board thickness under the saddle slot measures 1.2mm. That's just a bit too thin for my comfort...
You can see how the right side of the slot has cut down into the sound board. It doesn't look so bad in this picture, but the work was probably done with a dull chisel, and there is a significant amount of tear-out in the corners. A bit worrisome... Smooth-On's Black Onyx moulding resin works very well for this kind of application. It's a two part epoxy resin that starts out very viscous and will find its way into nooks and crannies to fill them up. Within minutes the material hardens and tranforms the area into a firm hard workable space with a 80D shore hardness (about the hardness of plastic used in construction helmets). The silver color under the piezo wire holes and saddle alignment holes are aluminum tape. The stuff seals semi-bumpy areas well, and can be removed fairly easily. When the mixed moulding resin is poured into the slot, the tape plugs the holes and protects against overflow and spillage. After leveling the area, the resin is poured...
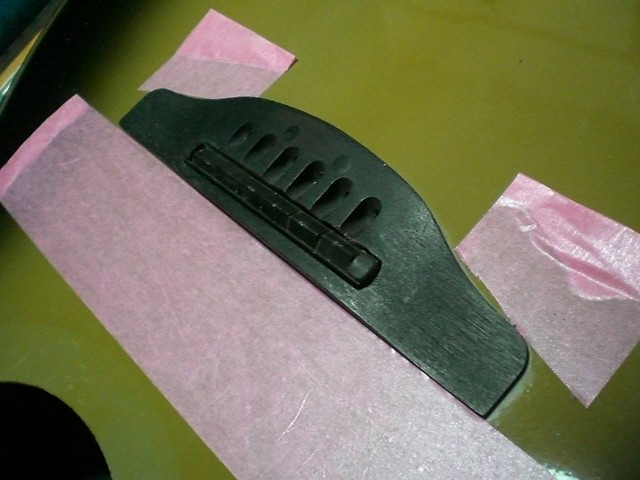
Within 2.5 minutes the resin hardens into a non-viscous soft-gel. After 10 minutes it reaches full-cure. Just amazing stuff. The aluminum tape is removed and she's ready to have her slot re-routed to proper specs! Cool!
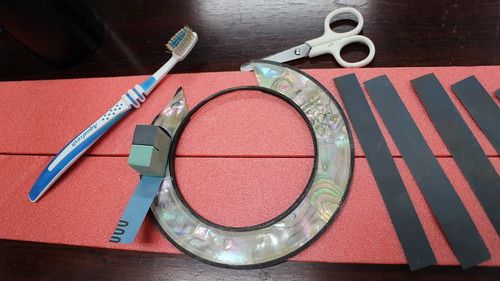
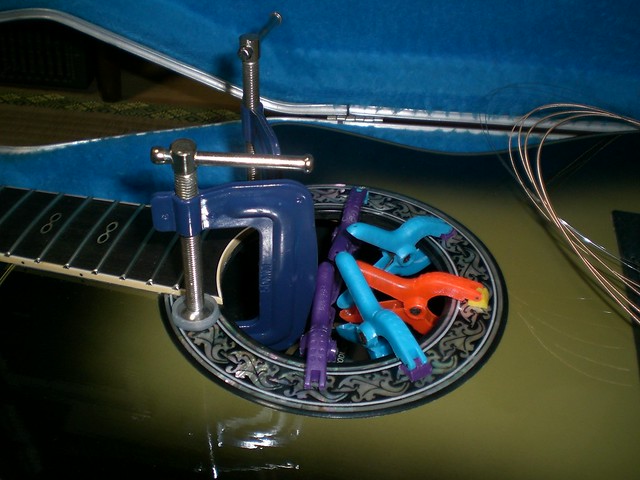
Now onto the rosette. In the past, I favored the simplicity of the Balladeer rosettes, but after watching Daren's Ultra rebuild (hard to belive that was over an year ago!) here...
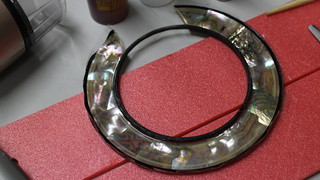
...and the immaculate work Dan did in that project really got me interested in these beautiful abalone rosettes. Unfortunately, with the future of the Mothership in question, I figured I'd better really take care of this rosette and try to reuse it instead of building one from scratch. We can't even get the clear frame that holds the abalone here in Japan! So extra care was taken for the removal process; however, this rosette came off relatively easily with very little hassle. Used the Ziploc Freezer Bag technique that I've come to rely on for many kinds of disassemblies. I neglected to take a picture of the rosette immediately after the removal, but it was covered with some burnt orange colored adhesive that peeled off relatively easily. That means this rosette was previously removed (or fell off) and re-installed. In any case, when the rosette is flipped upside down it's very easy to see that the abalone is bare...
This stuff is really brittle and can be damaged very easily. Took some 1000 grit sandpaper to smooth it out, and found that there were numerous cracks (unnoticable from the front) that suggested eventually demise. The shell was not glued in very clean tempting me to disassemble the whole thing (the glued shell can be remove from the frame by putting the whole thing in boiling water), but some of the shell had already shattered in various places and disassembly could mean lost shell pieces. So that was not an option. Decided to cover the back side with some good clear epoxy, and called on Pacer's Finishing Resin again. You'll notice the sanded rosette is surrounded by clear tape (shoud've used masking tape! Doh!). This acts as a reservoir to keep any epoxy from spilling.
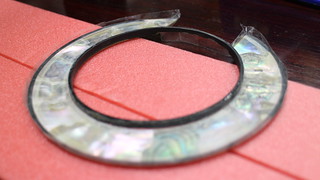
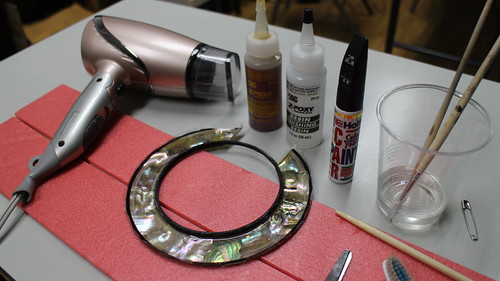
The thin epoxy layer will keep everything in place, provide a protective coat, and enable me to sand the underside of the rosette flat. The rosette needed to be thoroughly cleaned before the epoxy was applied. The Finishing Resin was applied with a brush. The black paint on these rosettes are very fragile and can be smeared, so the resin needs to brushed on very carefully. Actually, much of the epoxy was "globbed" on and spread lightly. The hair dryer was used to spread the epoxy once even coverage was achieved. Flat black automotive touch-up paint was applied where ever needed (very carefully! can't mix the paint with the epoxy!
This way, the abalone shell is protected and I don't have to worry as much about splintering and losing pieces of abalone. Lightly sanding with 1000 grit sand paper evened up the surface nicely. When this rosette is epoxied (not CA...thanks Dan!) back on to the sound board it will adhere quite nicely with little risk of coming loose again (at least not for another 30 years!)
With regard to the refret, I kind of had my heart set on EVO Golds. My obvious thought was that it would go great with the gold flaked neck finish; but after some inspection, it turns out that the black hardware and abalone rosette kind of conflict with the gold frets. Placed an order for some super jumbo Jim Dunlop fret (cheaper and easier to get over here). So I should be able to get to the frets next week. Meanwhile, really stoked to have been able to recyce this rosette. Despite the obvious visible wear from the underside, it still looks clean and pristine from the front!
Will follow-up with more when the saddle slot is routed, and the fret job is complete. Getting closer and closer! Thanks for letting me share and for the interest OFC-BFLG!
Posted 2018-07-10 9:55 AM (#544401 - in reply to #544395) Subject: Re: Nakao 5986 20th Anniversary "Japan Market only" USA O
Joined: May 2008 Posts: 1559
Location: Indiana
Super clean work, Ken.
FWIW, I've had 2 O's that were routed all the way down to the top. Like you, that made me nervous. Interestingly, neither was to compensate for neck angle as both were filled with multiple shims. My fix was carefully cut ebony filler pieces glued to the top with carpenters glue. I also use wood for shims. The little guy in the back of my head thinks it sounds better... though he's lead me astray before... and it's certainly not provable.
Carry on.
Posted 2018-07-10 10:29 AM (#544402 - in reply to #544401) Subject: Re: Nakao 5986 20th Anniversary "Japan Market only" USA O
Joined: June 2012 Posts: 2330
Location: Pueblo West, CO
WRT the routed saddle slot, the bridge on your 1612 has been routed and filled with rosewood. I thought about whether to use ebony or rosewood, but decided on rosewood because I thought it was slightly more resonant and would transmit the vibrations of the strings better.
I had to add the filler because the slot in the bridge wasn't level. When I leveled it out, it got too thin on one end and blew out the slot. So, I had no choice but to add a filler piece.
Ah, well the pics of the underside of the rosette explains why none of the pearloid got pulled from the rosette when it was removed from the top -- there is no pearloid. It's abalone.
Since the abalone is translucent, you'll want to paint the underside with a thin coat of black paint before you glue it down. This helps kick up the color and contrast.
Actually, you can use any color. I've tried silver and gold. They were okay. Black works the best.
Posted 2018-07-11 9:08 AM (#544420 - in reply to #544401) Subject: Re: Nakao 5986 20th Anniversary "Japan Market only" USA O
Joined: May 2011 Posts: 758
Location: Muenster/Germany
Jonmark Stone - 2018-07-10 4:55 PM
I also use wood for shims. The little guy in the back of my head thinks it sounds better... though he's lead me astray before... and it's certainly not provable.
Carry on.
Of course it will sound better. Remember how different the sound of an acoustic guitar is when you simply exchange a plastic saddle with a bone saddle. And two or more hard shims which are seperated from each other will not transmit the energy of the strings as precisely as one shim made of the same tonewood as the top will do.
I use wood shims in all of my Ovations and I´m absolutely convinced that at least the lower frequencies are more fat than before.
This may not be instantly remarkable, but we are talking about 2 or 3k$ Guitars and 10-20k $§& crazy people with a FINE sense of hearing who use them;-)
Posted 2018-07-11 1:23 PM (#544425 - in reply to #544402) Subject: Re: Nakao 5986 20th Anniversary "Japan Market only" USA O
Joined: October 2012 Posts: 1072
Location: Yokohama, Japan
DanSavage - 2018-07-10 12:29 AM
Ah, well the pics of the underside of the rosette explains why none of the pearloid got pulled from the rosette when it was removed from the top -- there is no pearloid. It's abalone.
LOL! Was there a difference? Doh! If I recall correctly, your Ultra rebuild for Darren had some great footage of your rosette build with green and red abalone. Inspiring stuff! I'll definitely experiment with back color...since it's translucent, I wonder how a mirrored back would work? Theoretically, the reflective surface should provide more reflection and color?
Jonmark Stone - 2018-07-09 11:55 PM
My fix was carefully cut ebony filler pieces glued to the top with carpenters glue. I also use wood for shims. The little guy in the back of my head thinks it sounds better...
Absolutely, Johnmark Stone. I think the little guy has got it right. Dan and DetlefMichel are also in agreement with the little guy. In this case, it looked as though structural integrity of the area was compromised with the saddle slot roughly and unevenly chiseled deeper on the treble side of the bridge. As Dan says, the saddle slot has to be level because an uneven saddle slot will jeopardize proper function of the piezo. So, the purpose of this repair was twofold; 1. to restore structural integrity and 2. prepare a level flat even saddle slot.
IMHO consistent resonance can be better maintained with a wood shim for sure. While the moulding resin has excellent shore hardness, construction helmet plastic is not entirely the epitome of resonance (although the Ovation Academy might beg to differ); and for many with excellent audio sensory capabilities like yourself, Dan and DetlefMichel, I'm sure the difference would be noticeable. Frankly, for an area this thin and small, I can't really tell the difference, but I'm afraid I don't fall in the "10-20k $§& crazy people with a FINE sense of hearing who use them" category that DetlefMichel talks about!
moody, p.i. - 2018-07-11 12:54 AM
Do you cut the shims yourself or buy a kit?
Hope you don't mind my responding moody, p.i., FWIW, I use shims from some good stash of various types of woods and veneers (right now, I've got holly, rosewood, redwood, koa, birch, sakura and ebony). I cut my shims out of these and match them up to whatever application.
Posted 2018-07-20 1:47 PM (#544550 - in reply to #544350) Subject: RE: Nakao 5986 20th Anniversary "Japan Market only" USA O
Joined: October 2012 Posts: 1072
Location: Yokohama, Japan
So...while we all wait for the paint to dry on Dan's historic Harry Chapin 1613-4 Rebuild, I thought I'd put in an hour or so for my Nakao...
To my great surprise, Jescar frets are now available in Japan, and they are cheaper than Jim Dunlap frets! Just 6 months ago, I had to special order my EVO Golds from the States...very convenient! My order for super jumbo 58118 18% nickel silver frets arrived today, and I'll start my fret job early next week.
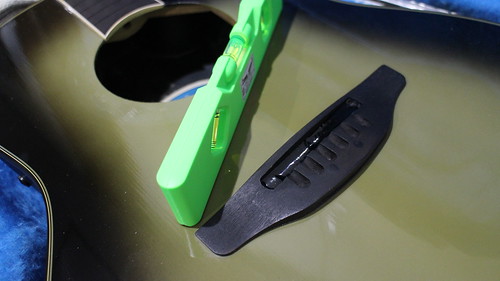
Decided to get my bridge saddle slot routed down and leveled; so I masking taped the soundboard, secured the saddle routing jig with double stick tape onto the masking tape.
Proceeded to route and level the slot. As the work progressed, it became painfully evident that I made a booboo on the mixture of the two-part moulding resin. Notice the bubbling of the black plastic in the picture below. too much hardner! Yikes!
Gonna leave it like this for now... leveled the slot using my small Dremel tool. It might be better to glue in a wood shim afterall! Despite the bubbling, the saddle fits perfectly flat in the slot...
Looks like it's all gonna work out okay in the end... Next will be installation of the new frets! Getting closer!
Posted 2018-07-22 6:10 AM (#544564 - in reply to #544553) Subject: Re: Nakao 5986 20th Anniversary "Japan Market only" USA O
Joined: October 2012 Posts: 1072
Location: Yokohama, Japan
Love O Fair - 2018-07-20 10:23 AM
That may be the coolest idea of the day. There are all kinds of various colors and types of thin leaf foil, either crinkled or flat.
Thanks Al! I don't have a lot of stock of metallic paper or thin foil sheets to experiment with so I opted to use a simple every day Japanese craft supply called "Origami". I have some of the fancy stuff which costs about 5 bucks and it has chrome, gold, metallic green, and black. So, I cut them up into quarter circles to match the rosette and fit them behind the rosette facing outward...as it turns out, none of them made a significant enough of a difference (at least for me) so I decided to stick with the rosette as is...now, moving forward
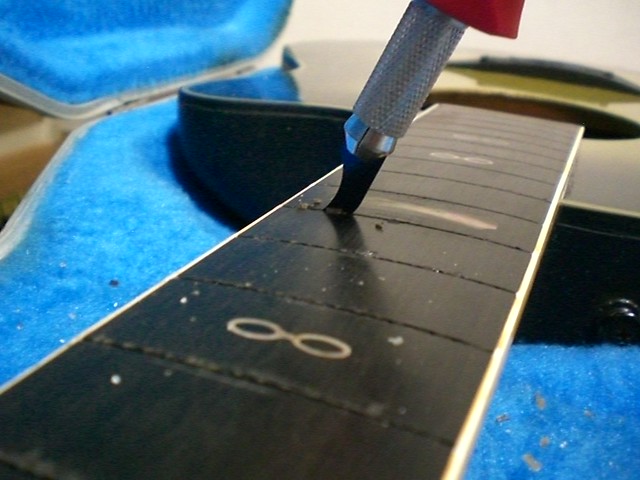
Got to work on my refretting, and the first thing to do was clean-out the fret slots on the finger board. This one was a bit strange as all the slots were filled with CA glue, but underneath the medium sized frets. Since, this 5986 is getting super jumbo frets, I needed to dig in and break up the adhesive with the refret saw and slowly dug out the excess CA glue with the slot cleaning tool.
When digging out the CA, the tool needs to be inserted absolutely parallel to the fret slot. Any twist or turn and you'll be taking a nice chunk out of the fret board along with the CA residue. Yikes! Sure enough, I gouged out a nice chunk of ebony while I was at it!
Fortunately, this was my only big fretting mess-up. CA'd the piece back in and sanded her down to level. There were others, but they were small enough to go unnoticed or hide under the frets...you can see one of them in the lower-right in the picture above.
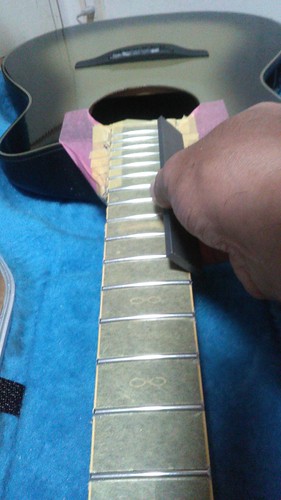
After positioning all the frets with some very light hammering, the finger board and neck were taped up in preparation for filing the sides and corners of the frets...
After tapping, the fret edges were angled for safety and comfort.
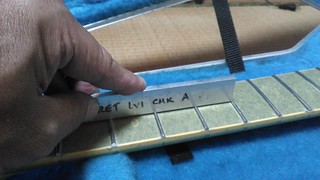
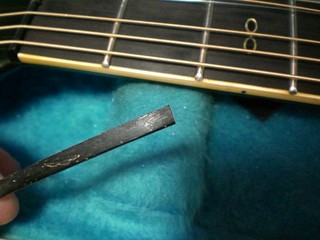
Next the fret levels were checked for any clicking floating frets. Cut simple straight aluminum bars into 3 lengths to check the frets.
Then the frets were rounded at the edges vertically and horizontally, and cleaned everything up with #000 steel wool...
After dressing up the frets I went through and checked the fret levels again...not one of the frets needed to be filled down! Has that ever happened to any of you? Must have leveled the finger board really good when I sanded the fret board down smoothly! Amazing!
Now, onto the nut. The previous owner cut into the nut a too deeply at the "G-string" and I was getting some severe buzzing. Unfortunately, didn't have any black nut blanks so I attempted the baking soda + CA trick...
Unfortunately, after tightening the strings during a trial run the hardened baking soda popped out! Oh well... So Changed strategy and thought I'd sub using the nut that comes with my iDea (which is still a project guitar), but to my surprise the nuts were not the same size (iDea nut on top)!
Another strategy change...this time by cutting a very small piece of black binding, and CA'd it into the nut slot. After drying, the slot was re-cut to the proper depth. And...it's working!
The scratchy pre-amp pots were cleaned with "Fernandez 999" - basically, Japan's version of De-Oxit. Forgot to take pictures of the disassembled pre-amp - tested the cleaned pre-amp to find that it was completely scratch free. Oh wow, this thing sounds pretty impressive!
Needed to make one small and last adjustment to the saddle slot in the bridge. The high "E" side of the saddle was a bit too high. Measurements for the 6th and 1st strings at the 12th fret was 2.5mm. Adjusted the first string down to 1.9mm. Cut a credit card to fit the saddle slot, and double sticked some 60 grit sandpaper to the tip to lightly sand the treble side of the saddle slot. I applied pressure in excess of the credit cards flex with the blunt side of a wooden skewer.
Finally, the rosette was epoxied to the top...
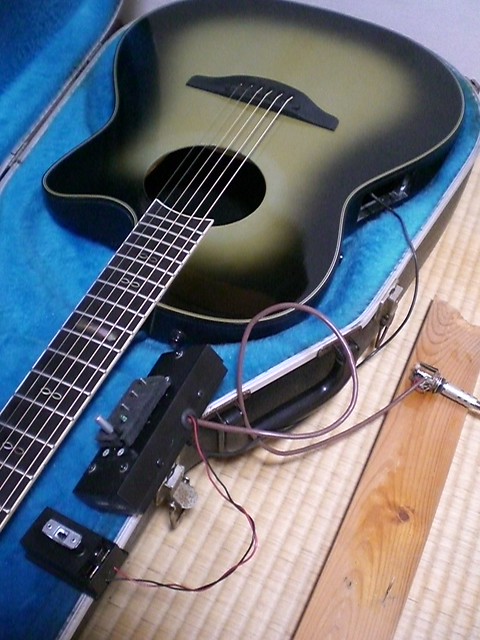
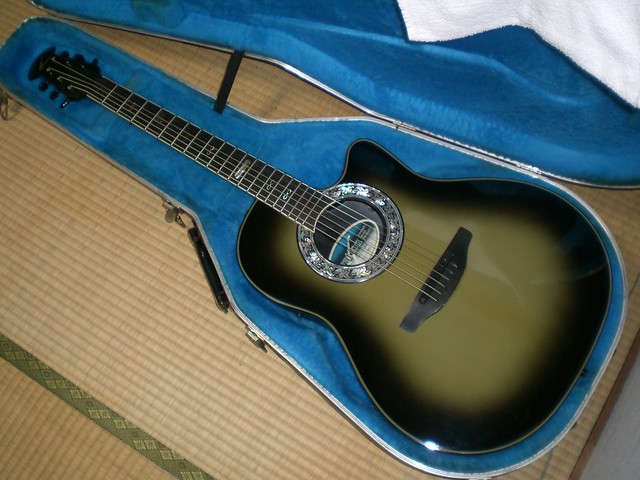
Really like the sparkly color of the rosette! So here she is all complete!
Very pleased with this highly unusual O - the 5986. Feels very much like a SSB Custom Legend. Really comfortable for me to play with the super jumbo frets. Like all Os she's a stellar performer through a pre-amp, but her acoustic sound is surprisingly full and satisfying. At 32 years old she is a bonified vintage. Strung her up with my favorite Adamas 1919Es to find she has a very thick, but sparkly sound and seriously impressive sustain. The AAA Sitka Spruce top seems to really like the extra tension of the medium gauge strings.
Hope to post a video in a couple of days. Thanks a bunch for letting me share!
Posted 2018-07-22 4:43 PM (#544569 - in reply to #544425) Subject: Re: Nakao 5986 20th Anniversary "Japan Market only" USA O
Joined: June 2012 Posts: 2330
Location: Pueblo West, CO
arumako - 2018-07-11 11:23 AM
LOL! Was there a difference? Doh! If I recall correctly, your Ultra rebuild for Darren had some great footage of your rosette build with green and red abalone. Inspiring stuff! I'll definitely experiment with back color...since it's translucent, I wonder how a mirrored back would work? Theoretically, the reflective surface should provide more reflection and color?
Yes, a big difference. The original rosettes used a thin plastic sheet printed with a mother of pearl pattern, known as pearloid. (Known derisively as Mother of Toilet Seat)
The first Custom Legends featured segmented abalone rosettes like the one on this guitar. Later Custom Legends had abalonoid plastic sheet in place of the segmented abalone. Had yours been made from abalonoid, it would most definitely left some of it on the top of the guitar.
Yes, I've still got those parts. Haven't really done anything with them as of yet.
Don't know how well the mirror back would work. It would definitely kick up the reflection.
Posted 2018-07-22 5:34 PM (#544570 - in reply to #544350) Subject: Re: Nakao 5986 20th Anniversary "Japan Market only" USA O
Joined: February 2016 Posts: 1846
Location: When??
Congratulation on your completion! Nice.. so nice! One wouldn't expect to find anything less than perfection from the famous Arumako Labs of Yokohama, and I can almost hear the rumble of those 1919s from here.
Posted 2018-07-24 12:30 PM (#544579 - in reply to #544574) Subject: Re: Nakao 5986 20th Anniversary "Japan Market only" USA O
Joined: May 2011 Posts: 758
Location: Muenster/Germany
Phantastic job, Arumako! Very interesting and rare guitar, I like the bling of the rosette, too bad that the guitar has no abalone purflings. And thanks for the inspiring and detailed documentation. Isn´t it crazy that all the time new problems (badly routed slots...) occur....and still I would not even THINK about re-fretting one of my guitars myself, brrrrrr.
But.. are you sure that the A-braced top will stand the tension of medium gauge strings?
Posted 2018-08-02 10:14 PM (#544721 - in reply to #544579) Subject: Re: Nakao 5986 20th Anniversary "Japan Market only" USA O
Joined: October 2012 Posts: 1072
Location: Yokohama, Japan
Thanks for the encouraging comments everybody! I really appreciate it!
DetlefMichel - 2018-07-24 2:30 AM
....and still I would not even THINK about re-fretting one of my guitars myself, brrrrrr.
But.. are you sure that the A-braced top will stand the tension of medium gauge strings?
@ DetlefMichel. With over 20 guitars in my collection, fret jobs were becoming an enormous financial burden (especially here in Japan where a full fret job costs about 300 bucks!). So with the help of all the kind folks here, I was tutored by the BFLG in the art of fretting, and I've never looked back! It's actually a lot of fun; and since I like the feel of jumbo frets (not found on a lot of acoustics), doing my own fret work allows me to upgrade my guitars to my favorite specs. I've seen you do some impressive work here at the BFLG too. Absolutely sure it would be a cinch for you!
and, Yes! The 30 year-old A-braced top is holding up very nicely to the medium gauge strings. Adamas 1919E are my outright favorite strings (I love the "pop" that they give to my instruments). They don't seem to over stress the tops, although I must admit I loosen the strings when the guitar does not get played for over a month. They're on my K-5 braced Dan Savage 1612 too (actually they're on all my steel-string acoustics except my vintage '73 1117-4 and '72 Yamaha FG160).
Decided to get a new nut as well, but my supplier said they won't be able to deliver until October! So, I improvised by using some bloodwood binding as a shim under the existing nut. Seems to have worked out okay...
It took me a while to get my video uploaded, but was finally able to get it all done today; so here's my demo of this magnificent New Hartford crafted USA Ovation (https://youtu.be/atBYkcr-gbQ)!
I really like her punchy voice. Really easy player too at 2.2mm (6th string/12 fret) and 1.8mm (1st string/12 fret). The jumbo frets really does it for me.
Really appreciate the BFLG for all your support and encouragement! Thanks for letting me share my journey!
Posted 2018-08-18 12:50 PM (#544942 - in reply to #544350) Subject: Re: Nakao 5986 20th Anniversary "Japan Market only" USA O
Joined: February 2016 Posts: 1846
Location: When??
What a rich, thunderous sound you're getting out of that beauty!
And watching that video made me feel young again.. like.. 5. I'm thinking that's about the time that I (Mr. Cowboy Chord) would have had to start practicing (hourly) in order to play like you do in comparison today. Very nice.