Posted 2023-02-23 4:00 AM (#558060) Subject: '74 1115-1 Pacemaker Restoration
Joined: October 2012 Posts: 1018
Location: Yokohama, Japan
Hi OFC/BFLG Family!
Hope all of you are doing well. It has been a long long time since I've had the chance to check out the OFC, much less post anything. Like many of you, I've been experiencing so many changes over the past year! Fortunately, haven't had to battle COVID myself (yet - fingers crossed); but aging parents, early retirement, moving homes and ensuing carpentry necessities have really kept me running for quite some time. Frankly, I don't know if I'll ever get to the end of this project either, but a bit of breathing space today prompted me to sit in front of my laptop to start this thread about a 1115-1 Pacemaker that I had the fortune of acquiring recently...
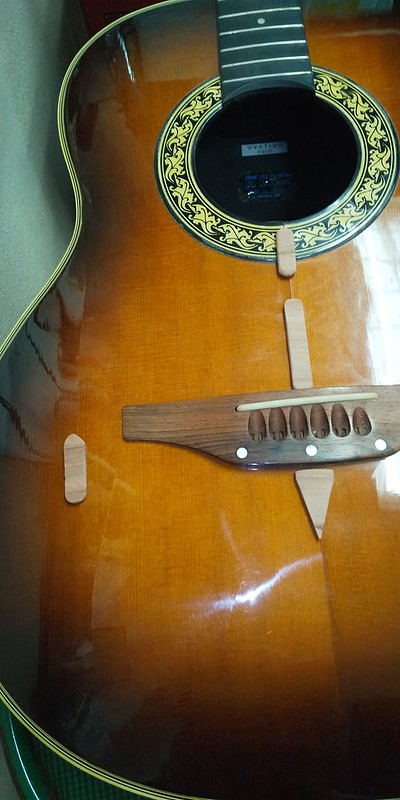
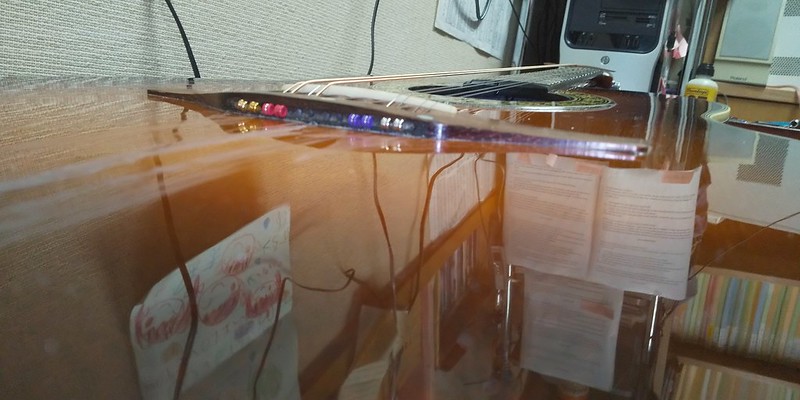
With Detlef and TwoWheel going on and on about their twelve strings, I just couldn't pass this up and it's a 12-Fretter to boot! These never come up for sale over here, but I made an offer for roughly $250 bucks (which I never thought would cut it), but here it is. This 1115 has some issues. There are two top cracks that are so common on these older Os (pretty long and go through the wood) that need to be cleated.
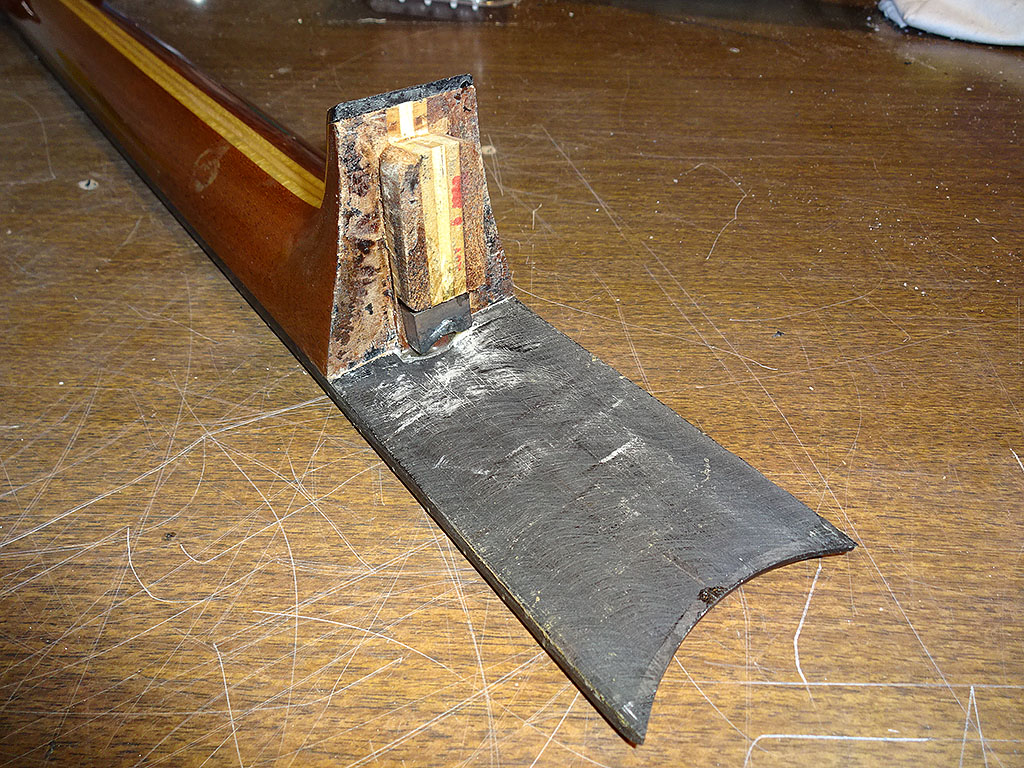
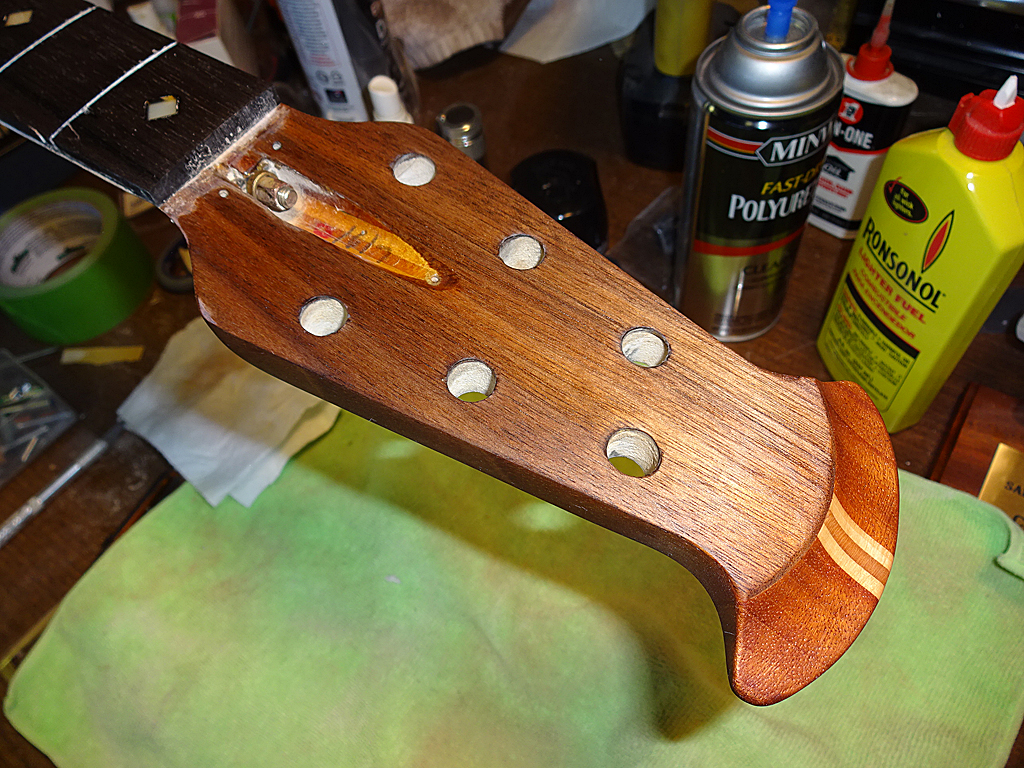
The bigger issue is going to be the headstock truss rod adjustment nut. Instead of the 1/4 inch nut stripping the threads on the rod, this nut kept screwing in until the wood area under the string-nut collapsed.
The collapse wood created a steep angle and as the adjustment nut was tightened, the truss rod end began to bend upward. Inside the headstock end of the neck, the bent truss rod began to exert force on the neck behind the string-nut weakening the headstock area of the neck - fortunately the headstock is still holding together.
So, the top will need to be humidified and cleated like seesquare did in his Pandora II thread. The "Vintage 12 String / Truss Rod is Not Hex" thread also showed me what a healthy 1115 truss rod adjustment area looked like enabling me to identify what was happening with this guitar's rod. Need to find a way to bend the truss rod back to the correct angle and rebuild the truss rod adjustment cavity as well as reinforce the underside of the string-nut area of the neck. Don't know how far I'll get, but it's not going anywhere if I don't start so... here we go! Wish me luck.
Posted 2023-02-23 9:17 AM (#558066 - in reply to #558060) Subject: Re: '74 1115-1 Pacemaker Restoration
Joined: November 2002 Posts: 3603
Location: Pacific Northwest Inland Empire
Lemme be the 1st. Good luck! You have some challenges there, but not insurmountable. You may have to make some compromises, though. Like, it may never be safe to maintain "concert pitch", due to the evidenced condition, at present. As you say, just jump into the breach........
Posted 2023-02-23 10:12 PM (#558070 - in reply to #558060) Subject: RE: '74 1115-1 Pacemaker Restoration
Joined: October 2012 Posts: 1018
Location: Yokohama, Japan
Thanks for the encouragement seesquare and MWoody - I really missed hanging out here!
I get what you mean about not being able to tune to concert pitch. I'll try not get my expectations up too high!
So moving forward a bit. Per the Ovation Tribute website's "Ovation Bracing" page here, this guitar has the "Ovation Fan" bracing.
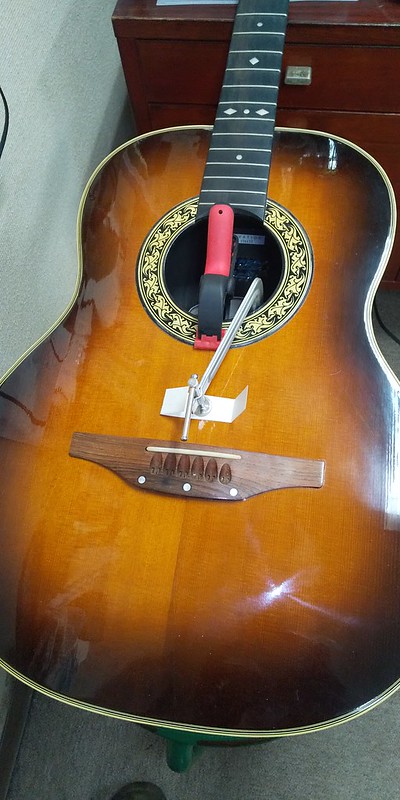
At some point, loose braces were glued down using CA glue, and they are firmly in place. So no need to glue down any loose braces here. The center crack goes down to the middle V area so one of the cleats will need to be shaped to fill the V up to the bridge plate. First, I'll need to humidify the top to close-up the cracks.
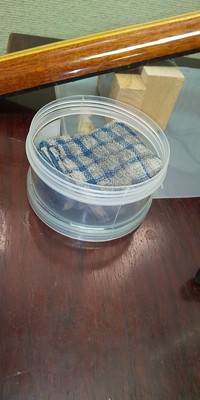
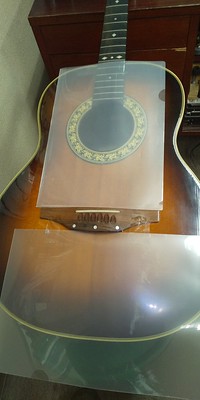
The entire guitar is terribly dry including the ebony fretboard which is slightly cracked near the sound hole. Gonna use a small round plastic tray with a folded cloth in it (to keep the water from spilling inside the bowl), cover the cracks with plastic sheets, and cover the entire guitar with bubble wrap (to keep the humidity contained) and leave her over night. The water is heated and cooled back down to 75 degrees C (about 170F) and poured into the tray over the towel then placed in the sound hole and positioned under the severest cracked area. If there is too much water or the water is too hot, condensation could occur under the sound board causing water build up and over expansion which in turn will strain the braces or the kerfing so starting very conservatively.
Okay... that's about it for now. Gonna start cutting and carving up the cleats. Planning on making the cleats out of some Pacific Redwood scraps from one of my nylon string re-top projects from yesteryear. Haven't had this much fun in a long long time! Thanks for letting me share on the BFLG!
Posted 2023-02-24 12:31 AM (#558071 - in reply to #558060) Subject: Re: '74 1115-1 Pacemaker Restoration
Joined: February 2016 Posts: 1770
Location: When??
Hi, Ken. Good to see you back on the boards! I was just recently thinking about you and your family, and hope that all is stable and well. It looks like you have a classic trifecta happening on this guitar; though I shall refrain from contemplating good luck as we here never shed a worry that your veteran knowledge and competent skills cannot overtake the challenge to arrive at the most thrilling of victory with no luck required (but good luck anyway.) Looking forward to watching the progress!
Posted 2023-02-24 12:07 PM (#558074 - in reply to #558060) Subject: RE: '74 1115-1 Pacemaker Restoration
Joined: May 2011 Posts: 751
Location: Muenster/Germany
I had a similar tr problem with a 12 string, the screw was too tight and the wood was collapsed behind the saddle. First I removed the screw, and fixed the broken wood. After that I replaced a part of the neck wood with solid ebony, added a metal plate and a metal washer and thus was able to work with the tr. again.
Maybe you could try a similar solution, but I´m afraid you have to go maybe until under the fretboard.
Posted 2023-02-24 12:15 PM (#558075 - in reply to #558060) Subject: Re: '74 1115-1 Pacemaker Restoration
Joined: May 2011 Posts: 751
Location: Muenster/Germany
...and...I have 10 12string guitars but 6 of them tuned 1/2 step down and the other 4 1 full step down. Do not tune a 12 string to concert pitch, will not sound better, the high G string will be prone to break all the time and it`s easier to play anyway. Listen to me, I know what I´m doing.
Posted 2023-02-24 8:37 PM (#558079 - in reply to #558060) Subject: RE: '74 1115-1 Pacemaker Restoration
Joined: October 2012 Posts: 1018
Location: Yokohama, Japan
@LOF - Thanks Al! It's great to be back. Thanks for your thoughts and your encouragement!
@Detlef - the 12-string Maestro has spoken! Thanks for the great info and pics! Did you just CA glue the carbon fiber into place? Definitely will need to carve the wood up to just about a mm under the fretboard. Thinking that's going to be the most difficult part of this project. Planning on using some birch, but I do have some carbon fiber blanks too. Did you just super glue the carbon fiber into position? I was planning on using a bit of left over hysol for adhesion. Thanks for sharing! It's good to know this battle can be won!
By the way, this is my Fxxxxr F330. It's an MIJ all laminate 12-string. Sounded amazing and was my main guitar for about 10 years. Practically used it every week; so, I kept it at concert pitch. One day it refused to stay in-tune as I was playing, and after a few frustrating attempts to keep it in-tune, I realized the neck was beginning to come apart from the body. Removed the strings, and the neck just popped right out of the dove joint. Pretty sure hide glue was used and the glue joint just gave out. It's been disassembled since and is awaiting a new spruce or cedar top. Don't imagine this would ever happen to an Adamas, but anything less...I don't know...
Anyway...hope to finish the easier part of the project today, and get to the truss rod cavity thereafter. Thanks for all the great advice everybody! Be back in a bit!
Posted 2023-02-25 5:53 PM (#558080 - in reply to #558060) Subject: RE: '74 1115-1 Pacemaker Restoration
Joined: October 2012 Posts: 1018
Location: Yokohama, Japan
Completed the hydration process by soaking the towel in the round hydration tray twice. The hydration process went very well. Both top cracks are completely back to proper dimensions so all I have to do is glue the cleats in place. Shaped some old low grade Pacific Redwood scraps into cleats. Redwood is very flexible with the grain, but very stiff perpendicular to the grain, and is very very light. They'll provide good support without overly compromising the resonance of the sound board. Here's my cleating plan.
Did a couple of dry runs, and decided to just use Titebond to glue in the cleats.
Worked one cleat at a time by applying the adhesive into the crack from inside the bowl and lightly pushed the cracked area from the outside over and over to let the glue work a little bit into the crack. The straight center cleats were clamped lightly. The V cleat fit snuggly so I just flipped the guitar bowl-side up and put a weight on it while the glue dried. Magnets were used to apply the cleat on the side crack.
Dan always warns against "creeping" when using Titebond, and that's exactly what happened with the side cleat that I clamped with magnets. By the time the glue cured the cleat moved ever so slightly requiring an additional cleat to be applied to the area. No big deal, but I think I could have prevented the creeping by just applying some masking tape over the magnet inside the bowl, doh!
In any case, I'll finish the top by applying CA glue to the cracks in the finish and the cracked rosette, scrape and sand the CA glue and re-buff the entire top. But first, I'll need to start work on the truss rod adjustment area of the neck. Fortunately, the neck angle looks good meaning that I won't have to venture into "bowl bending" territory!
Unfortunately, the nut is stuck in there really tight. The usual truss rod wrench is not working, and pliers aren't cutting it either. Need to think about this a bit more before I plunge forward! That must mean it's a good time to stop. Be back in a bit!
Posted 2023-02-25 7:21 PM (#558081 - in reply to #558080) Subject: Re: '74 1115-1 Pacemaker Restoration
Joined: November 2002 Posts: 3603
Location: Pacific Northwest Inland Empire
Significant progress! Doesn't Stew-Mac make a gizmo for cutting around the truss nut? Maybe, it's only for recutting the shoulder after the nut is removed. Dunno. Good advice & note to self to proceed in managable increments. Soldier on!
Posted 2023-02-26 10:43 AM (#558083 - in reply to #558060) Subject: RE: '74 1115-1 Pacemaker Restoration
Joined: October 2012 Posts: 1018
Location: Yokohama, Japan
Thanks seesquare and OMA! Yes, Stewmac does make a tool to recut the truss rod cavity; but like you say, it is used after the nut is removed. Really useful tool that's used when the truss rod end either breaks or the threads become stripped. The tool cuts a deeper truss rod cavity, and another tool is used to re-thread the end of the stripped or broken truss rod. The tool makes broken truss rods much easier to repair, but a poor cut of the truss rod cavity weakens that whole area of the neck significantly.
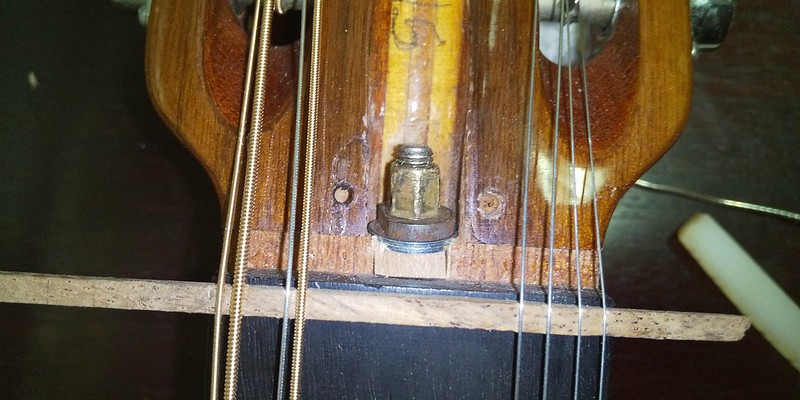
Meanwhile, wanted to get in as much work as I can while I can so decided to get back to removing the truss rod adjustment nut. Man am I glad that O used a 1/4" hex nut back in the day. Quarter inch is the international standard for hex sockets even in Japan. After rummaging through some of my old tools I found this manual screw driver socket wrench!
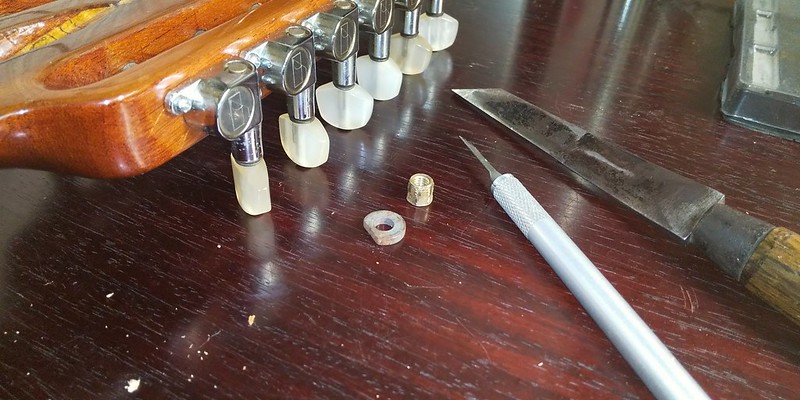
Cool - perfect fit! After chiseling around the nut and embedded TR washer a bit, got a perfect fit and the nut was off. Got my super thin cutting knife to pry the washer loose and voila!
Grabbed a blank piece of wood to see if I can get the truss rod bent back to the proper position - don't push too hard - easy does it, easy does it - and voila!
Cleaned up the mushed-up maple a bit...
Hmmm...
Now how am I going to rebuild this area? Definitely gonna need more time to think...
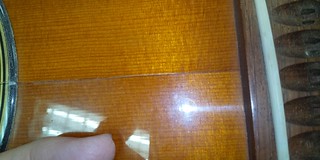
Better switch gears and fill the top finish cracks with CA glue! Used some high viscosity CA and applied the glue directly onto the finish of the sound board. Gently pushing and releasing the sound board under the cracks to get the glue to work into the finish. The glue seeps into the cracked finish and leaves a bit of a valley, so I keep filling the gaps with glue until all the valleys become mounds. Once the glue is dry, the mounds of CA glue will be scraped level to the finish with an exacto knife blade. The entire top will be sanded and buffed or re-shot with a thin coat of clear poly finish and buffed. The cracks won't be invisible, but the process will discourage the existing finish cracks from extending further.
The last thing before "calling it a day" was applying lemon oil to the bone dry ebony fingerboard. Now, if the truss rod cavity can be fixed properly, this is going to be a beautiful instrument! Better sleep-on-it for now...
Posted 2023-02-26 6:48 PM (#558084 - in reply to #558060) Subject: Re: '74 1115-1 Pacemaker Restoration
Joined: February 2016 Posts: 1770
Location: When??
Two questions for you Master Ken.
When hydrating with the cup of 170 F water and cloth you mentioned to begin very conservatively, so did you do that procedure only once to achieve full desired hydration, or have to repeat it?
And on the redwood cleats, I cannot see the grain of the cleats in the photos, so I'm not sure if you meant that you should place the grain of the cleats perpendicular to the crack for a tight hold, or parallel with the crack to allow micro flex in tandem with any possible future expansion/contraction of the rest of the top wood.
Posted 2023-02-26 10:29 PM (#558085 - in reply to #558060) Subject: RE: '74 1115-1 Pacemaker Restoration
Joined: October 2012 Posts: 1018
Location: Yokohama, Japan
Hey Al! Thanks for the interest. Will send an update on my family by e-mail soon...
With regard to the hydration: I had to repeat the process just once. The towel was wetted with warm water and wrung out and placed into the tray. By estimation, I poured about 50ml of hot water in the tray each time over the wet but wrung out towel. The 2nd 50ml went in when the standing water in the tray was gone. At that point, the cracks were still not fully healed.
With regard to the Redwood cleats: yeah, grain perpendicular to the cracks. You might remember the Redwood top I used for my heirloom rebuild. I used left over scraps from this top...
This piece of lumber is "low" grade because the grains are not tight like the more sought after stuff that you'll see on Patch's beautiful Redwood O's (but I really love the look and color match with this nylon stringer's maple b/s and neck). That's probably why the grains are not visible to you, but they are there. Also, I wanted cleats that were a bit thicker to withstand the tendency for the top to return to its pre-cleated condition. When I sent my friends Nakao NNS778-9 Elite with a cracked top to the Mother Ship back in 2015, Mr. Budny and gang used some pretty hefty square shaped spruce cleats to make the repair. Thought I'd better not veer to far from what they did. Sorry for rambling on my friend!
Posted 2023-02-27 11:43 AM (#558086 - in reply to #558060) Subject: Re: '74 1115-1 Pacemaker Restoration
Joined: May 2011 Posts: 751
Location: Muenster/Germany
Nice project again, I can feel with you every step. Too bad how some people abuse trussrods, instead of choosing lighter strings or lower tuning.
Rebuild the nut area....fortunately the screw is long enough. I used ebony (and tightbond), because I believe wood on wood fits best. You should definetely reinforce this point, but you have easy access, that´s good. And I think you do not need to go further than the fretboard level. I probably would remove the area ca. 1cm left and right from the screw and replace it with a piece of any hardwood and then use the old washer. A little grease on the screw and this should work. That sounds easy, eh?, but when I look at the pictures I´m glad that I´m not at the workbench this time.
Posted 2023-02-28 12:27 PM (#558095 - in reply to #558060) Subject: RE: '74 1115-1 Pacemaker Restoration
Joined: October 2012 Posts: 1018
Location: Yokohama, Japan
I didn't realize 12-string tuning was such a controversial issue, DetlefMichel! Lol!
Thanks FlySig! Been itching to get back!
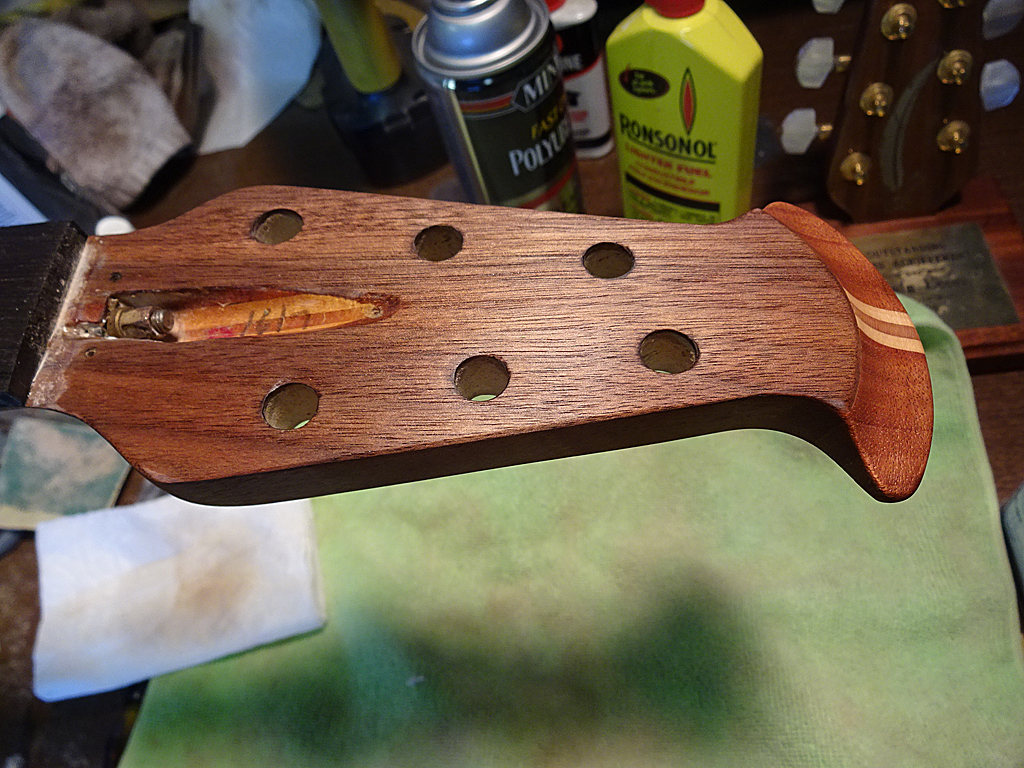
Was able to make a little progress on the easier top cracks. The CA glue dried up nicely so I went ahead and scraped the mounds of CA flat. To minimize the possibility of gouging the finish, I use a small piece of an exacto knife and push lightly with the middle of the blade into a convex shape.
The cracks in the finish will still be visible after polishing the finish back to luster, but the cracks have been stabilized, and the top is finished! Now, how am I going to tackle the truss rod adjustment area?
After some thought, decided I needed to make a mock-up truss-rod adjustment cleat out of Birch and test if the truss rod is actually working! Would be tragic to fix everything only to find the rod doesn't work at all! The collapsed area behind the truss rod nut is angled to about 20 degrees to the fret board. The truss rod should be about 10 degrees so, my mock up needs to compensate accordingly.
Really like working with Birch, but the final filler is going to be made of African Black Wood which is considerably harder than Ebony.
I'll drill a hole in the mock up tomorrow, string up the guitar with six strings only, apply some washers and tighten the truss rod nut to see if the relief is eliminated. If it's all on the up-and-up, I'll start working on repairing the truss rod adjustment area. African Black Wood is super hard and brittle so it'll take more time than the Birch mock-up, but just making progress through the project feels good!
Posted 2023-02-28 7:09 PM (#558102 - in reply to #558060) Subject: Re: '74 1115-1 Pacemaker Restoration
Joined: February 2014 Posts: 699
Location: moline,illinois
Hi Arumako good to see you back on the forum and working on guitars again,This is for a slightly different kind of repair but have you heard of taping to sides of a razor blade so you can scrape glue without gouging the top,heres a vid where he did it on a drop fill. https://www.youtube.com/watch?v=rTVScFJoe24
WRT to 12 string tuning the old school technique is to tune a 1/2 to a full step down to ease the tension on the top and make it easier to sing,you can always capo up if you want standard tuning,I tune my Adamas to concert pitch because they can handle it but older guitars benifit from tuning down,less like likely to belly and develope high action...Love Your Work So Far!!!
Posted 2023-03-01 11:46 AM (#558103 - in reply to #558060) Subject: RE: '74 1115-1 Pacemaker Restoration
Joined: October 2012 Posts: 1018
Location: Yokohama, Japan
Thanks TPA and Twowheeldrummer. So glad to be working on guitars again! Getting to share my progress here is such a privilege! Thanks for commenting!
@Twowheel - Yes, I've seen that video and use Dan Erlewine's techniques a lot. He's an enriching resource for sure. For this particular project, the cracks are fairly extensive so I'm planning on sanding down and buffing the entire top. I'm also hoping to thin down the poly finish as they are very thick. Might need to airbrush a thin coat or three of water-based poly before buffing the entire top. Since I'll be rebuffing the whole top a few (or even a lot of) scratches from the exacto knife is not going to be a problem. For what it's worth, I do shorten the exacto blade to minimize any gouging damage that my enthusiastic scrapping might cause.
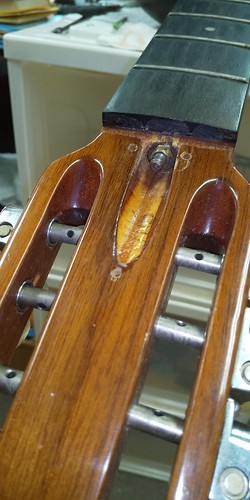
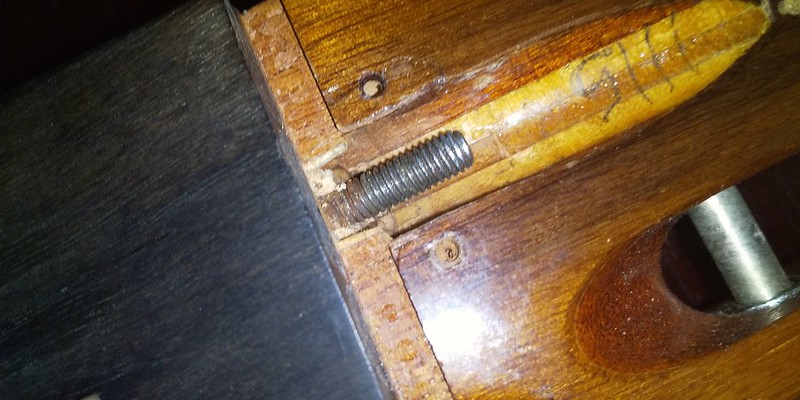
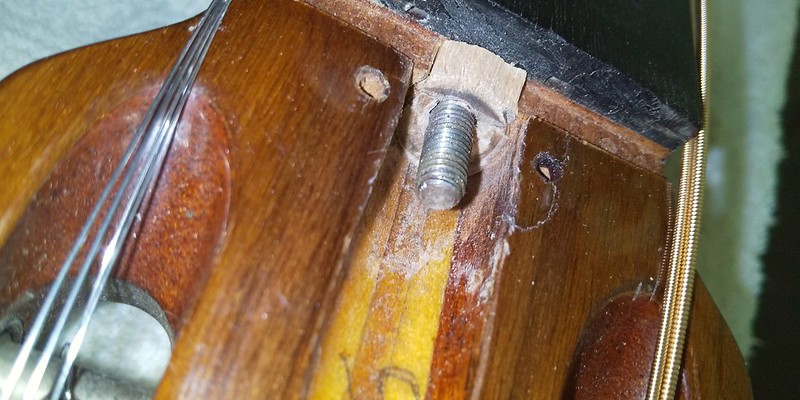
Continued to make a bit of progress today with the truss rod. A 5mm hole was drilled into my Birch mock-up to make room for the end of the truss rod.
In order to ensure a good tight fit I folded some 120 grit sand paper into the truss rod nut slot, and used that as a guide to sand the mock-up into ideal shape.
Also cut around the truss rod cavity under where the nut goes.
Everything fit nicely. The truss rod angle is good so it was time to add the washer and nut. Added two additional washers to ensure I had plenty of threads to tighten the nut. Let the truss rod test begin!
Since the Birch mock-up is in the way of the D and G strings, I strung up the Ee, Aa, bb, and ee strings. These are EJ39 medium gauge strings so they should provide plenty of tension. A thin piece of Koa was laid on the edge of the fret board where a zero fret might go. Notice that the neck has a lot of relief because the tross rod nut hasn't been tightened.
Tightened the strings just a bit (but not tuned), and began to tighten the truss rod nut little by little. Once the truss rod nut was in a fairly tight and standard depth I verified that the relief in the neck was gone. With the neck flat the 8 strings were tuned to concert pitch. The guitar's top was solid and resonated well. The heel of the head stock was in good shape, but the neck bow was back. At this point, the truss rod nut was turned a quarter turn at a time. After each turn, I verified the top and bridges structural integrity, the headstock heel's integrity and the extent of neck bow. At about the sixth quarter turn, the truss rod end started to bend upward this applied pressure to the headstock heel. From here, I had to apply some pressure to the truss rod end to bend it back down after each quarter turn. When the truss rod was bent down, the headstock heel's pressure was relieved and I could make another quarter turn. Wondering if this means the truss rod is bent or poorly installed - not sure, and I sure don't want to take the fret board off to find out!
This is how the neck looked after 11 quarter turns. Interestingly, the nut would have gone further.
For this test the string height is irrelevant as I'm using a koa insert as a temporary nut. The important thing is that the neck is straight from both the bass and treble side of the guitar - which means the truss rod is working! The headstock heel is also holding up although for all practical purposes it will have to be reinforced. Now, check out how far the nut screwed into the truss rod.
This is when I noticed the top of my Birch mock-up was gone! It cracked off and flew silently into the abyss. Notice how the Birch mock-up has been compressed. That is some serious pull force this truss rod is generating! My F330 had super low action and was the easiest 12-string to play, but the truss rod wasn't compressing the wood like this! Birch is very similar to maple in hardness and the 5-ply neck used on this O has maple right where the truss rod's nut applies force. But that's a reality for all Os that have 5-ply necks. So what gives? So I loosened the strings and examined my mock-up...
The birch mock-up insert has been completely crushed. Here's how it looked after I removed it from the truss rod cavity.
I've used Birch for some pretty high-load applications in the past, but I've never seen it obliterated like this! Weird! So the good news is the truss rod is working and the headstock heel is holding up...the bad news is; well, there is no real bad news, but I'm thinking African Black Wood may not cut it. May have to resort to carbon fiber??? Whoa, gonna need more time to think!
Posted 2023-03-02 7:06 AM (#558105 - in reply to #558104) Subject: Re: '74 1115-1 Pacemaker Restoration
Joined: November 2002 Posts: 3603
Location: Pacific Northwest Inland Empire
I can personally attest to that. Find a practitioner with the right "touch & technique" and they can achieve amazing results. The majority of the remedy is knowing the cause.
Posted 2023-03-02 12:33 PM (#558106 - in reply to #558104) Subject: Re: '74 1115-1 Pacemaker Restoration
Joined: October 2012 Posts: 1018
Location: Yokohama, Japan
Love O Fair - 2023-03-01 11:44 AM
Keep this up long enough and they will eventually give you a license to be a chiropractor.
Lol! You know, "Guitar Chiropractor" sounds better than "Guitar Hack"!
seesquare - 2023-03-01 9:06 PM
I can personally attest to that. Find a practitioner with the right "touch & technique" and they can achieve amazing results. The majority of the remedy is knowing the cause.
I definitely don't know what is causing the high pressure truss rod adjustment on this 1115-1, but I think I may be close to the remedy! Lol!
Didn't have much time today, but a little progress was made...
Took my chisel and thin exacto knife and cleaned around the truss rod. Took Dellef's advice and cleared a relatively straight and flat area upto the fret board.
It was a bit difficult to get at the area behind the fret board, but patience definitely paid off here! Took my mini-file and 120 grit sandpaper and we're good to go!
Now, I just need to decide what material to use as an insert. Carbon fiber, aluminum, Ebony, African Black Wood or something else?
Posted 2023-03-02 4:10 PM (#558107 - in reply to #558106) Subject: Re: '74 1115-1 Pacemaker Restoration
Joined: November 2002 Posts: 3603
Location: Pacific Northwest Inland Empire
Unobtainium. Jus' kiddin'. How's about a brass insert? Softer than the steel washer & nut, but harder & less apt to crush or split than wood fiber. You can probably find a brass bushing with the correct I.D & O.D., then cut it to length.
Posted 2023-03-02 7:34 PM (#558108 - in reply to #558060) Subject: Re: '74 1115-1 Pacemaker Restoration
Joined: February 2016 Posts: 1770
Location: When??
Since the rod-bend is being so uncooperative, I tend to agree with your thoughts on aluminum or with Seesquare on the brass option after seeing the result of your wood insert splintering (though as long as there is zero possibility of a metal insert rising up against the end tip or underside of the fretboard).
Heck.. maybe you could get really inquisitive and take it to an aforesaid friendly chiropractor or applicable elsewhere for an x-ray to see just how far down the neck the rod is actually bending.
Posted 2023-03-03 1:18 PM (#558110 - in reply to #558106) Subject: Re: '74 1115-1 Pacemaker Restoration
Joined: June 2012 Posts: 2303
Location: Lake Forest, CA
arumako - 2023-03-02 10:33 AM
Now, I just need to decide what material to use as an insert. Carbon fiber, aluminum, Ebony, African Black Wood or something else?
Quite a project you've got going, Ken.
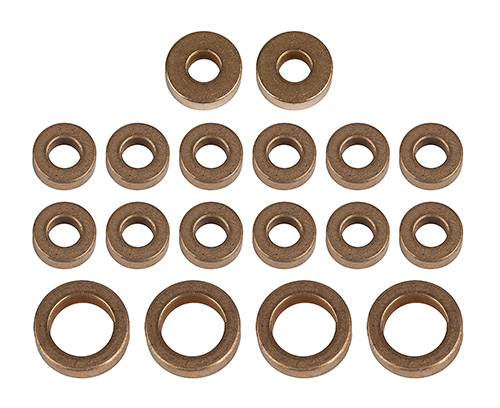
Personally, I would use a bronze bushing.
I've used bronze wheel bushings off R/C cars for bottomed-out TR nuts that needed spacing.
The nice thing about R/C car bushings is that they have a small-ish outer diameter and a large-ish inner diameter. They're also thicker than a washer so you'd only need one.
This allows them to fit over the TR and stay inside the TR cavity in the head stock.
Here's a couple of photos of a sintered bronze bushing I used on a 1617 I re-topped. These particular bushings came from Team Associated and were for their RC10 car. I think these have been discontinued.
I looked on the Team Associated web site and found this bushing set for another car. (Enduro SE)
They don't have any specs, so you'd have to order a set to confirm whether one in the set fits your application.
They also have another set of bushings for their Reflex 14R.
You could also call around to your local hobby stores to see if they have anything that might fit.
Yet another possibility would be R/C airplane wheel collars and for the same reason -- large hole, small outer diameter and thicker than a washer. They are usually nickel-plated brass or stainless steel.
Posted 2023-03-03 4:36 PM (#558113 - in reply to #558060) Subject: Re: '74 1115-1 Pacemaker Restoration
Joined: December 2004 Posts: 556
Location: Denmark
If the rod has been bent out of shape a few times it will loose strength. It is becoming interesting to see what is below the fretboard, isn't it?
Edit: Looking at this indicates what might be in there. I would probably use a brass shim wide enough to rest against wood at the sides and thick enough to transfer the force. A bronze shim as proposed by Dan would give a good bearing. Give the thread some molykote grease to reduce friction and thereby the risk of breaking the truss rod when tightening the nut.
Posted 2023-03-03 7:27 PM (#558114 - in reply to #558113) Subject: Re: '74 1115-1 Pacemaker Restoration
Joined: June 2012 Posts: 2303
Location: Lake Forest, CA
tpa - 2023-03-03 2:36 PM
A bronze shim as proposed by Dan would give a good bearing. Give the thread some molykote grease to reduce friction and thereby the risk of breaking the truss rod when tightening the nut.
FWIW, most sintered bronze bushings are self-lubricating. They're known in the industry as "Oilite."
During the manufacturing process the resulting bearing has microscopic pores and they're vacuum-impregnated with SAE 30W oil. Total volume of oil in the bushing is in the neighborhood of 20%.
Because of the oil being present and the porous surface, it's recommended that they not be machined, filed, ground or reamed as this will clog the pores unless an extremely sharp tungsten carbide bit is used.
Posted 2023-03-04 10:33 PM (#558120 - in reply to #558113) Subject: Re: '74 1115-1 Pacemaker Restoration
Joined: October 2012 Posts: 1018
Location: Yokohama, Japan
DanSavage - 2023-03-03 3:18 AM
Here's a couple of photos of a sintered bronze bushing I used on a 1617 I re-topped.
Dang! Thanks Dan! I shoulda known you've "been there, done that." Really appreciate the pics and encouragement.
tpa - 2023-03-03 6:36 AM
If the rod has been bent out of shape a few times it will loose strength.
Note taken. That's going to be a huge concern moving forward. Don't think more truss rod bending is necessary. Hoping the minimal bending I did doesn't compromise the rod's integrity too much!
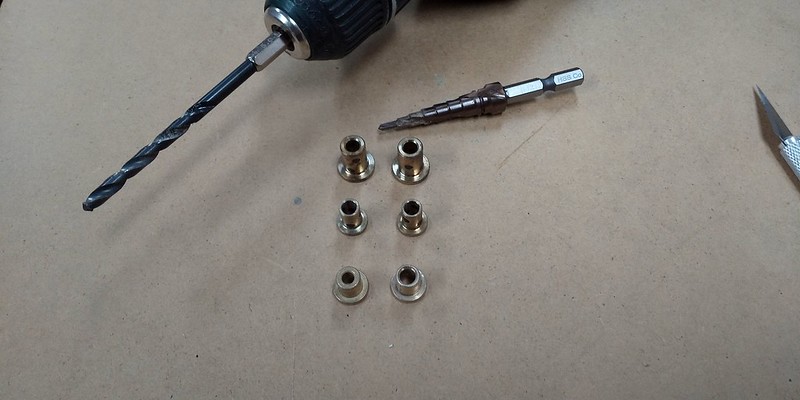
Thanks for chiming in everybody. The BFLG continues to be such a valuable resource - Arigatou. After reading your suggestions, I spent a day just looking for brass, bronze, and aluminum fittings that might work. The hobby shops in Japan have a bunch of Aluminum stuff, but not much bronze or brass. So I ordered a few parts off the net to see if I might find some Unobtanium!
The cut around the truss rod is 1/2 in. (approx. 12mm) in diameter. Since it's been cut flush up to the finger board, my thinking is a 1/2 inch or 12mm anchor would really help spread the load of the truss rod nut over a larger area.
1). Aluminum shaft coupler:
12mm OD, 5mm/6mm ID, and 20mm L: This will fill the entire truss rod cavity and will need to be hack sawed and ground into shape. Not so sure about adhesion of wood and aluminum.
2). Bronze flange bearing (oil impregnated):
11mm flange OD, 8mm shaft OD, 4mm bore (will need to ream to 5mm). I think this is the stuff Dan was talking about. Thinking a flange would provide better overall stability than a sleeve. Also, the nice thing about a flange bearing is that, I can cut a 1/2 in. OD Ebony dowel, drill a 8mm hole and cover the bearing shaft with some ebony or other wood. This way the flange bearing will be encased in Ebony and will glue into the truss rod cavity more securely. Does that make sense? My only concern was, since it is an oil impregnated bearing, the ebony may weaken over time and crack.
3). Brass flange sleeve bearing (oil-less):
11mm flange OD, 7mm shaft OD, 5mm bore. Same logic as the bronze flange bearing, but this one is not oil impregnated. Might be better than the bronze oil impregnated bearing if I encase the bearing with a wood sleeve.
Ordered all three of the above to test, but thinking one of these will prove to be the Unobtanium! Any thoughts? Will need to wait a week or so for all three to arrive. Meanwhile, I guess I should get started on reinforcing the neck/headstock area. I found out they call this area the "volute" while researching for my reinforcement! Thinkin' it's a good sign that I'm still able to learn...Lol?
Posted 2023-03-10 10:56 PM (#558130 - in reply to #558060) Subject: RE: '74 1115-1 Pacemaker Restoration
Joined: October 2012 Posts: 1018
Location: Yokohama, Japan
Hey OFC/BFLG! Back with some heart break. Yup, in true hack form (just as TPA warned), I broke the truss rod on this beautiful 1115-1. Bummer!
But in hopes that my mistake is not repeated, thought it would be good to leave a record of how I went about attempting the fix... prepare your heart for some guitar carnage ...
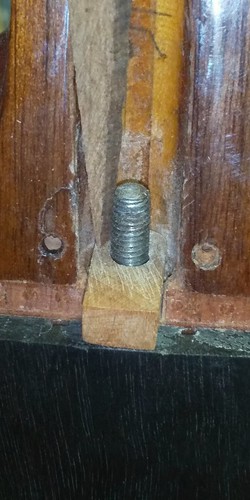
Since this truss-rod adjustment exerted unusually high pressure (at least in my estimation), I figured the cavity receiving the washer and nut needed to be as flat as possible so some final prep was performed using a 12 mm dowel with a 5mm bore. Some 60 grit sand paper was double-stick taped to the end.
Just insert the rod and rotate...
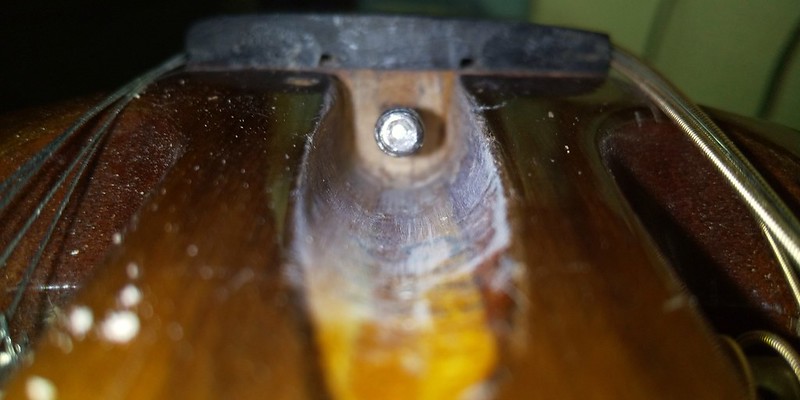
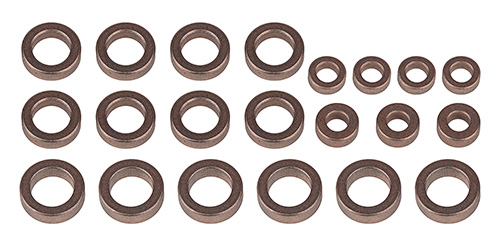
Once flatness was satisfactorily achieved needed to select the best flange bearing for the job. The aluminum rod extension cylinder hasn't arrived yet, but these fixtures would be better suited for this project anyway. Bored the bronze flange bearing's (bottom) ID needed from 4mm (L) to 5mm (R). The brass flange bearings (middle) have the right ID, but is a bit long. The larger flange bearing (top) would need to be machined further for a good fit (top) so gonna go with the bronze flange bearing.
Performed some dry runs. Again, recalling to mind the extensive force applied to the truss rod cavity, I decided to add a hard paper plumbing washer (the blue thing) between the wood and the bronze flange bearing in hopes that some of the pressure would be absorbed by the paper washer and spare any wood deformation that might occur (in retrospect, I think this worked very well)...
One final thing was to make sure the string nut fit over the "flange" of the flange bearing. Was originally planning on hacksawing the flange, but decided instead to file the underside of the string nut. Always thought these nuts were bone, but this one was plastic and easy to form.
Then it was time to string her up. Figured this guitar will never wear anything more than extra light gauge strings. DAd's EJ41s are PB and suited to the task. Tightened the truss rod nut to make the neck dead straight, and installed the strings from outside to in.
Once strung, the truss rod nut was tightened as the guitar was tuned to concert pitch. To my surprise the headstock/neck joint was very stable thanks to the truss rod being pulled straight and true. The nut did not seem to be too tight at all and felt easy to turn. Performed a quick set-up and everything was almost perfect. At this point, I was able to verfiy that this guitar sounds magnificent (which bodes well for the future of this guitar)! But then, I thought, "Just one quarter-turn more..." and the heart sinking, "SNAP!" (Warning! guitar carnage ahead...)
After some time, I was able to compose myself and begin the evaluation process (all the time thanking God that this wasn't a friend's guitar!). First thing that jumped out at me was the bronze oil impregnated flange bearing was sweating oil. Took the broken off assembly apart and check this out...
The left is a new bronze flange bearing. On the right is the one I used for this project. Didn't even notice how much this thing was compressing, but I've never seen a truss rod adjustment that could do this to bronze - attesting to my true "hack" status because that just means I was obliviously applying way too much pressure (hence sweating oil)... on the other hand, the neck was still moving as the truss rod was tightened; and IMHO it would have straightened out even more had the truss rod not snapped...
But the glimpse of this guitar's voice I heard but for a brief moment is enough to keep this guitar in my fold until it is fixed. Thinking there's one more thing I can try with the exposed threads on the truss rod by using one of these female barrel nuts and a sleeve.
With the right length, the barrel nut can thread into the truss rod and pull it while a flanged sleeve can provide leverage, but then this truss rod pulls with some serious force... might just need to install a new truss rod. What to do? What to do?
In any case, here's to hoping that this information might prevent some future BFLG guitar carnage. Thanks for letting me share my journey. Sorry that this one is so anti-climactic, but it will be back - fingers crossed...
Posted 2023-03-11 9:16 AM (#558134 - in reply to #558132) Subject: Re: '74 1115-1 Pacemaker Restoration
Joined: June 2012 Posts: 2303
Location: Lake Forest, CA
tpa - 2023-03-11 6:27 AM
How is the truss rod anchored in the far end? Can the neck be separated from the body? What I think is to pull the rod out and replace it.
The TR has a metal slug welded on the end of the neck heel.
With a glued neck and a cloth bowl like this guitar has, I would not recommend attempting to remove the neck. The risk of separating the neck block from the bowl is too great.
The only way to remove the TR is to first remove the fretboard from the neck, then dig the TR out of the slot that's milled into the neck.
Posted 2023-03-11 10:59 PM (#558139 - in reply to #558132) Subject: Re: '74 1115-1 Pacemaker Restoration
Joined: October 2012 Posts: 1018
Location: Yokohama, Japan
Thanks Seesquare, and thanks for the encouragement everybody! Will be looking for the right fasteners to see if my barrel nut/sleeve idea is do-able over the next couple o-days. Meanwhile...
tpa - 2023-03-10 10:27 PM
How is the truss rod anchored in the far end? ... What I think is to pull the rod out and replace it.
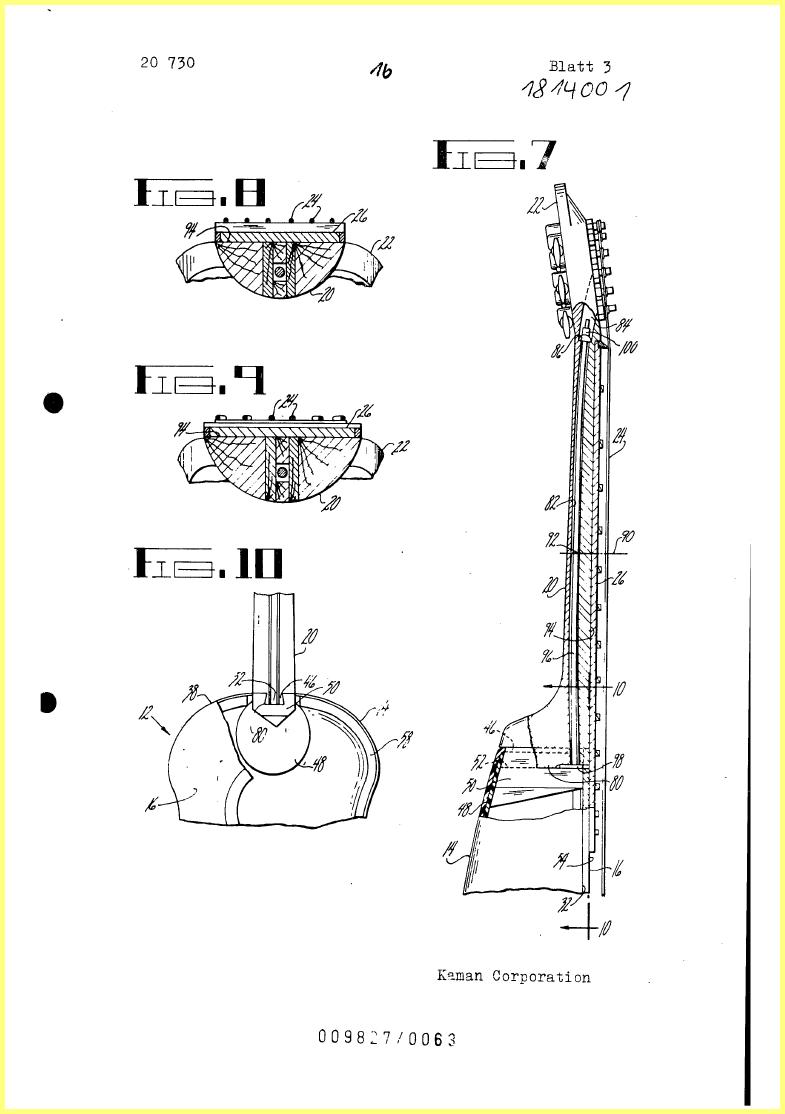
My thoughts exactly TPA. As Dan says, removing the neck is probably not the best option especially with my current skillset. But this drawing that you shared sheds some light on how the rod is installed. The triangulated neck block suggests an older (maybe 60s?) design. My 1115 has a standard neck block (70s on). Both probably use the same truss-rod design in a different neck block. Additional clarity is provided by Dan's pic (Thanks Dan!). Maybe the rod can be removed out of the neck without removing the neck or the fret board?
@Dan - So assuming my barrel nut + sleeve idea doesn't work, do you think it's possible to cut through the neck block to the truss rod end through the sound hole and pull the rod out through the sound hole? I'd rather not remove the fret board to get to the rod if I don't have too, and these older rods require a concave groove to be cut in the neck with a symetrically concave wood cover to ensure the rod stays curved inside the neck. A cut in the middle of the neck block from inside the sound hole might provide enough access to pull the rod out (there's enough rod sticking out of the headstock to lightly pound it out too), and the hole created in the neck block can be filled (it might not even need to be filled). Seems over all structural integrity won't be compromised? In either case, some welding/threading will be necessary to make an appropriate replacement truss rod (I'm sure nobody sells anything like this anymore!). Your expert advice/thoughts would be highly appreciated - please!
Posted 2023-03-12 11:02 AM (#558142 - in reply to #558141) Subject: RE: '74 1115-1 Pacemaker Restoration
Joined: October 2012 Posts: 1018
Location: Yokohama, Japan
tpa - 2023-03-12 12:33 AM
As in opening here:
by removing wood ?
Yeah TPA, exactly... Crazy, huh? But if I can get my mini craft tool and cut an opening, I should be able to pound the current rod out by directing it through the sound hole. Welding a similar piece to an iron bar of same dimensions and threading the end will be pretty easy (the threads and nut will all be metric though). I've removed and replaced fret boards in the past, and I get the feeling that cutting a rectangular hole in the neck block might be considerably easier? Of course, my assessment might be way way off...
Posted 2023-03-12 11:05 AM (#558143 - in reply to #558060) Subject: Re: '74 1115-1 Pacemaker Restoration
Joined: December 2004 Posts: 556
Location: Denmark
For a new truss a round steel bar threaded from one or both ends would work depending on how you anchor the far end. Which thread is the original? I have no idea if metric or imperial.
Looking at the figure, it seems thickest wood is between the fretboard and the rod and thinnest wood is on the back (around the number "82" on the figure). What is plan B if pounding the rod breaks the thin wood on the back of the neck?
Would it make sense to stabilize back of the neck with a beam of some kind while pounding.
Posted 2023-03-12 5:09 PM (#558146 - in reply to #558060) Subject: Re: '74 1115-1 Pacemaker Restoration
Joined: December 2004 Posts: 556
Location: Denmark
Even with additional thread I would expect the truss rod and the wood under direct load to be challenged trying to both straighten the neck and counteract the string tension. Would setting the neck straight by clamping it - maybe for some time and maybe heated with the waterbag trick - help?
Posted 2023-03-12 6:34 PM (#558147 - in reply to #558146) Subject: Re: '74 1115-1 Pacemaker Restoration
Joined: June 2012 Posts: 2303
Location: Lake Forest, CA
IMO, part of the problem is tuning this guitar to concert pitch.
According to Elixir, 12-string lights exert 251 lbs. of tension. I'm assuming this measurement was done with the guitar tuned to concert pitch.
I found another site that talks about tuning 12-strings down and shows a chart with a 12-string tuned down 1-1/2 steps and the tension is ~173 lbs. which is about the same as a six string with light-medium strings tuned to concert pitch. Extra light strings only pull ~131 lbs.
I'd imagine that with tuning down to a full step would equal right around 200 lbs. of tension, which is where I keep my 12-strings tuned. (1655 & 1758)
Personally, I don't thing clamping and heat would do the trick. As soon as the strings go on, the tension would pull the neck forward again.
The fact that Ken's sintered bronze bushing got squished and distorted says a lot about how much force was being exerted on it.
Posted 2023-03-12 6:55 PM (#558148 - in reply to #558060) Subject: Re: '74 1115-1 Pacemaker Restoration
Joined: February 2016 Posts: 1770
Location: When??
Speaking of carnage, the last dozen or so posts here reminds me of a book I recently read about the crew of the US Navy frigate USS Roberts after it plowed into submerged mines in the Persian Gulf. Bad.. real bad.. and survival required days of construing every unorthodox tactic imaginable.. but an eventual combination of those methods did in fact save her for another 27 years of service. Carry on, Captain Ken!
Posted 2023-03-12 10:50 PM (#558149 - in reply to #558143) Subject: Re: '74 1115-1 Pacemaker Restoration
Joined: October 2012 Posts: 1018
Location: Yokohama, Japan
Thanks for your encouragement to think out-of-the-box BFLG!
tpa - 2023-03-12 1:05 AM
...Looking at the figure, it seems thickest wood is between the fretboard and the rod and thinnest wood is on the back (around the number "82" on the figure). What is plan B if pounding the rod breaks the thin wood on the back of the neck?
Plan B? What plan B? Lol! Area #82 is definitely of concern. However, these truss rods are not glued into their slots and they're threaded only at the tip so theoretically the only resistance that should come into play is the rod rubbing against the curved wood inside the neck.
tpa
Would it make sense to stabilize back of the neck with a beam of some kind while pounding...
If this method is implemented, I will definitely make sure to provide plenty of support for the entire neck and body before the pounding begins!
tpa
Would setting the neck straight by clamping it - maybe for some time and maybe heated with the waterbed trick - help?
I think Dan is right. Any amount of heat to straighten up the wood won't provide any real permanent mechanical change in the wood itself so it will flex right back to where it was originally before the heating process. I use the water bag trick when removing the entire neck from the body, but this 1115's neck is already angled perfectly. If I can take the appropriate amount of bow out of the neck, she will have low action and with a proper fret job - no buzz. So I don't think there's a real need to change the neck-to-body angle or a need to remove the neck entirely.
The greater concern might be possible damage to the inside of the top if I pull the rod out of the sound hole. The curved rod might be difficult to manage as I remove it and install the new one. Even if I can get it started with a light pound once the rod is out about an eighth of the way, it's going to start exerting upward force typical of a 1/8" iron bar refusing to straighten up. Of course, I could cut the rod into sections as I pull it out little-by-little, but I'll have to deal with the same issue when installing the new rod (without the luxury of working in smaller pieces) - could be really really troublesome.
@Dan - Thanks for all of your valuable input - again! AND for providing info from Elixir! Serious tension exerted on these 12 strings! Arigatou!
I think "Mother Necessity" is saying "Start with the barrel nut and sleeve!" I ordered a 12mm length barrel nut which has an OD of 5.9mm. I can first tighten this over the existing truss rod thread to see how much more thread I've got on the rod (all I need is about a 1/4~5/16 inch - if not, the threading tool!). The aluminum rod extender that's on it's way has a 6mm ID (might have to bore it to 7mm to give the barrel nut some wiggle room) and 20mm length. If I cut the rod extender in half to 10mm, the barrel nut will have a 2mm start to begin threading into the broken end of the truss rod which has about 2.5mm of thread sticking out of the wood - that should be enough to get the nut started.
At this point the question will be whether the threads in the barrel nut (and the remaining threads on the rod) will hold up to the force exerted by the rod and the neck. In theory, the stainless barrel nut and steel rod threads should hold-up. Not so sure about thread compatibility. The truss rod thread is 10-32 while the barrel nut thread is M5. These are typically compatible for things like furniture assembly (like the stuff you buy at IKEA), but I'm not sure how they'll fair under this kind of intense tension. Looked at detailed drawings of both and they seem to be a perfect match, but when I actually fit a M5 nut on a 10-32 bolt, it doesn't "feel" quite as snug as a matched pair. My reading of the drawings suggest my "feel" is a figment of my imagination; but as is so often the case, I could be wrong.
The next time I tighten up this truss rod, I need to use a torque wrench to see what kind of measurements I get. Some of my tools are packed, as I'm right in the middle of a big move, but would be interesting to see how much torque needs to be exerted on this nut when the guitar is at concert pitch! You know what, I think I just need to give up my pursuit for concert pitch on this one. I keep thinking I'll get it to concert pitch once and tune everything down afterwards, but it looks like this 12-string ain't gonna let me have it my way! Don't know if I can get another 27 years from this 1115, Al; but the guitar chiropractor has not given up - yet!
Posted 2023-03-13 1:11 AM (#558150 - in reply to #558060) Subject: Re: '74 1115-1 Pacemaker Restoration
Joined: February 2016 Posts: 1770
Location: When??
We all know that I am not exactly Mr. Truss Rod; hence, I am curious to learn.. is the rod made of all-thread, or only threaded on the adjustment end? The diagram shows smooth.. though it also shows smooth beyond the tip where the adjustment nut threads on, so the diagram accuracy is not absolute. I followed Dan's link to the Stewmac TR rescue tool page and see their threading tools (indeed quite pricey) which leads me to think smooth.. however.. they are only specifying for Fender and Gibson. I ask because if Ovation happened to use all-thread for their truss rods then the resistance could end up pretty tight if you choose the pound & pull method to remove and install.
Posted 2023-03-13 11:21 AM (#558151 - in reply to #558150) Subject: Re: '74 1115-1 Pacemaker Restoration
Joined: October 2012 Posts: 1018
Location: Yokohama, Japan
Love O Fair - 2023-03-12 3:11 PM
...is the rod made of all-thread, or only threaded on the adjustment end?
Hey Al! The old classic single rod TR is threaded on the adjustment end only. They usually say "Fxxxxr" or "Gibson" because all classic single rod TRs regardless of your guitar brand were basically based on one or the other back in the day. My 1115-1 and many Os from the 60s and 70s use the "Gibson" style TR. Quite a brilliant and simple design really. Here's a YT video of a Luthier named Michael Wilson. He makes a Gibson style truss rod from scratch. The Ovation rod has a much more robust welded stop piece than the one built in this video. At 2:41 he shows a real medical X-ray shot of a truss rod inside of a neck. Pretty cool stuff!
You'll notice in the video that he cuts a pretty lengthy thread at the end of the truss rod. A lot of it is cut off in the final adjustment, but there's usually some extra thread on the rod that is hidden under the TR cavity. That's what I'm hoping for with this 1115. If there is more thread hidden in the TR cavity, that will give my barrel nut enough to grab onto.
Oh, and like a big dummy I missed the most obvious and most important dimension that differentiates a 10-32 nut from an M5! It's the diameter! Duh! So the feeling that an M5 nut was a bit loose on a 10-32 bolt was not my imagination! An M5 bolt has a 5mm diameter while a 10-32 has a 3/16 in. (4.76 mm) diameter. That means my M5 barrel nut will fit over the 10-32 truss rod threads with a bit of play and may not be snug enough for this application... not sure how I'm going to find a 10-32 barrel nut in Japan. Everything is metric over here! Gotta spend more time researching! Perseverance shall win the day! Well, one of these days - eventually...
Posted 2023-03-13 5:00 PM (#558152 - in reply to #558151) Subject: Re: '74 1115-1 Pacemaker Restoration
Joined: November 2002 Posts: 3603
Location: Pacific Northwest Inland Empire
How long does it take for overseas mail- like California to Japan? Someone could send you a dozen 10-32's for peanuts, I'm sure. Maybe not the most expedient solution, but it is an option.
Posted 2023-03-14 2:24 AM (#558154 - in reply to #558060) Subject: Re: '74 1115-1 Pacemaker Restoration
Joined: February 2016 Posts: 1770
Location: When??
Thanks for the video link, Ken. Dang.. just when I had refreshed coffee and settled in for the cutting of the groove, it ended. I'll have to go find Part II for that since I would like to see how much clearance he puts between the rod, the neck wood and the fingerboard. I have always pictured it as fairly loose (say 2mm all around), and hence wondered if all-thread may have been the cost-effective way of producing guitars.. and also to calculate in my mind's foggy eye how much the rod gives working forbearance into free space before actually contacting wood with pressure at any given section of the rod (especially at #82). I guess that may be splitting hairs, and I realize this is a place where the well-seasoned come to dwell, and not necessarily classroom, so I thank y'all for putting up with me.. and if anybody wants to know the techs and stats of an ice skate or a chili relleno, let me know. Now back to your 1115.
Posted 2023-03-17 10:39 AM (#558164 - in reply to #558060) Subject: Re: '74 1115-1 Pacemaker Restoration
Joined: May 2011 Posts: 751
Location: Muenster/Germany
Trussrod screws are -sorry- steel-made assholes.
Always make trouble, I have a very bad minded example in my Adamas 12 string which tried to destroy the back of the headstock exactly like this.
I would try to use a piece of Aluminium, it will not break like woods and is is still a bit formable when is has to withstand the pressure of the washers.
Posted 2023-03-17 11:24 AM (#558165 - in reply to #558153) Subject: Re: '74 1115-1 Pacemaker Restoration
Joined: October 2012 Posts: 1018
Location: Yokohama, Japan
seesquare - 2023-03-13 7:00 AM
...Someone could send you a dozen 10-32's for peanuts, I'm sure. Maybe not the most expedient solution, but it is an option.
Thanks a bunch Seesquare and Twowheel (that's the one)! OFC folks are just the best! Domo Arigato!
Found out yesterday that my daughter is returning from college to Japan for the summer! I'm gonna order the fasteners I need from McMaster-Carr along with more Hysol 9462 and 0151 (per Dan's amazing projects)...maybe even spring for the Stewmac tools and have my daughter hand carry them to Japan! Should be able to continue with this project again in May! Woohoo!
@Al - you've got me craving chilli relleno! Harder to get in Japan than 10/32 threaded barrel nuts!
@Detlef - My 12-string's "steel-made asshole" just snapped; and now I need a new nut for my "steel-made asshole!" Sorry! Couldn't resist!
Posted 2023-03-17 3:14 PM (#558166 - in reply to #558165) Subject: Re: '74 1115-1 Pacemaker Restoration
Joined: November 2002 Posts: 3603
Location: Pacific Northwest Inland Empire
Things generally work out. That's tremendous your daughter will be able to resupply the operation! Tough thing about rellenos is getting the right type & size of chiles. Our friends in SoCal are usually replete about July or August. Getting produce to you through the inspections process might be a bit tricky, though.
Anyrate, keep us posted. I will try to entertain the populace in the meantime with my creations.


 ...
...