| The Ovation Fan Club | ||
| ||
| Random quote: “Music is a moral law. It gives soul to the universe, wings to the mind, flight to the imagination, and charm and gaiety to life and to everything.” -Plato |
 Am I ever glad to find this place! Am I ever glad to find this place!
| View previous thread :: View next thread | |
| The Ovation Fan Club -> Welcome Center | Message format | |
| JCAllison |
| ||
Joined: April 2015 Posts: 14 | Good morning everyone, Permit me to introduce myself: I am JCAllison, 76 years old, and happen to be the caretaker of two very nice guitars. The first one is "Martina", a Martin D35-12, twelve-string, with Brazilian Rosewood back, a Barcus Berry Insider pick-up, and a set of Ernie Ball Slinky strings using the Rickenbacker configuration. Martina came to live with me in 1973, the gift of a very generous patron. That's a long story. The second one is "Shara", named after the Jean Simmons character Sharon Falconer, in the movie "Elmer Gantry". Shara is an Ovation Preacher Deluxe twelve-string, Serial Number 15467. Shara is Black, with Gold fittings, and has, as of yesterday, a NEW set of Martin Marquis Light strings, and is strung in the conventional configuration. With that said, am kind of nonplussed as to where to start. Am thinking it appropriate to relate how the Shara came to live with with Martina and me. Back in 1981, a $250.00 deposit was given to a music store in Houston, Texas for a Roland Drumatix, and a Roland Bassman. But before these two items could be delivered, the music store was forced to go out of business. Thus twas that they were not going to be able to complete the transaction, nor were they able to refund the $250.00. So they decided that I could look over their inventory and pick out something else in lieu of the Drumatix/Bassman. After perusing what merchandise they had on hand, the only thing that even slightly interested me was Sharon. BUT, they allowed as to how she was worth substantially more then $250.00. Still, nothing else they had was of any interest, and it was with no small amount of haggling, that they finally gave me Shara, along with her hard-shell case to settle the matter. While Martina is the guitar that is usually played because she doesn't require amplification, there have been intermittent occasions when Shara has been played, but to be perfectly honest, while my level of expertise is sufficient to play un-amplified, when amped (such as with Shara), the results are less than acceptable, and so it is that Shara has been seldom played. But recently, it was decided to get back to endeavoring, so Shara was taken out of her case after having not been handled for over a decade, and it was decided that she needed a new set of strings as the strings that were on her were the ones she came with back ing 1981. So yesterday, the NEW set of Martin Marquis Lights were put on. Now you might think that THAT would be a simple operation, but as it turns out, it is complex beyond my ability to understand. After removing the OLD strings, and cleaning the entire guitar, I found that the Bridge and Saddle, being of an adjustable nature wouldn't go back together in a manner that would render Shara tuneable and playable. This wasn't of much concern, for surely there would be just gobs of information on the Internet explaining how to proceed, and so it was that after starting at noon yesterday, Shara was finally put back into her case at 10:00 p.m., with the intentions of finding out all that was needed to be known today on the World Wide Web. Well, guess what! There is actually very little information available, or it may be that where to look is not all that obvious. BUT, what WAS found was this site (The Ovation Fan Club) where an impressive array of obvious expertise seems to be in residence. Have registered, have gotten my user name and password, am posting my first post to the "Welcome Center" per the instructions, and would like to become a regular netizen here, and hopefully get Shara back to the point to where she can given more attention than she has been getting. BTW, it is NOT just out of neglect that Shara has not been given more attention. Back in 1998, I became terribly ill, but fortunately, it seems that the disease that accosted me has decided that it has caused enough grief, and is apparently leaving. So in celebration of THAT, am going to start doing all the things that were curtailed when the malady arrived, and one of the major things is getting back to playing guitar. Well, enough of this. Am going to sign off here as there are other things that need to be taken care of, but probably later today or tomorrow, more specific questions will be introduced. Comments are desired and welcome, and both Shara and I thank you in advance for any assistance that may be proffered. Take care, and we (Martina, Shara, and I) hope you all are well. JC | ||
| |||
| Damon67 |
| ||
Joined: December 2006 Posts: 6996 Location: Jet City | Welcome JC, and thanks for sharing your story. Your guitars sound very special indeed. I've recenty been looking for a "Shara" of my own. I'm not sure I understand what the issue is. Can you describe how it is un-adjustable? Have you raised and or lowered the bridge? There's alse a screw on the backside that adjusts the height of the backside of the tailpiece. You would probably have to adjust it as well. Did you disassemble th e guitar completely, neck and all? If so, maybe a readjustment is needed there. Pictures help too. If you're unsure how to post them, you can email me at my username here @mac.com and I'll get them posted for you. | ||
| |||
| Mr. Ovation |
| ||
Joined: December 2001 Posts: 7248 Location: The Great Pacific Northwest | Looking forward to the pictures. Unless something is broken, which I can't image what, generally reassemble and you should be ready to play. If you disassembled the bridge, that could be an issue if you didn't get back together correctly. As Damon stated, pictures will help and you'll be all set. | ||
| |||
| JCAllison |
| ||
Joined: April 2015 Posts: 14 | damon67 - 2015-04-12 1:00 PM Welcome JC, and thanks for sharing your story. Hey Mr. D, Thanks for the welcome, and you're welcome for the thanks. Your guitars sound very special indeed. They're like having grandchildren even though I have no kids! I've recenty been looking for a "Shara" of my own. You mean a Preacher 12-String. Shara's Serial Number is 15467 which indicates it's a 1970 to 1972 vintage. I'm not sure I understand what the issue is. Can you describe how it is un-adjustable? YES! And I'm so happy you asked, for THAT is the crux of the difficulty. The Bridge is a "cast" or "forged" part, complete with the Saddle cast all in one piece. Although it is formed in such a manner as to resemble an adjustable Saddle, with some of the String Grooves closer to the Nut, while some are further from the Nut, it is not actually adjustable. The Bridge itself sits on two vertically adjustable "pylons" which can raise and lower the Saddle. There IS a Bolt that is slotted for a screwdriver, but the head is cut so that it is not circular, but retangular, and there is a place in the Plastic Bridge Cover into which the rectangular head fits so that it won't turn when everything is assembled. The Bolt threads go down through the Bridge and then through the Body, terminating inside the cavity where the 9-Volt Batterys reside under a two Dzus Fastener secured Access Plate. It is secured by: 1) a "starred" Washer (with a wire attached to it, probably a ground circuit of some sort); 2) a large Flat Washer; and 3) a Nut. When the OLD Strings were removed, the Black "U" shaped Plastic Bridge Cover came off of the Bridge, being only positioned by a number of short "Pegs" that fit into the Bridge. Although ONE of the Pegs doesn't fit into its hole, which renders the Plastic Bridge Cover slightly cocked or canted. When the Bridge Cover came off, it revealed the Bridge/Saddle, and the rectangular headed Bolt. That rectangular headed Bolt was loose. It is now realized that it was loose because there was no string tension on the Bridge. Nonetheless, the rectangular headed Bolt was removed so that the Bridge could be removed to clean the cavity under the Bridge. After Shara was cleaned, the Bridge was reinstalled, the Plastic Bridge Cover was put back in place, and the NEW set of Martin Marquis Light Strings were threaded through their respective holes in the Bridge and the Bridge Cover. The Strings were then wrapped around the Tuning Key Capstans, and were then tried to be tuned. That's when the problems began. As you can imagine, the whole thing was completely out of adjustment. Have you raised and or lowered the bridge? Yes. That is done by turning the Pylons at each end of the Saddle. There's alse a screw on the backside that adjusts the height of the backside of the tailpiece. Yes. That is the rectangular headed bolt, and it is adjusted by a Nut in the Battery Cavity. You would probably have to adjust it as well. Yes, all three of the threaded Adjustment Screws need to be adjusted, but there is a BIG problem with THAT. Did you disassemble the guitar completely, neck and all? No. Only the Bridge/Saddle, the Plastic Bridge Cover, and rectangular Bolt, Washer, and Nut were disassembled. If so, maybe a readjustment is needed there. That is exactly the conclusion that was reached. So seeing that THAT was what needed to be done, the adjustment began. And here is where the whole thing seems to be a conundrum. With the Adjustment Pylons adjusted to their LOWEST point, and the rectangular headed Bolt adjusted so that the Bridge/Saddle is level, the Strings are all lying on the Frets. The raising of the Saddle by turning the Adjustment Pylons began. All seemed to be working as it should, but the rectangular Bolts also had to be adjusted to keep the Bridge level. This is not rocket science, and everything was going along good when all of a sudden, and before the adjustment was satisfactory, the Plastic Bridge Cover came out of its cavity, the Pegs came out of the holes in the Bridge and the String Tension tilted the Cover. But the Strings were all slack. The Bridge Cover was able to be pushed back into place, but wouldn't stay there until the Adjustable Pylons were lowered. It would then stay where it was supposed to be, BUT the Strings were once again lying on the Frets! Now we have a choice: Either we have the Bridge Cover properly positioned; OR we can have the Strings up off the Frets, but after messing and messing with it, have yet to figure out how to have BOTH the Bridge Cover properly positioned AND the Strings up off the Frets! I started a little after 12:00 noon, and finally just had to give up on it for the night at 10:00 p.m.! Pictures help too. If you're unsure how to post them, you can email me at my username here @mac.com and I'll get them posted for you. Thanks for the offer, but I am an experienced form member over on the Ford Muscle and Dodge Talk forums and have a Photobucket account. I'll make up a complete set of JPGs and demonstrating the situation. You see, Mr. D, this is exactly what I was counting on. The problem is NOT with Shara, or the Ovation Preacher design. The problem is my being uneducated about how to go about doing what needs be done. Anyway, let me get out of here, and get started with taking the JPGs. Will be back in touch as soon as all that is done. Again, thanks for the prompt response. It is GREATLY appreciated. Take care. JC | ||
| |||
| JCAllison |
| ||
Joined: April 2015 Posts: 14 | mileskb - 2015-04-12 1:20 PM Looking forward to the pictures. Unless something is broken, which I can't image what, generally reassemble and you should be ready to play. If you disassembled the bridge, that could be an issue if you didn't get back together correctly. As Damon stated, pictures will help and you'll be all set. Hey Mr. O, There isn't anything broken. It may not be reassembled properly, though if it isn't it is something quite subtle. Pictures are on their way soon. Thanks for the response. Regards, JC | ||
| |||
| JCAllison |
| ||
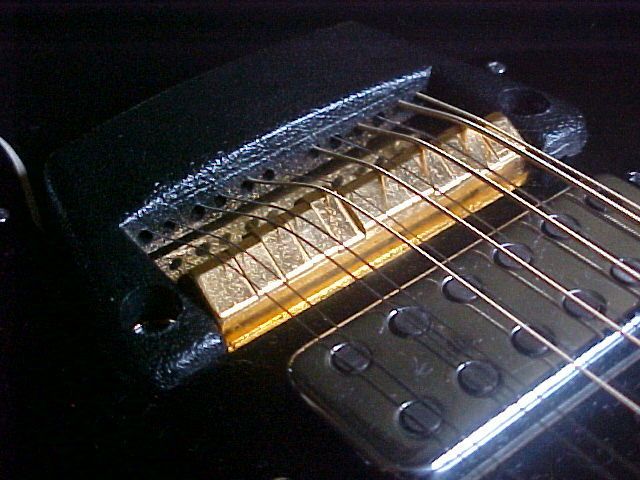
Joined: April 2015 Posts: 14 | Hey Mssrs. D, M, and All, Meet one of my two sweethearts. This is Shara, the 1972, 1285-5 Ovation Preacher Deluxe Twelve String Guitar: This First one is of her lying on the Table, followed by a shot of her Serial Number.   This next one is of her assembled Bridge, Saddle, and Plastic Bridge Cover As they should look when adjusted and tuned.  This one of two Adjustment Pedestals used to raise the Saddle. there is another one on the other side:  This is the Star Washer connected to a wire (though it cannot be seen in this image, trust me, it is there), a Flat Washer, and Nut in the Battery Compartment. This Assembly is used to limit the distance that the Bridge can rise under the tension of the Strings:  This image shows the height of the rear of the Bridge under very little tension from the Strings, as they are not tuned at this point. Were Shara in tune, this height would be a bit higher:  This image shows how much adjustment there is when the rear of the Bridge is pushed down against the tension of the Strings:  This JPG shows how high the rear of the Bridge can be raise when pushing down on the Bridge Cover in front of the two Adjusting Pylons:  This image shows how high the Bridge Cover sits when completely un-adjusted. Note the amount of Bridge Cover showing above the Scuff Plate:  Compare this JPG with the last one. This is how far down the Bridge Cover can be pushed with some amount of downward pressure. But there is a bit of a problem in that the Bridge Cover on the Eleventh and Twelfth String side has a peg that doesn't line up with its corresponding hole in the Bridge, rendering it "canted" all the time:  This JPG shows how much the Bridge Cover rises when the rear of the Bridge Cover is pushed down against the tension of the strings, which are still nowhere near being tuned. Compare the height of the Bridge Cover in the last two images with this:  This next JPG is illustrating another small problem. Normally the Number Eleven and Twelve Strings should be in this position:  BUT... When the Strings are in tune, the little groove for the Number Twelve String isn't deep enough to keep the Number Twelve string in the proper position. This is where the string moves to when the Twelfth string is under a bit of tension. Am thinking that what need be done is to obtain some really small Fine Files and accentuate the String Grooves, but I didn't want to do that until someone who knows about these matters is consulted:  This next JPG isn't very clear, but it shows the String height off of the Frets when the Adjusting Pylons are adjusted up. They are only adjusted up a small distance in this picture:  If they are adjusted up even a small amount, THIS happens!  So that is the problem Shara and I are facing. Keeping the Bridge Cover in place when the Strings are in Tune and the Bridge is under full tension, and the Adjusting Pylons are high enough to get the Strings up off the Frets. Comments are welcome, and I'm going to probably feel silly for not having seen the obvious solution, whatever it is. Anyway, what do you think? Can this be remedied? Thanks in advance for any help. JC | ||
| |||
| Mr. Ovation |
| ||
Joined: December 2001 Posts: 7248 Location: The Great Pacific Northwest |
This is a bit of a design flaw that I have seen before. When the string comes up to tension, it's pushing against the top of the hole in the plastic cover. Totally unnoticed until the guitar ages or you have a roadie changing strings at least 50 times a year for 10 years. One the other one I saw do this, we just left the plastic off. But, theoretically you could just file the top of the holes where the strings rub. Then get the plastic back in place. Originally, that back plastic piece was just set into place with those posts into their holes and the tips of the posts heated up to hold them in place. I have seen a dab of glue on some, I think that was just common sense after-market idea's. You can clearly see what's happening in this pic. Those holes are just their to cut a path for the strings. When the bridges are new, the bond holding the plastic onto the base is enough and this flaw is unnoticed. But clearly, those strings shouldn't be putting any pressure on the plastic at all, yet they do.
File the tops of the holes a little and all should be fine. | ||
| |||
| JCAllison |
| ||
Joined: April 2015 Posts: 14 | mileskb - 2015-04-12 8:11 PM
This is a bit of a design flaw that I have seen before. Hey Mr. O, I am just laugh and laugh! A diary in which is kept detailed accounts of the odyssey that is my existence, has an entry in it with regards to this tryst, and the comment that was made is "This is either an OBVIOUS design flaw, or those Ovation designers know something that is so esoteric that we mere mortals are too ignorant to understand!" And you don't know what a relief it is to have someone other than myself, someone with obvious and actual experience in matters such as these, confirm that we "mere mortals" are NOT completely at the mercy of those who hold positions of eminence over the details involved in our lives.  When the string comes up to tension, it's pushing against the top of the hole in the plastic cover. Yup! Totally unnoticed until the guitar ages or you have a roadie changing strings at least 50 times a year for 10 years. Let me make mention of another quirk of this caper. When the restringing of Shara began, the Number One String was missing. And the Number Two String had been installed with the String going through the hole in the Bridge, but instead of going through the hole in the Plastic Bridge Cover, it went UNDER the Plastic Bridge Cover. It was just a minor detail, but it probably exacerbated the problem of the Plastic Bridge Cover, after ageing, being pryed loose from the Bridge. On the other one I saw do this, we just left the plastic off. After analyzing this situation at the time, it seemed obvious to me that the Bridge/Saddle assembly would functions just fine without the Plastic Bridge Cover being involved, but the nagging doubt that there was some "esoteric" function provided by the Plastic Bridge Cover kept me from just blundering on without it. Besides, the cosmetic function of the Plastic Bridge Cover would be lost. But, theoretically you could just file the top of the holes where the strings rub. Mmmmm! Am afraid that THAT solution is one of them "it's easier said than done" kind of things! For you see, the holes in the Plastic Bridge Cover are drilled through about one inch of plastic! That Plastic Bridge Cover is a pretty substantial piece of stuff. Which is not to say that your suggestion is not valid, but the operation of filing the top of the holes would involve a precision drilling that I'm afraid that I'm not equipped to consummate. BUT, now that you have restored my confidence in my powers of perception, it behooves us to come to a more comprehensive solution to the problem. Then get the plastic back in place. EXACTLY! But this time it must be put back in place in a manner that will not fail over time. More on this a bit further on. Originally, that back plastic piece was just set into place with those posts into their holes and the tips of the posts heated up to hold them in place. And therein lies the design flaw that we MUST remedy. If I am to understand this correctly, when NEW, the Plastic Bridge Cover, the Rectangular Headed Bolt, and the Bridge/Saddle were a WHOLE "permanently" assembled unit that was installed by setting the whole previously assembled unit on the Body with the Adjusting Pylons fitting through their holes in the Bridge, and the Rectangular Headed Blot protruding down through its hole into the Battery Compartment where the Star Washer (with the attached Wire), the Flat Washer, and the Nut held it loosely in place till the Strings were installed and THEN the whole assembly was adjusted using the two Adjusting Pylons, and the Nut on the Rectangular Headed Bolt. That the Plastic Bridge Cover was supposed to be permanently affixed to the Bridge/Saddle also meant that the head of the Rectangular Headed Bolt would be "trapped" it the recess on the bottom of the Plastic Bridge Cover to prevent it from turning when the Adjusting Nut in the Battery Compartment was turned. Right? I have seen a dab of glue on some, I think that was just common sense after-market idea's. YES! BUT... A "dab of glue" would be as tenuous a "fix" as the original heating of the "tips of those posts" to hold the Plastic Bridge Cover in place. A more "permanent" fix would be to "grind" all but two of the little "posts" on the bottom of the Plastic Bridge Cover completely OFF, and use the holes in the Bridge/Saddle to put small Screws into the Plastic Bridge Cover to semi-permanently, but securely fasten it to the Bridge/Saddle. The two little "posts" that would NOT be "ground" off would function to properly position the Plastic Bridge Cover on the Bridge/Saddle. You can clearly see what's happening in this pic. Those holes are just there to cut a path for the strings. When the bridges are new, the bond holding the plastic onto the base is enough and this flaw is unnoticed. But clearly, those strings shouldn't be putting any pressure on the plastic at all, yet they do.
EXACTLY! And you see, Mr. O, it was THAT situation that left me with the question: Is THAT poor design? OR is that some subtle and wondrous feature that the designers at Ovation had included and that us mere mortals couldn't understand due to limited knowledge? File the tops of the holes a little and all should be fine. Well, YES... That IS the solution, BUT... here's where we come to the "easier said than done" part. So let me run this past you to see what you think. There might be more than one way to "skin this cat". First: Have found on the Internet: Small diameter Files that could be used to run through those holes, and which could be utilized to provide a bit of clearance so that the Strings don't bear on the top of the holes. Second: Working on the under side of the Plastic Bridge Cover, we could cut a channel to each of the holes and instead of stopping the channel cutting at the hole, we would continue the channeling till the proper clearance is obtained. This last method would substantially weaken the Plastic Bridge Cover though. In either case, the final result would be to alleviate the upward pressure on the Plastic Bridge Cover. BUT... since originally the Plastic Bridge Cover was "permanently" bonded to the Bridge/Saddle by the "heating" of the little posts, and it was only over time that that bond eventually failed, if the Plastic Bridge Cover was attached by small Screws through the Bridge/Saddle into the Plastic Bridge Cover, the result would be the same as originally existed, but it would NOT fail over time. And this solution would preclude having to modify the holes in the Plastic Bridge Cover. Permit me to detail the operation: There would initially be the filing or grinding off of all but two of the little posts from the Plastic Bridge Cover. Then there would be the obtaining of teenincy Flat Head Screws. There would be the counter-sinking of the holes in the bottom of the Bridge/Saddle to accept the teenincy Flat Head Screws. There would be the drilling of tiny pilot holes where the little posts used to be. There would be the fastening of the Plastic Bridge Cover to the Bridge Saddle with the teenincy Flat Head Screws. Then there would be the installation of the whole unit just as was previously done at the factory. The Strings would STILL bear on the top of the Plastic Bridge Cover Holes, but so what? That's the way it was originally, and it would be just fine because the fastening of the Plastic Bridge Cover to the Bridge/Saddle couldn't come loose because it is not just "bonded". It is actually, physically fastened with threaded fasteners. What do you think? Shoot me down if you can. You know what the worst part of this fix is? That it is going to entail the sacrifice of a perfectly good set of Martin Marquis Light Strings, because they are going to have to be taken off to perform the operation, and there is no way to get the curled ends to go back through the holes in the Bridge and the Plastic Bridge Cover. Oh well, they are expendable. And besides, the only reason that they were used was because they were ordered for Martina, and then I decided that they were much to heavy for her. So a set of Ernie Ball Slinkys were installed on Martina instead. At this point, just as an aside, what Strings would YOU recommend to put on Shara? Anyway, thanks for the response. Let me know what you think of the proposed solution, and if it meets with your approval, I'll make sure to document with JPGs the progress. Hope this finds YOU doing well. Take care. JC | ||
| |||
| Mr. Ovation |
| ||
Joined: December 2001 Posts: 7248 Location: The Great Pacific Northwest | Any solution is worth a try. So to be so brief after you tool so much time, but not that you mention the "depth" of the holes, it reminded me that on another bridge I had, although I don't remember why, I just used a drill bit to elongate the hole. I think your tiny screw idea is good, but I also recall that plastic being pretty fragile. The other option some have chosen is just upgrade to the newer all metal bridge. I am personally not a fan of this as I like the sound of the older brass'n plastic bridge. But I just thought I would offer that up. I don't have time to post a pic, and they are pretty hard to find, especially in 12-string, but they essentially drop right in. You are left with the hole in the back that some plug as the newer style does not require the rear adjustment. | ||
| |||
| JCAllison |
| ||
Joined: April 2015 Posts: 14 | mileskb - 2015-04-13 11:04 AM Any solution is worth a try. Hey Mr. O, Was at the hardware store this morning, and the smallest Flat Head Screw that they had was about twice the size of what is needed. Just took a look at Shara, and the "oval" headed Phillips Screws that are used to hold the Scuff Plate on is about the right diameter, but probably much too long. Won't REALLY know what size is needed until the Martin Marquis Light Strings are removed and the Plastic Bridge Cover and Bridge/Saddle are removed again. So to be so brief after you took so much time, but not that you mention the "depth" of the holes, it reminded me that on another bridge I had, although I don't remember why, I just used a drill bit to elongate the hole. Alas, that MIGHT solve the problem of the Strings hitting the top of the Holes in the Plastic Bridge Cover, but it doesn't solve the problem of the Plastic Bridge Cover not being fastened to the Bridge/Saddle. It NEEDS to be securely fastened. I think your tiny screw idea is good, but I also recall that plastic being pretty fragile. Actually, the plastic used on the Plastic Bridge Cover seems to be quite substantial. And it is NOT just a "shell". It is a quite thick casting. Again, we won't know for sure till we get the unit disassembled again which will be later today. The other option some have chosen is just upgrade to the newer all metal bridge. Were the situation one of utility and urgency, THAT might be an option. Fortunately, having Shara up and playing is not in any way urgent. Would like to keep her as original as possible, and the teenincy screw in a countersunk hole in the under side of the Bridge/Saddle would, while not messing with the originality, actually be an upgrade. I am personally not a fan of this as I like the sound of the older brass'n plastic bridge. Not having a point of comparison, the sound of the different bridges is lost on me. But I just thought I would offer that up. I don't have time to post a pic, and they are pretty hard to find, especially in 12-string, but they essentially drop right in. Not wanting to CHANGE out anything if we can help it, will pass (unless absolutely necessary) on swapping in a NEW Bridge, but that is good thinking. Have noticed some OTHER Bridges with adjustable Saddles. That would be an upgrade from the Saddle that presently resides on Shara. You are left with the hole in the back that some plug as the newer style does not require the rear adjustment. Actually, the hole in the back is INSIDE the Battery Compartment and would be TOTALLY un-noticable. Anyway, am going to take the Strings off of Shara, and will have the Bridge/Saddle and Cover off. Will have JPGs of what is there and we'll be able to make some definite decisions at that time. Again, thanks for the response. Take care. JC | ||
| |||
| Damon67 |
| ||
Joined: December 2006 Posts: 6996 Location: Jet City | FWIW, I prefer the newer all metal bridge. To each his own. Good luck JC | ||
| |||
| JCAllison |
| ||
Joined: April 2015 Posts: 14 | damon67 - 2015-04-13 2:45 PM FWIW, I prefer the newer all metal bridge. To each his own. Good luck JC Hey Mr. D, Thanks for the best wishes. Having no experience with your preference, and only some amount of grief with Shara's original Bridge, I have developed no preference, but with THAT said, the overweening reason for staying with Shara's original Bridge is to keep Shara original. So in pursuit of originality, here is an effort to show the parts involved in order to make a more knowledgable decision. These first two JPGs are of the Rectangular Headed Adjusting Bolt that goes through the Body and into the Battery Compartment. The reason for the rectangular shape will become apparent a little further on in this post:   The next three JPGs are of the Bridge. Notice in the third one that there are two Phillips Head Threaded Fasteners that go through the Bridge and hold the Saddle in place. There are three large holes shown. Two of them are for the Adjusting Pylons which raise the front of the Bridge, and can also adjust the slant of the Bridge so that one side can be higher than the other side if desired. The third large hole is for the Adjusting Bolt that goes through the Body into the Battery Compartment. It adjusts the rear of the Bridge up or down and controls the forward cant of the Bridge when under the tension of the Strings. Notice also all the little holes in Bridge. The reason for those little holes will become apparent a little further on in this post. The twelve holes on the lip of the Bridge are where the Strings go through:    The next seven JPGs are of the Plastic Bridge Cover:   Notice all the little posts on the bottom of the Bridge Cover. Those posts fit through all the little holes in the Bridge Plate.   This is a close up of the indentation into which fits the Rectangular Headed Bolt head, shown in the next three JPGs. This is what keeps the Adjusting Bolt from turning when the Nut in the Battery Compartment is turned.    The next four JPGs are of ALL the pieces that comprise Shara's Bridge, Saddle, Bridge Cover, and Adjusting Bolt. It is this complete assembly that is put on the front of Shara. Notice how the Bridge fits snugly up against the Bridge Cover. This is the position that MUST be maintained for the Bridge and Cover to function properly.   These last two JPGs show the Rectangular Headed Adjusting Bolt installed between the Bridge Plate and the Bridge Cover.   After looking carefully at where the little Posts that go through all the little holes in the Bridge Plate, it appears that there are only four of them that have enough material behind them to handle a teenincy Screw to be screwed into the Bridge Cover. And the fact is that the Screws wouldn't have to be countersunk as there seems to be plenty of room under the Bridge to accommodate round headed Screws, which is evident when there are two round headed Screws holding the Saddle in place. So here is one possibility: Remove four of the little Posts (BTW, one of them is already broken and is tenaciously holding on with just the barest of material), drill a tiny hole where the Post used to be, and with the Adjusting Bolt in place, use either epoxy or cyanacrylate (super-glue) to assemble the unit with the four teenincy Screws installed. This Bridge/Saddle/Cover/Adjusting Bolt assembly should NEVER have to be taken apart. So Mr. O, you previously mentioned using a bit of glue between the Bridge Plate and Bridge Cover. What do you think about the "screw&glue" idea. Also, I'm still contemplating the idea of "ovalizing" the holes that come out of the Bridge Cover so that the Strings don't have to make such a radical bend to go over the Saddle. Now, with all that said, let me vent a suspicion here. After working with Shara, and having turned her over and right side up many times, I happened to have found on the work area a strange, little Ring, with the inside diameter of about the size of the outside diameter of the little positioning Posts on the bottom of the Bridge Cover. And looking carefully (through 10X Magnifiers) at the posts, it appears that there was at one time, little grooves around the ends of the little Posts. I suspect that at one time the Bridge Cover was FASTENED to the Bridge Plate with a bunch of those little "keeper" Rings and that someone who previously had possession of Shara pryed the Bridge and Cover apart and broke all those little keeper Rings. I have no way to confirm this suspicion, and I have no way to actually know if that, in fact, happened. But suspicions are what they are. Anyway, we are still in the game at this point. Hope this finds YOU all doing well. JC | ||
| |||
| Mr. Ovation |
| ||
Joined: December 2001 Posts: 7248 Location: The Great Pacific Northwest | The bridge cover was just pressed onto the plate. No glues, or fasteners. This issue of the string pulling it off, as far as I know only happened on the 12-String models that have the one-piece saddle like you have. Other versions of this bridge look similar but have adjustable saddles and I believe are slightly less tall reducing the angle going over the saddles as well. For a variety of reasons they later went to the all metal bridge. I think you're idea will work, can't see why not. Not sure what affect the strings touching the cover are, but any angle lost and maybe affecting tension could be regained by adjusting the back of the bridge a little lower. | ||
| |||
| JCAllison |
| ||
Joined: April 2015 Posts: 14 | mileskb - 2015-04-13 4:40 PM The bridge cover was just pressed onto the plate. No glues, or fasteners. Hey Mr. O, Wish you could see what I'm seeing with the 10X Magnifiers when looking at the little Post ends. At first it appears that there IS the tiniest little grooves, and one side is broken on each of them, and it's alway the same side, as if someone pryed (pried?) the Bridge Cover off. BUT, I'm fluctuating between there being tiny grooves and another possibility. Could it possibly be that the plastic used to make the Bridge Cover could be melted and the ends of the little Posts mushroomed after being assembled so that the little Posts can't slip back through the holes in the Bridge Plate? You previously mentioned that heat was used on them. Am wondering what would happen if I dressed one of the little Posts into a mushroom shape with a Soldering Iron? I just can't imagine just pressing the Bridge Cover onto the Bridge Plate. Not when the Strings are exerting as much pressure on the Bridge Plate as they must. This issue of the string pulling it off, as far as I know only happened on the 12-String models that have the one-piece saddle like you have. Other versions of this bridge look similar but have adjustable saddles and I believe are slightly less tall reducing the angle going over the saddles as well. For a variety of reasons they later went to the all metal bridge. Have to say that the assembled unit looks REALLY nice. If only it worked as good as it looks! I think you're idea will work, can't see why not. The only trepidation present is that either epoxy or cyanoacrylate might not adhere to the plastic. Not sure what affect the strings touching the cover are, but any angle lost and maybe affecting tension could be regained by adjusting the back of the bridge a little lower. Yes. Have been doing some Internet searching for "needle files". What was found were small diameter rods coated with diamond fragments. Supposed to work on metal, wood, PLASTIC, etc. And looking at the holes in the Bridge Cover, they would be easy to file out as per your suggestion. Am leaning toward THAT course of action to reduce the upward pressure of the strings as they exit the String Holes in the Bridge Cover. Also, one of the things that was asked in the post with the first group of photos in it was about the String Groove in the Saddle for String Number Twelve. Is there a standard way of enlarging them? Or does one just get a small file and start filing? Or maybe using a Dremel type Rotary Tool? Anyway, again... Thanks for the responses. Things are moving along at a bewildering pace. It's onward through the fog! JC | ||
| |||
| JCAllison |
| ||
Joined: April 2015 Posts: 14 | Hey All, I have started another thread in the "My Guitar" forum. JC | ||
| |||
| JCAllison |
| ||
Joined: April 2015 Posts: 14 | JCAllison - 2015-04-14 4:42 AM Hey All, I have started another thread in the "My Guitar" forum. JC That thread is in the "About My Guitar" forum. (Pardon the double post, but there doesn't seem to be any way to edit a previous post to correct an oversight) | ||
| |||
| Old Man Arthur |
| ||
Joined: September 2006 Posts: 10777 Location: Keepin' It Weird in Portland, OR | JCAllison - 2015-04-14 2:47 AM That thread is in the "About My Guitar" forum. (Pardon the double post, but there doesn't seem to be any way to edit a previous post to correct an oversight) There is a Time Limit when you can edit. After a short while, you are stuck with what you wrote.  | ||
| |||
| JCAllison |
| ||
Joined: April 2015 Posts: 14 | Hey Mr. O, and All, Have spent some time examining Shara's Bridge/Saddle/Bridge Cover, and have finally settled on a "do-able" solution to the problem of the Bridge Cover separating from the Bridge/Saddle. Permit me to describe the solution: There are nine of the little "Pegs" that position the Bridge Cover on the Bridge Plate: There are three on one side; Three on the other side; and three in the middle. This can be seen in a number of the JPG posted previously in this thread. It just so happens that one of the Pegs of the three in the middle is right in the middle of the where the String holes are. It is the Peg closest to the Rectangular Headed Bolt. That happens to be the "beef-iest" place on the whole Bridge Cover. So here is what I have decided to do: Am going to get a brand NEW Drill Bit exactly the size of the "middle" Peg Hole in the Bridge Plate. Am going to remove the "middle" Peg from the Bridge Cover. With the Bridge Plate and Bridge Cover assembled, am going to drill through the Bridge Cover using the the middle hole in the Bridge Plate as a guide. Am going to counter-sink the drilled hole on the top side of the Bridge Cover. Then, with the Rectangular Headed Adjusting Bolt in place, am going to put an Oval Headed Phillips Bolt, down through the hole in the Bridge Cover, and the Bridge Plate, and nut it into place, securely fastening the Bridge Cover and Bridge Plate together. Am then going to use cyanoacrylate to adhere all the little Pegs in their respective Bridge Plate Holes, and anywhere that there is a close proximity of Bridge and Bridge Cover. The only difference in appearance between this configuration and the perfectly "stock" appearance is that there will be an Oval Headed Phillips Bolt head in middle of the Bridge Cover. What do you think? JC | ||
| |||
| JCAllison |
| ||
Joined: April 2015 Posts: 14 | arthurseery - 2015-04-14 5:24 AM There is a Time Limit when you can edit. After a short while, you are stuck with what you wrote. Hey Mr. A, I see that. Anyway, "all's well that ends well". (W. Shakespeare) Thanks for the response. JC | ||
| |||


| Jump to page : 1 Now viewing page 1 [25 messages per page] |
| Search this forum Printer friendly version E-mail a link to this thread |
| This message board and website is not sponsored or affiliated with Ovation® Guitars in any way. | |
| (Delete all cookies set by this site) | |