| The Ovation Fan Club | ||
| ||
| Random quote: "Got time to breathe, got time for music." --Briscoe Darling. |
 1619-4 Rebuild... 1619-4 Rebuild...
| View previous thread :: View next thread | |
| Member Communities -> Bottom Feeding Luthiery Guild | Message format | |
| DanSavage |
| ||
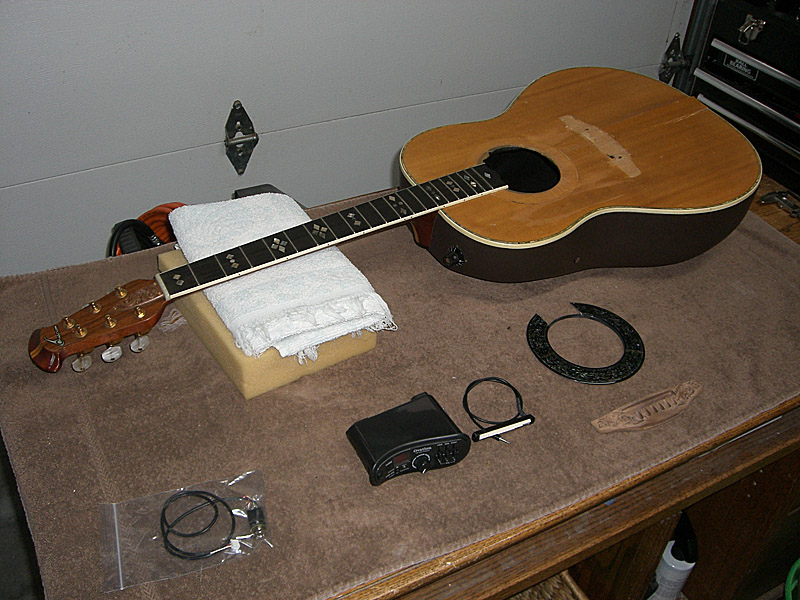
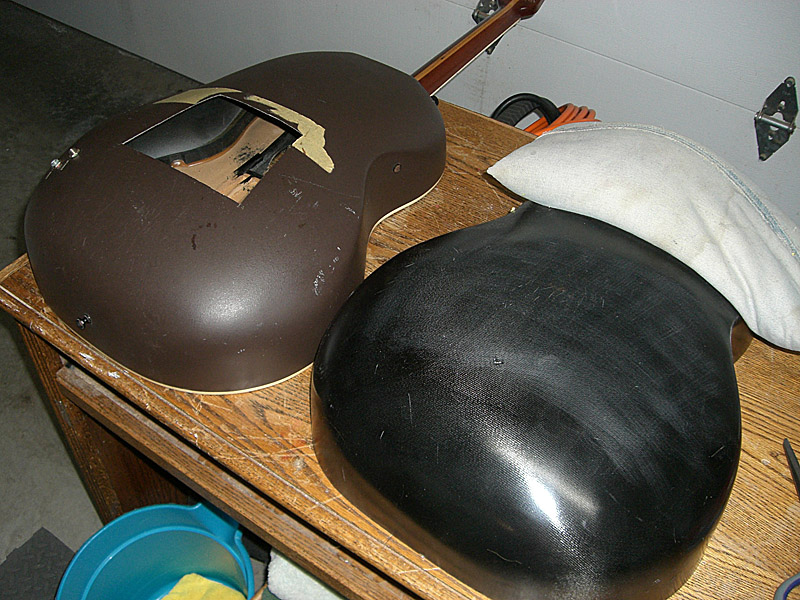
Joined: June 2012 Posts: 2332 Location: Pueblo West, CO | So, I bought the circa-1976 1619-4 BFLG from TJR.
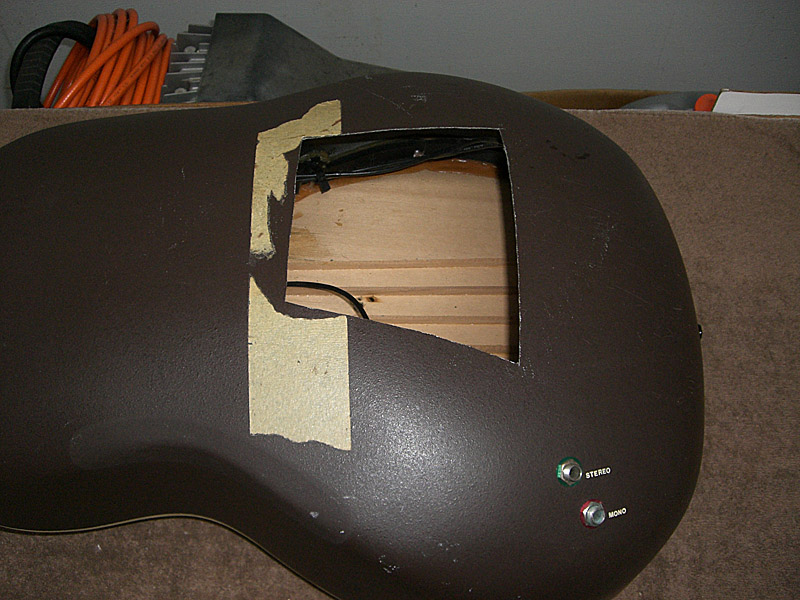
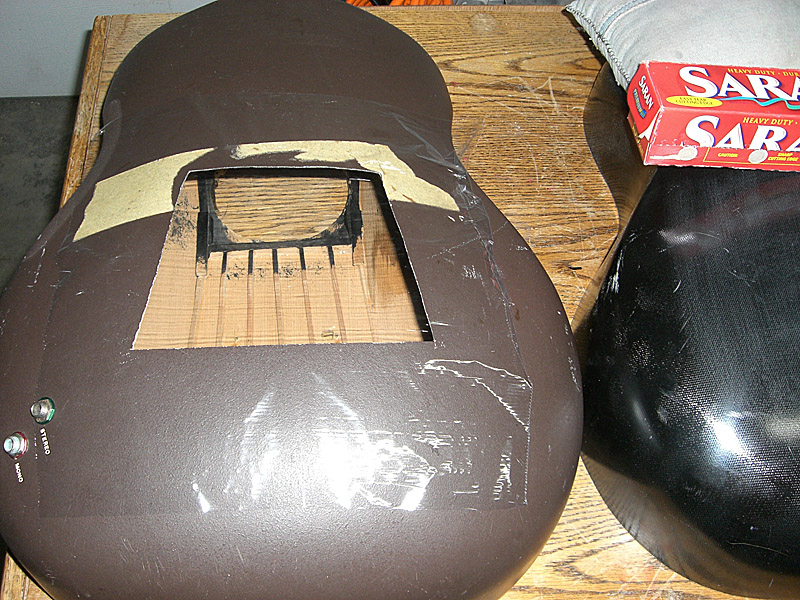
The top is pretty beat up and there's a trapazoid-shaped hole in the back. The ultimate plan is to route out the top leaving the purfling and binding in place, then replace the top with new wood using forward-shifted X-bracing. Since I've already got an A-braced 1710-1 CL, I don't need another one and I really like the lively sound of X-braced guitars.
The top sits on a shelf of kerfing that will make it pretty easy to glue a new top in its place.
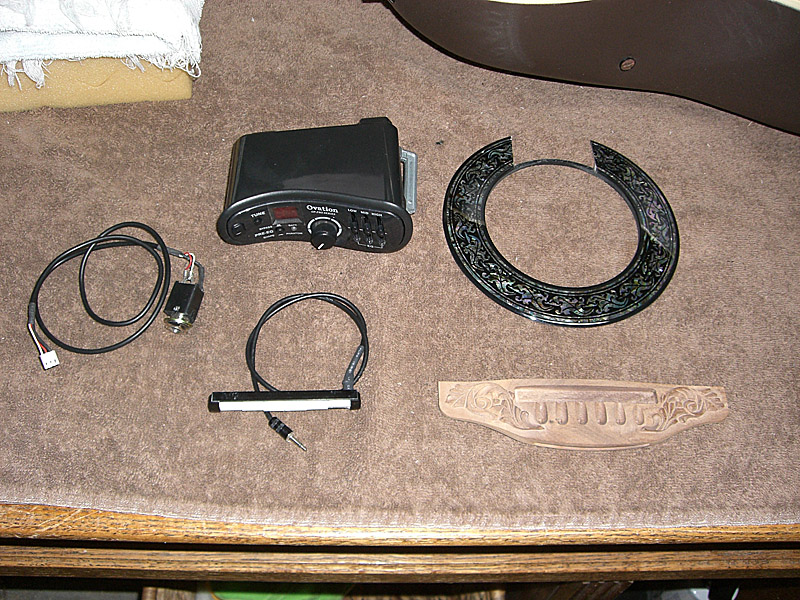
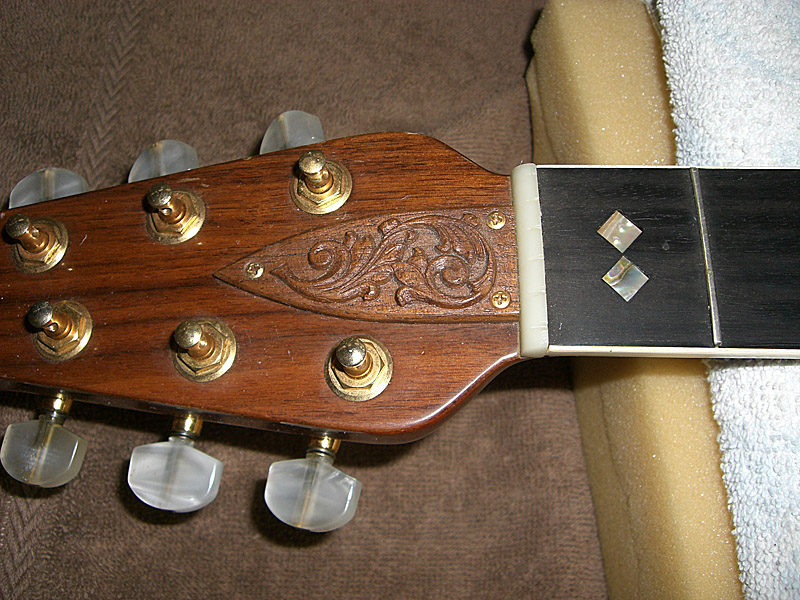
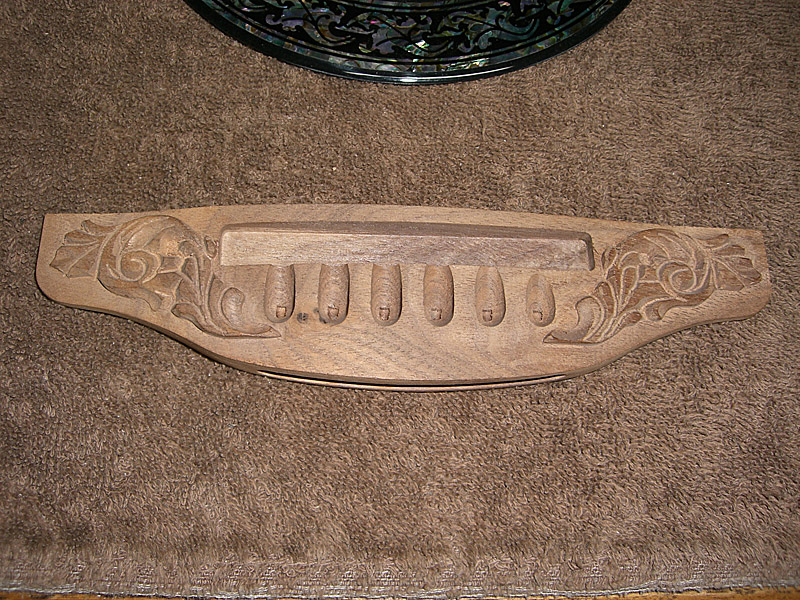
It was also missing the carved walnut bridge and abalone rosette. Luckily, I was able to obtain these from JB at the Mothership. I also got a complete OP-Pro setup including pickup and jack.
The first order of business will be to do a 3D scan on the TR cover and bridge, then 3D print them so I can use a duplicating machine to make wooden copes of them.
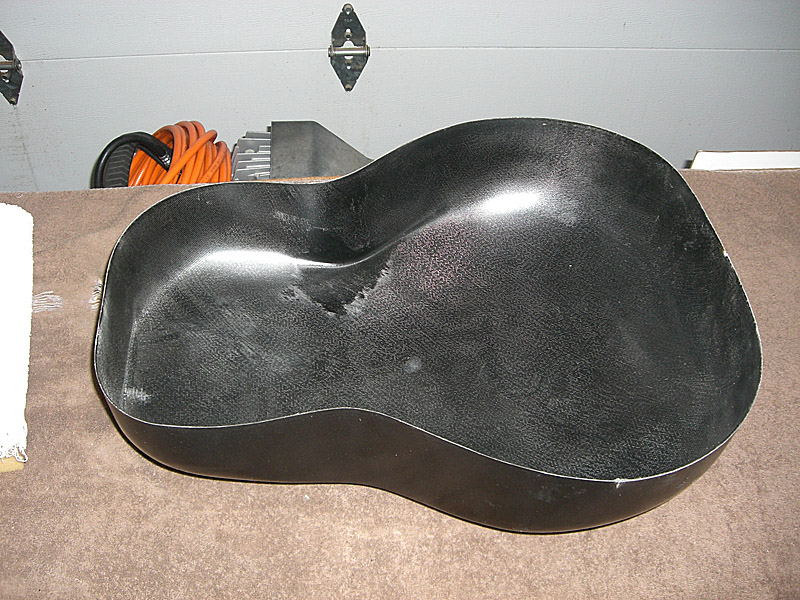
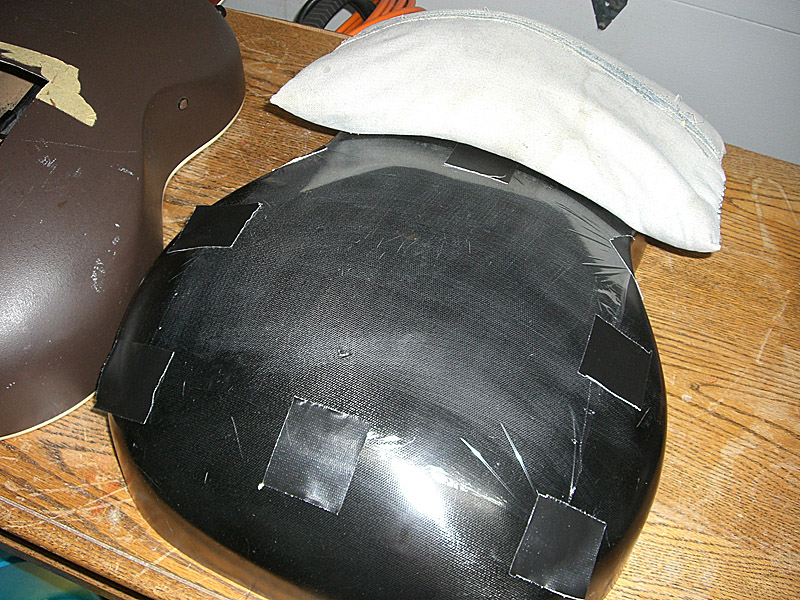
I was thrilled to learnTJR was including an unmolested, modern, hand-laid bowl in the deal as well as some scraps of the 8.5 oz. 2x2 twill cloth used by the factory to lay up the bowls. Short-term plans are to use it to lay up a patch for the hole in the back using the scraps TJR included. Long-term plans are to splash a mold off of it so I can lay up more bowls.
I recently did a neck-reset for a friend of mine. One think I didn't like was the excessive amount of glue the factory used to attach the top. But, compared to this one, the modern workers were quite frugal. "Do you think you used enough glue there, Butch?"
The photos don't do justice to the quantity of glue squeezed out of these top joints. They are almost 1/4" thick and nearly 1/2" wide.
Even the rosette had a copious amount of glue.
Edited by DanSavage 2014-05-09 9:18 PM | ||
| |||
| seesquare |
| ||
Joined: November 2002 Posts: 3648 Location: Pacific Northwest Inland Empire | So, Dan- You're planning to put a new top INSIDE the purfling?! Sounds a bit tedious. And, all that glue will make getting the neck off, a real challenge. Best of luck, & you have my admiration for rehabbing this critter. | ||
| |||
| DanSavage |
| ||
Joined: June 2012 Posts: 2332 Location: Pueblo West, CO | Putting a new top inside the purfling is the initial plan, though I'm certainly not wedded to it. I would like to preserve as much of the original guitar as possible. Having a molded cloth bowl gives me a lot of options, up to, and including cutting the old body off from around the neck and building a new one in its place. I was originally planning to cut the neck off the body and converting it to a bolt-on neck. To that end, I looked at the German patent drawings on the OvationTribute.com site. They show the end of the truss rod on these glue-on neck models is buried deep inside the body. So, while I can do a fairly clean job of cutting the wood, cutting the steel truss rod buried inside the neck is another matter entirely. If that's the case, then instead, I'm going to leave the neck glued into is block and on the body and cut the top off from between the fingerboard extension and the top of the neck block, or at least as much of it as I can. I checked the alignment of the neck and it's got a decent angle to where the bridge is located, though it looks like it has some minor crush damage that pushed the top of the bowl toward the tail. Taking the top off should relieve this pressure. Edited by DanSavage 2014-05-10 11:07 AM | ||
| |||
| seesquare |
| ||
Joined: November 2002 Posts: 3648 Location: Pacific Northwest Inland Empire | If you cut away the bowl, can you save the purfling? All things considered, I think saving the neck, intact, is the better option. Once you get the big pieces removed, heating up the neck joint should get the dovetail loose from the block, easier. Then, if you want to convert it to a bolt-on, you have the exposed joint to work with, without messing with the trussrod. | ||
| |||
| DanSavage |
| ||
Joined: June 2012 Posts: 2332 Location: Pueblo West, CO | I'm not sure about being able to save the purfling or separate it from the bowl. If I can't get the top off cleanly, then I then I agree with you that it would be easier to cut the body away from the neck to expose the neck joint and build a new body to go with the neck. Having a bare bowl makes it really nice to be able to make that choice. Splashing a mold off this body is not going to take that long, once I get started. Then, after the mold is made, laying up a new bowl will only take a couple of hours. What will take a fair amount of time is making the jig to hold the body and keep it stable enough to add the kerfing, glue the top and route it for new purfling/binding and to make a jig to hold the neck in the right position to glue the neck block to the body. I'll make the decision about which way to go when I get ready to start cutting into the top. The main reason why I'm taking the route I am is that it will be faster and cheaper to just have to make a new top for this guitar, then making a whole new body to go with the neck. Edited by DanSavage 2014-05-11 1:24 AM | ||
| |||
| Old Man Arthur |
| ||
Joined: September 2006 Posts: 10777 Location: Keepin' It Weird in Portland, OR | Be sure to take photos of the process. That would be educational. | ||
| |||
| DanSavage |
| ||
Joined: June 2012 Posts: 2332 Location: Pueblo West, CO | Will do. | ||
| |||
| seesquare |
| ||
Joined: November 2002 Posts: 3648 Location: Pacific Northwest Inland Empire | I dunno. Any way I can figure, the neck's gotta come off. Very precise adjustment on a router table may get the existing top off the bowl, at that point. One of those Stew-Mac, Dremel-mounted purfling routers might do the job, too. It would be such a shame to lose the abalone "bling". | ||
| |||
| TJR |
| ||
Joined: July 2002 Posts: 288 Location: Maine | I'll be impressed if you can make anything out of it. Yes I agree. The glue squeeze out is very excessiv, maybe they didn't care since the guitar seemed to be a engineering test model. Also a bit "hack" is the black sound hole paint which doesn't match the rest of the exterior build quality and appointments. Makes me think of home kitchen installers who hack out the cabinets to install sinks and such . Looks good from the outside but don't look under the sink Interesting Idea to mold the patch off the spare bowl. I thought you were going to cut the patch from the spare bowl? | ||
| |||
| DanSavage |
| ||
Joined: June 2012 Posts: 2332 Location: Pueblo West, CO |
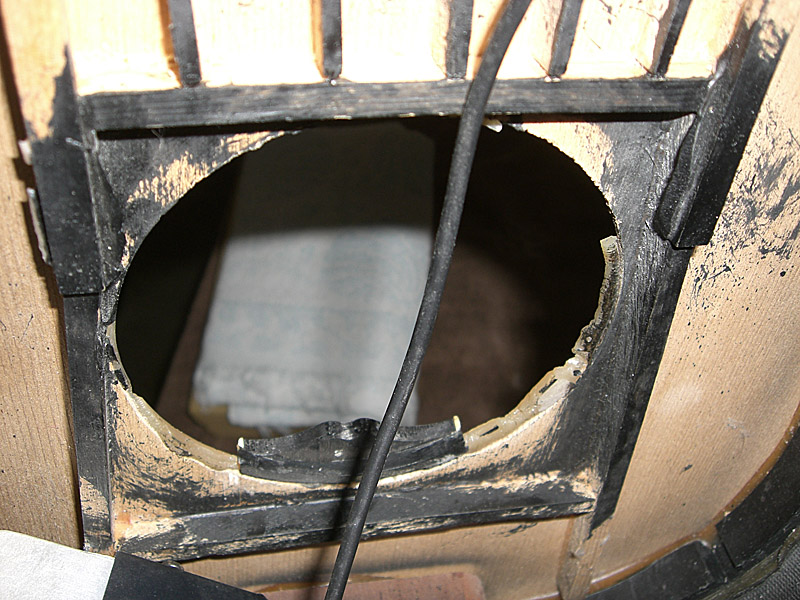
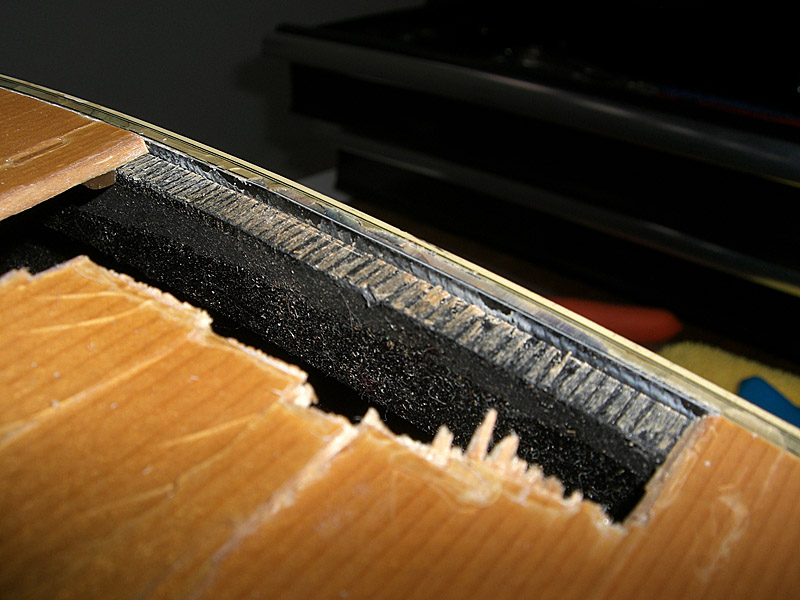
seesquare - 2014-05-11 5:53 AM I dunno. Any way I can figure, the neck's gotta come off. Very precise adjustment on a router table may get the existing top off the bowl, at that point. One of those Stew-Mac, Dremel-mounted purfling routers might do the job, too. It would be such a shame to lose the abalone "bling". Getting the top of may be even easier than I thought. Here's one of the damaged parts of the top as it came to me. The top has separated cleanly from both the kerfing and the purfling. Additionally, if you look closely you can see that the finish has also been pulled up off the abalone. 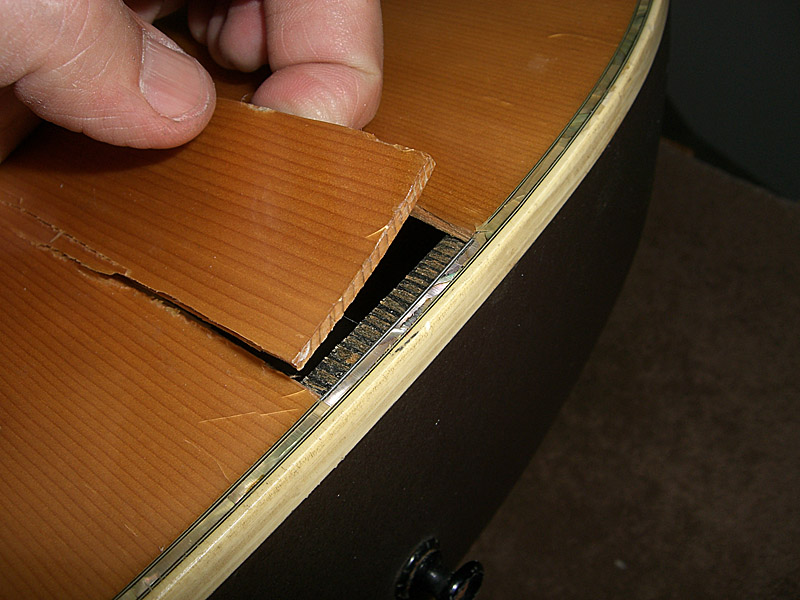 So, I conducted an experiment. I used a pair of Channel Lock pliers and pulled up more of the top.
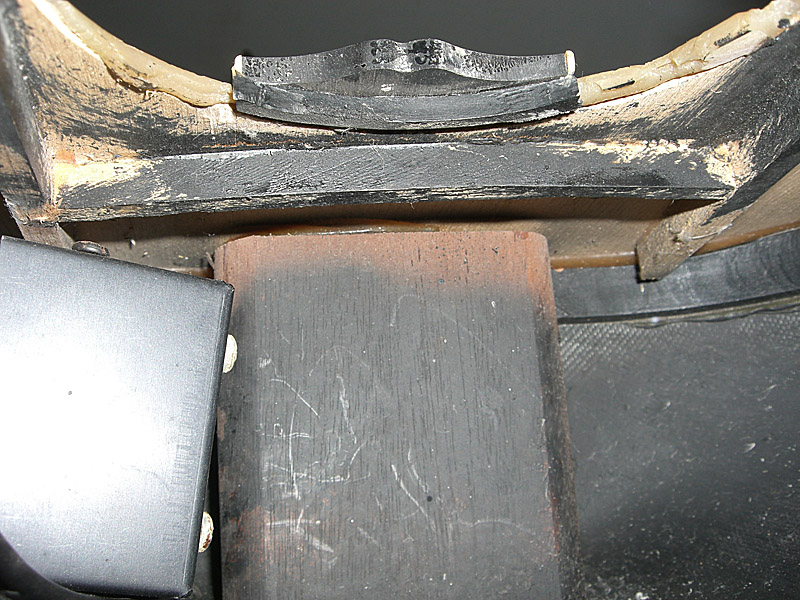
After these pics were taken I pulled up another couple of inches on either side of what you can see here, so almost the whole lower bout is free from the top. The epoxy glue globs that squeezed out of the joint fracture and separate cleanly from the kerfing. In a couple of spots the clear finish has come off the abalone and it's real purty. The old finish leaves it looking dull and yellowed. As far as getting the top off without pulling the neck, here's my plan of action. It's kind of hard to see here, but there's a gap between the top of the neck block and bottom of the top wood. The factory filled this space with epoxy. (naturally)
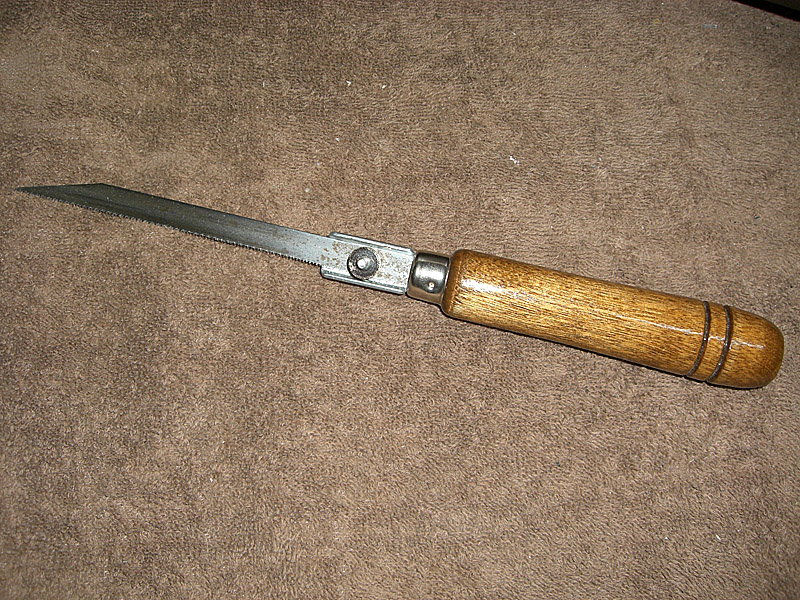
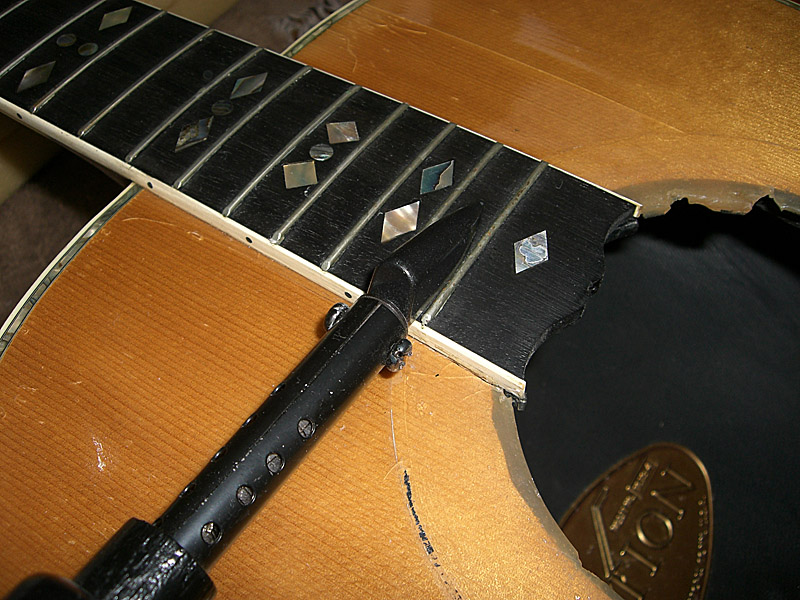
Once the top is off the body and the sides of the neck block are exposed, I'm going to use a Zona saw to cut the top free from the neck block.
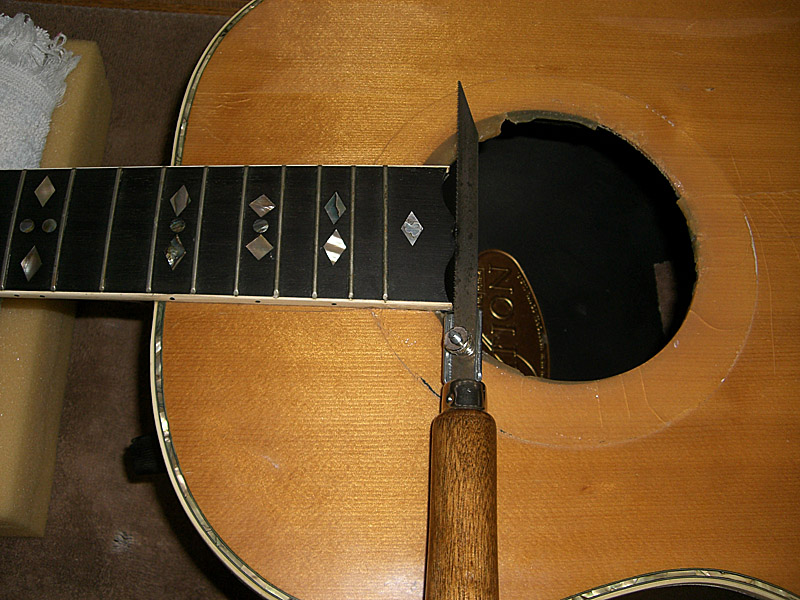
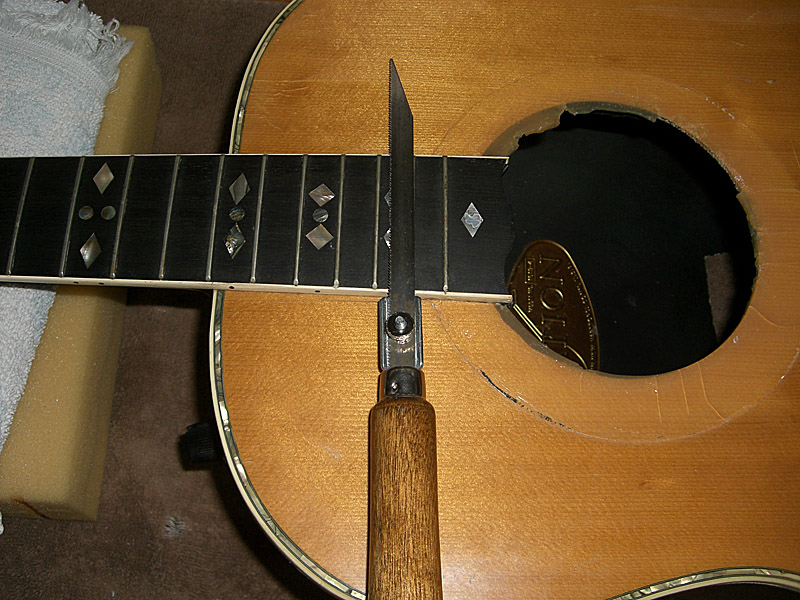
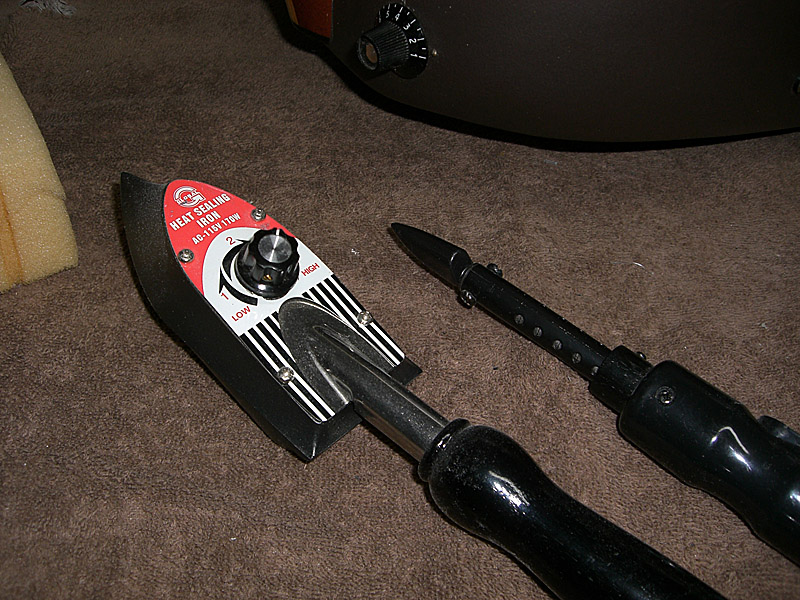
To separate the fingerboard extension from the top, I'm going to use my trim seal iron (on the right) to heat the ebony and soften the glue between it and the top.
It's small and narrow enough to get between the frets so I don't melt the glue holding the fret markers or the binding.
| ||
| |||
| DanSavage |
| ||
Joined: June 2012 Posts: 2332 Location: Pueblo West, CO | trickard - 2014-05-11 6:55 AM I'll be impressed if you can make anything out of it. Yes I agree. The glue squeeze out is very excessive, maybe they didn't care since the guitar seemed to be a engineering test model. Interesting Idea to mold the patch off the spare bowl. I thought you were going to cut the patch from the spare bowl? I could cut the patch from the spare bowl, but I'd rather keep that in pristine condition. Or, at least long enough to know I'm able to make usable duplicates of it from my own molds. Making a patch off the bowl is an idea borrowd from my model airplane experience. This is the same principle as molding landing gear doors on the bottom of the wing so the finished pieces match the bottom profile of the wing perfectly. What I'm going to do is to tape some thin plastic visqueen to the back of the bowl so it smooth and wrinkle free. Then, lay up the patch over the visqueen. Lastly, lay more visqueen over the patch pulling it taut so it's also smooth and wrinkle-free. When the epoxy is fully cured, The visqueen is pulled free of the patch. The visqueen leaves the fiberglass patch glassy smooth with no print-through or pin holes. Then, I just place the patch over the hole matching it to the shape of the bowl and trace out the outline of the hole onto the patch for a perfect fit. I may or may not add a reinforcement. I'm planning to use Hysol, which is an aerospace-quality epoxy to edge-glue the patch. If I think it needs reinforcement, I'll add a thin strip of cloth and resin to the inside of the bowl around the outline of the patch. | ||
| |||
| DanSavage |
| ||
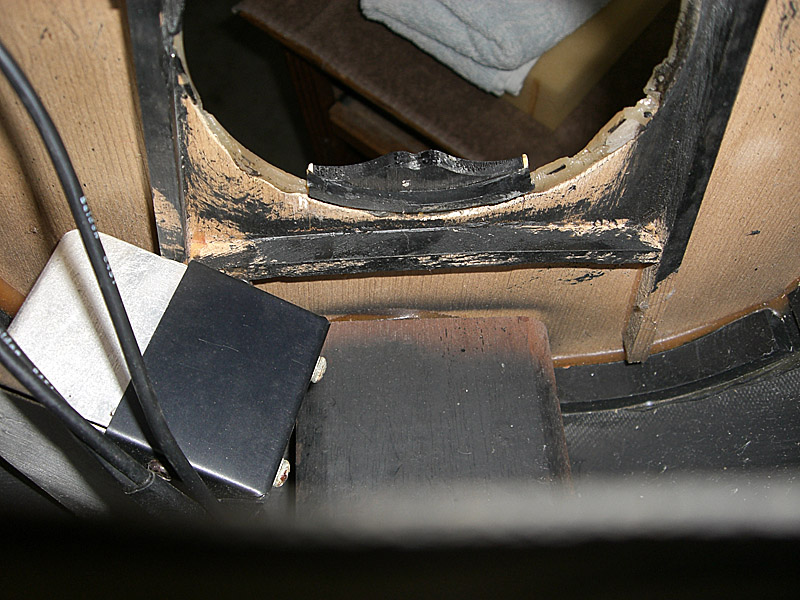
Joined: June 2012 Posts: 2332 Location: Pueblo West, CO | Here's what the lower bout looks like after 10 minutes of work. Top is coming cleanly out of the pocket. I'm probably going to hold off doing any more until I get the 3D models of the TR cover and bridge done. Pics to follow.
| ||
| |||
| seesquare |
| ||
Joined: November 2002 Posts: 3648 Location: Pacific Northwest Inland Empire | Well, okay, then! Nice work, Dan. Could be the top isn't glued real strongly to the purfling, cuz the glue for the purfling isn't epoxy. I use something like airplane glue to put on plastic bindings, and I think it's just a thick, acetone-based adhesive, anyway. So, the wood may not be well-bonded to the purfling, to begin with. Cute little saw ya got there, Dan. Should do the job. Persevere! | ||
| |||
| DanSavage |
| ||
Joined: June 2012 Posts: 2332 Location: Pueblo West, CO | It looks like the top was glued with epoxy. Epoxy can be made to cure at different rates. The quicker epoxy dries, the less it's able to soak into the pores of the wood. This looks like what happened with the top. The factory used a fairly quick-curing epoxy to glue the top, which grabbed onto surface of the wood fibers. The epoxy was able to make a better bond between the purfling, the binding and the bowl, which is why I've been able to pry the wood out of the joint. Also, as epoxy ages it continues to cure and continues to get harder and more brittle, and that's definitely what I'm seeing here. The epoxy has gotten so brittle that it's losing its grip on the wood. Don't misunderstand, it's still got a good grip. If I weren't going after it with a pair of pliers it would still hold the top in place. But, with the concentrated pressure I'm applying, the glue joint is failing, which in this case, is a good thing. Thanks! Edited by DanSavage 2014-05-12 9:26 AM | ||
| |||
| jamesholl |
| ||
Joined: June 2012 Posts: 112 Location: Bristol England | Dan, You never cease to amaze me with your knowledge and skill. Keep up the good work. James. | ||
| |||
| DanSavage |
| ||
Joined: June 2012 Posts: 2332 Location: Pueblo West, CO | trickard - 2014-05-11 6:55 AM Also a bit "hack" is the black sound hole paint which doesn't match the rest of the exterior build quality and appointments. Makes me think of home kitchen installers who hack out the cabinets to install sinks and such . Looks good from the outside but don't look under the sink. Painting the wood around the sound hole and nowhere else is an old theater/show biz trick. "If the audience can't see it, don't paint it."  | ||
| |||
| DanSavage |
| ||
Joined: June 2012 Posts: 2332 Location: Pueblo West, CO | jamesholl - 2014-05-12 9:35 AM Dan, You never cease to amaze me with your knowledge and skill. Keep up the good work. James. Thanks for the kind words, James. Removing the top on this guitar was made easier because Ovation didn't follow standard practices when installing the purfling/binding. Here's a pic from Stewart-MacDonald's web site showing how purfling and binding are normally installed:
Had they followed traditional techniques, I would not have been able to pull the top up without also pulling up the purfling/binding. I don't know if all Ovations are built this way, but the non-tradtional construction technique they used here makes re-topping this guitar much easier. Edited by DanSavage 2014-05-12 2:45 PM | ||
| |||
| DanSavage |
| ||
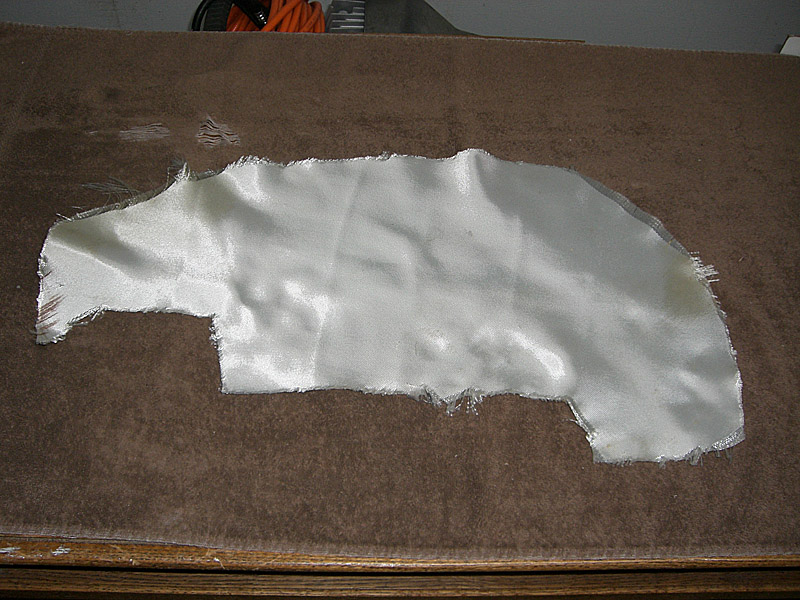
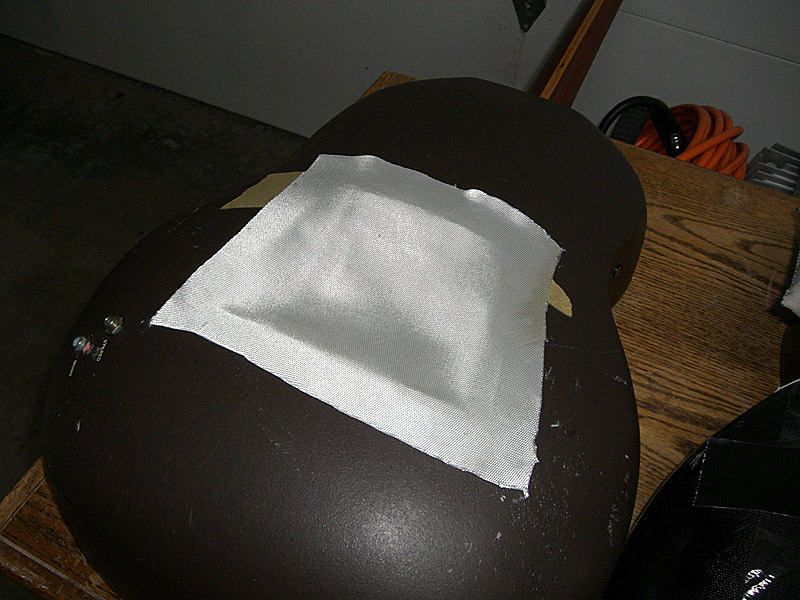
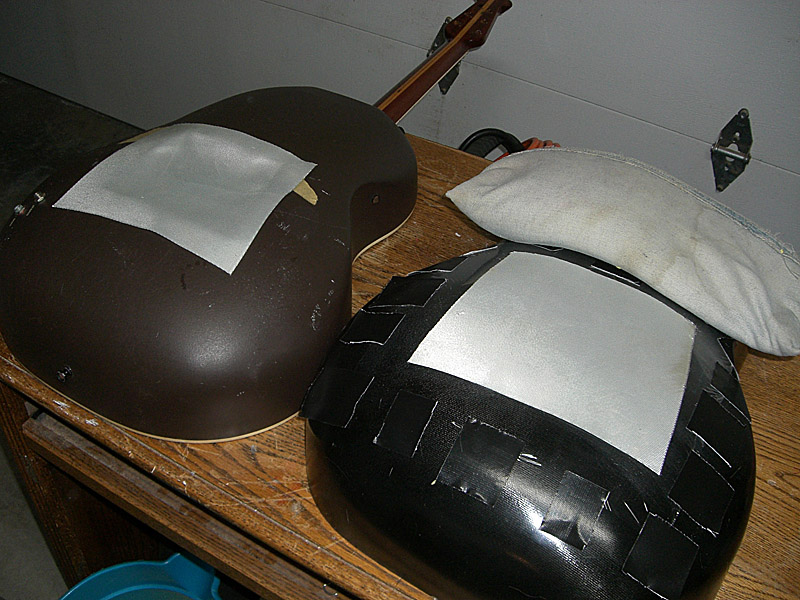
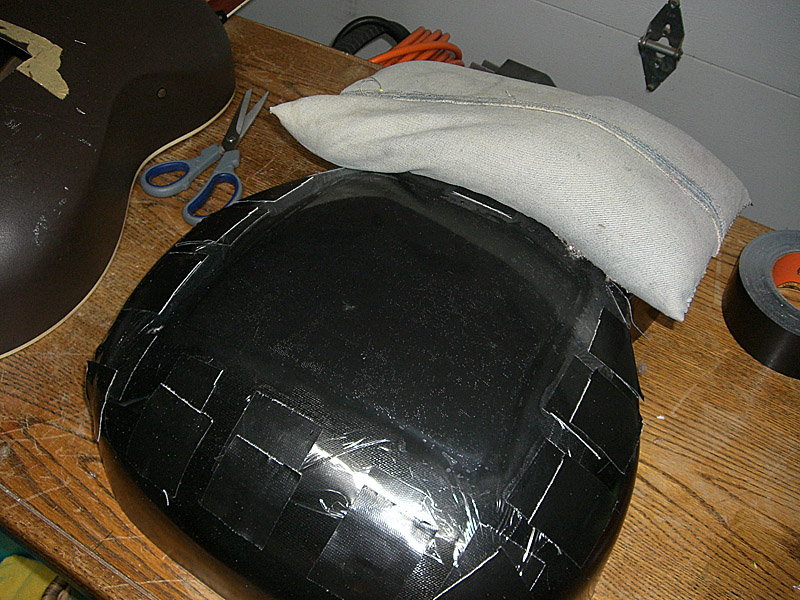
Joined: June 2012 Posts: 2332 Location: Pueblo West, CO | While I'm gathering the parts I need to build a new top I thought I'd make the patch for the back. The first task is the knock off the high spots on the mold so the new piece is smooth.
Next, I cut a piece of visqueen (aka Saran Wrap) that's oversize to the patch.
Stretch it down over the 'mold' using Gorilla tape. I've used masking tape in the past, but sometimes it comes up, so this time I thought I'd use Gorilla tape because I know it won't come up. It didn't.
Cut out an oversized piece of cloth.
I wasn't sure if the bowls are one layer of cloth or two. I've read from other sources that they are 'two-ply', so I decided to make this patch two layers. I'll know for sure once I cut the patch to size. If it's too thick, I'll lay up another patch using only one layer of cloth.
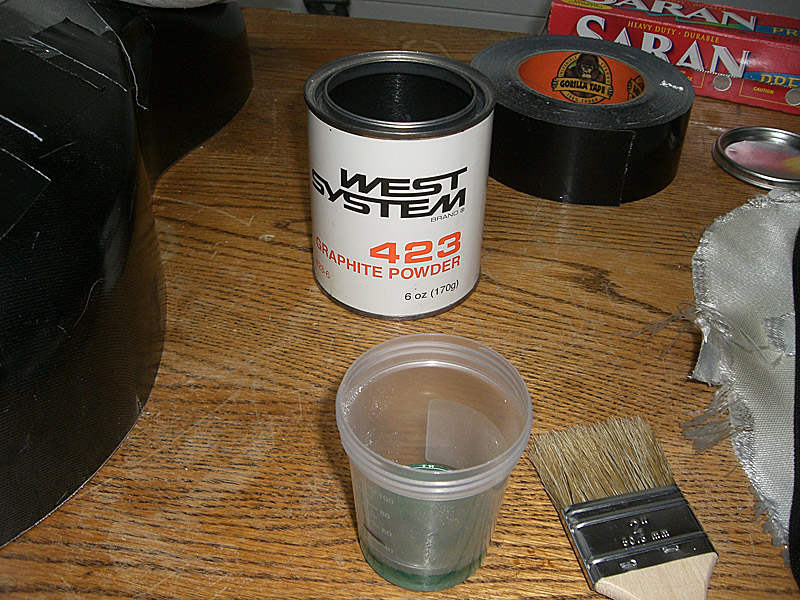
I added some graphite powder to color the resin black so it will be easier to finish later. (it will take less black paint) I mold my parts using MGS epoxy. It's an aerospace-grade epoxy from Germany. It is used on numerous full-size composite airplanes and kit planes. First, I mix the powder with the hardener to make sure the powder is completely mixed in, then add the resin and stir.
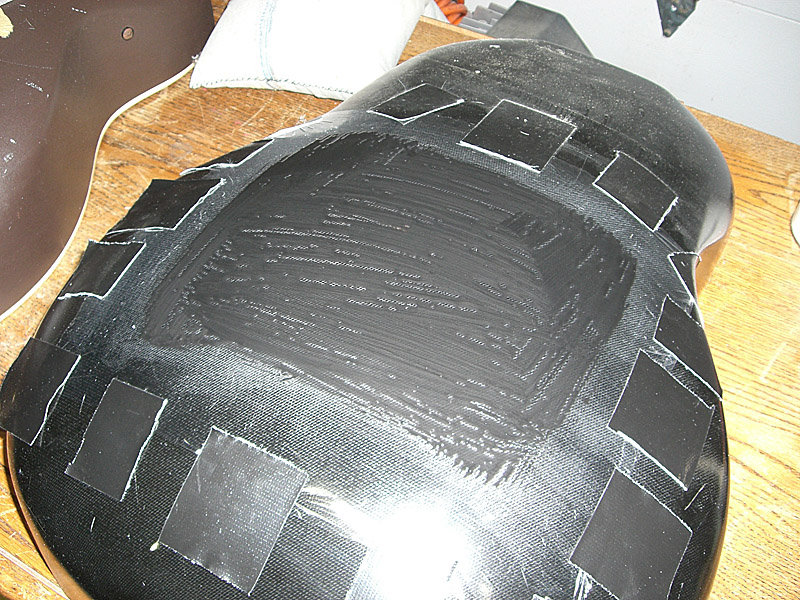
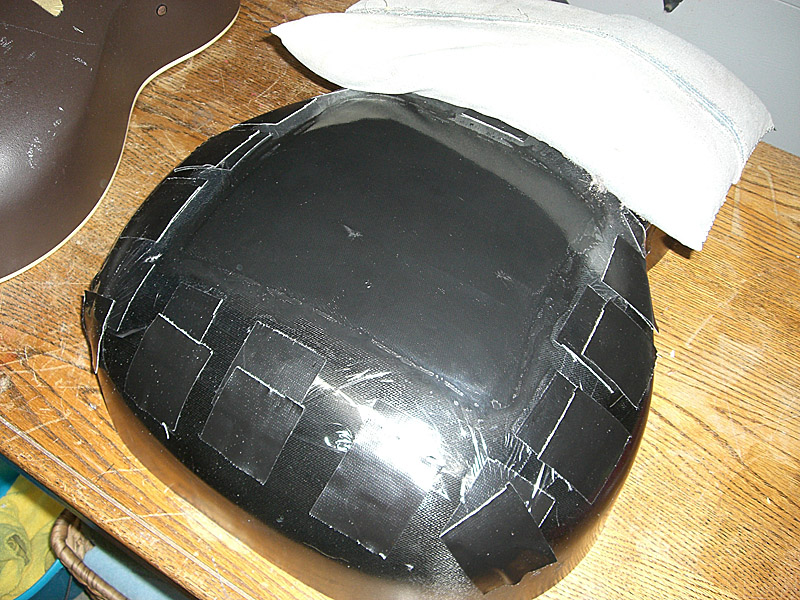
Paint on a layer of resin.
Lay on the first layer of cloth and wet it out. Then, paint on more resin and add the second layer of cloth and wet it out, too.
Once the cloth is uniformly wet, cut out and tape down the top Saran Wrap, er, visqueen.
Use a thin credit card to squeeze out all the trapped air bubbles and let it dry overnight.
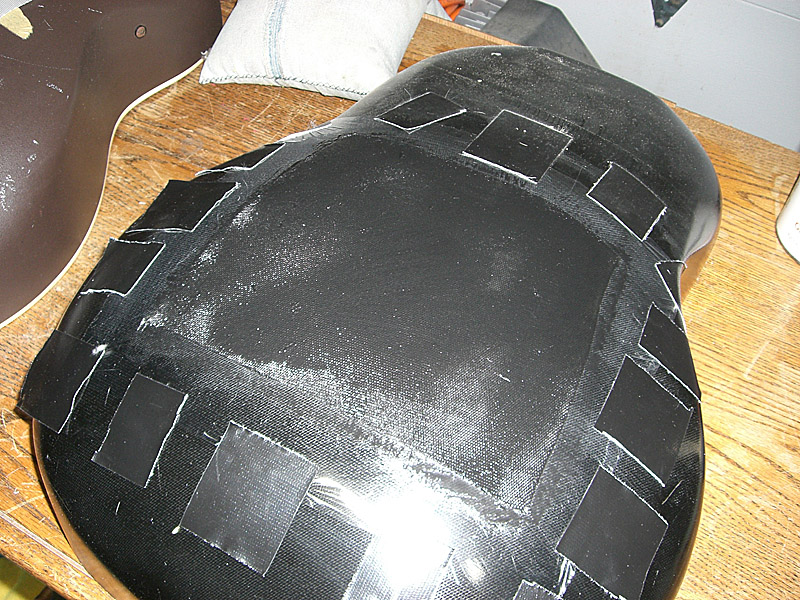
Patch is done. Test fit and it matches the contour of the bowl perfectly.
Trim the rough edges.
Next step will be to trace the outline of the hole and cut the patch. Pics to follow. | ||
| |||
| dvd |
| ||
Joined: December 2003 Posts: 1889 Location: Central Massachusetts | Keep it coming, Dan, this is very cool to see... | ||
| |||
| TJR |
| ||
Joined: July 2002 Posts: 288 Location: Maine | Nice. You don't waste much time. Actually looks like fun. | ||
| |||
| DanSavage |
| ||
Joined: June 2012 Posts: 2332 Location: Pueblo West, CO | dvd - 2014-05-15 9:02 AM Keep it coming, Dan, this is very cool to see... Will do. Thanks. | ||
| |||
| DanSavage |
| ||
Joined: June 2012 Posts: 2332 Location: Pueblo West, CO | trickard - 2014-05-15 9:42 AM Nice. You don't waste much time. Actually looks like fun. Thanks! I'm really looking forward to playing this guitar once it's finished. Yeah, this kind of stuff is kind of fun. It's the 'making something from nothing' aspect that I really liked about model airplanes. What I didn't like about model airplanes is the possibility of crashing it every time it left the ground. The patch I laid up has a semi-feathered edge that was a result of the layup process I used. I may end up simply sanding the edge down so it's completely feathered and glue it to the back of the body instead of trying to edge-glue it into the hole. This would this make a stronger glue joint that would not need any reinforcement. It would also be easier and faster to do. I'll probably wait to actually glue the patch into place until after the top is on the guitar just in case I need to have easy access to the underside of the top. I even toyed with the idea of making the hole into a back door by cleaning up and evening out the hole and adding an inner lip, then making the patch into a removable hatch. Edited by DanSavage 2014-05-15 1:34 PM | ||
| |||
| jay |
| ||
Joined: January 2009 Posts: 1249 Location: Texas | Dan, thanks for taking the time and effort to post all the steps of this project...its incredibly interesting and also for your continued work on "History of the Bowl". | ||
| |||
| DanSavage |
| ||
Joined: June 2012 Posts: 2332 Location: Pueblo West, CO | amosmoses - 2014-05-15 11:32 AM Dan, thanks for taking the time and effort to post all the steps of this project...its incredibly interesting and also for your continued work on "History of the Bowl". You're welcome, Jay. I'm glad you're enjoying both threads. I think it would be pretty cool to actually make an Ovation guitar from scratch. The cloth bowl I got from TJR has helped me overcome a major hurdle to that goal. Edited by DanSavage 2014-05-15 1:38 PM | ||
| |||
| jay |
| ||
Joined: January 2009 Posts: 1249 Location: Texas | Well...I would like to get my order in first. I would like a 1967 DanSavage Classical Re-Issue. Which brings me to...the shiny bowl. What did they actually do differently to shine it up. And I guess that process was ditched because of efficiencies (which Fender masterfully used to eventually snuff out Ovation)? | ||
| |||


| Jump to page : < 1 2 3 4 5 6 ... > Now viewing page 1 [25 messages per page] |
| Search this forum Printer friendly version E-mail a link to this thread |
| This message board and website is not sponsored or affiliated with Ovation® Guitars in any way. | |
| (Delete all cookies set by this site) | |