| The Ovation Fan Club | ||
| ||
| Random quote: "One good thing about music, when it hits you, you feel no pain." - Bob Marley |
 1619-4 Rebuild... 1619-4 Rebuild...
| View previous thread :: View next thread | |
| Member Communities -> Bottom Feeding Luthiery Guild | Message format | |
| TJR |
| ||
Joined: July 2002 Posts: 288 Location: Maine | Nice progress.. Boy, that bear was RIPPING that tree apart! As others have said, I'm looking forward to the rest of the rebuild .. | ||
| |||
| marenostrum |
| ||
Joined: August 2007 Posts: 1008 Location: Tuscany, Italy | Bravo !!! | ||
| |||
| DanSavage |
| ||
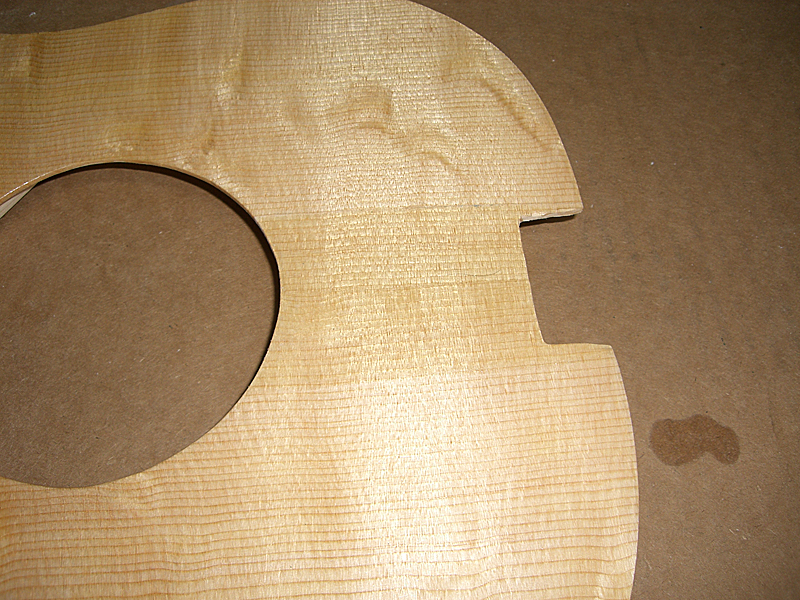
Joined: June 2012 Posts: 2303 Location: Lake Forest, CA | Thanks! I figure that if I'm going to use bearclaw spruce, the spruce should look like a bear clawed it. :D Actually, I'm really happy with the figuring. The photos don't really show all the figuring it has. Even the sanding guy commented on how nice it looked. | ||
| |||
| TJR |
| ||
Joined: July 2002 Posts: 288 Location: Maine | Not my ad but in case you want to do another Custom Legend re-top project http://nwct.craigslist.org/msg/4476492444.html TJR | ||
| |||
| DanSavage |
| ||
Joined: June 2012 Posts: 2303 Location: Lake Forest, CA | Thanks for the head's up. I'll have to talk to my accountant.  | ||
| |||
| BanjoJ |
| ||
Joined: September 2012 Posts: 809 Location: Thredbo, NSW, Australia | DanSavage - 2014-06-08 11:21 AM Thanks for the head's up. I'll have to talk to my accountant. Can you talk to mine as well? :-) I think I have terminal GAS! | ||
| |||
| DanSavage |
| ||
Joined: June 2012 Posts: 2303 Location: Lake Forest, CA | Sure thing. I'm not sure it'll do any good, but I'm always willing to try.  | ||
| |||
| DanSavage |
| ||
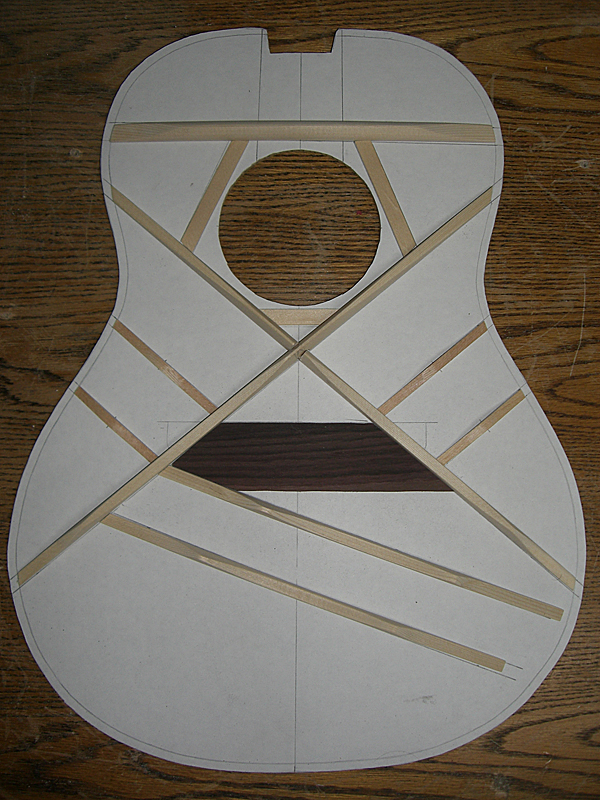
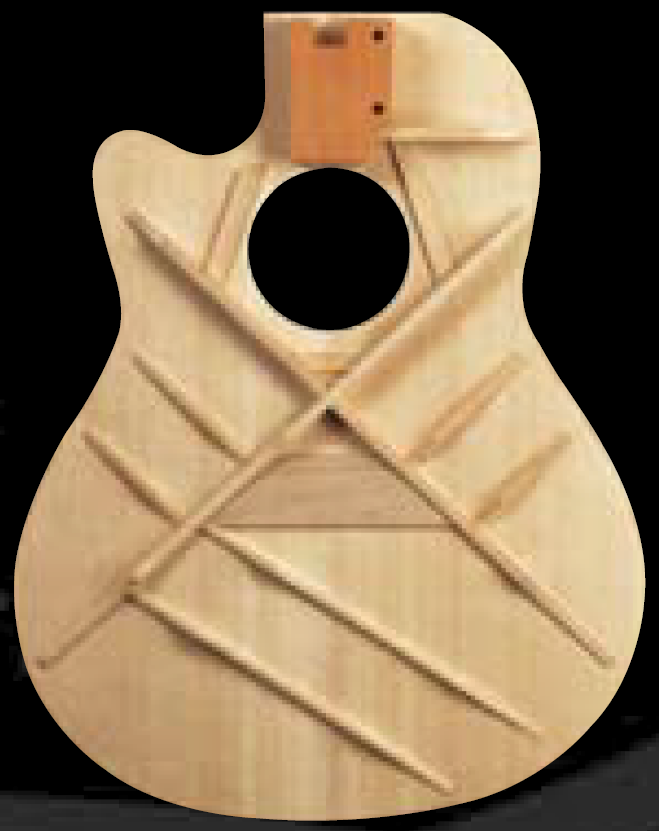
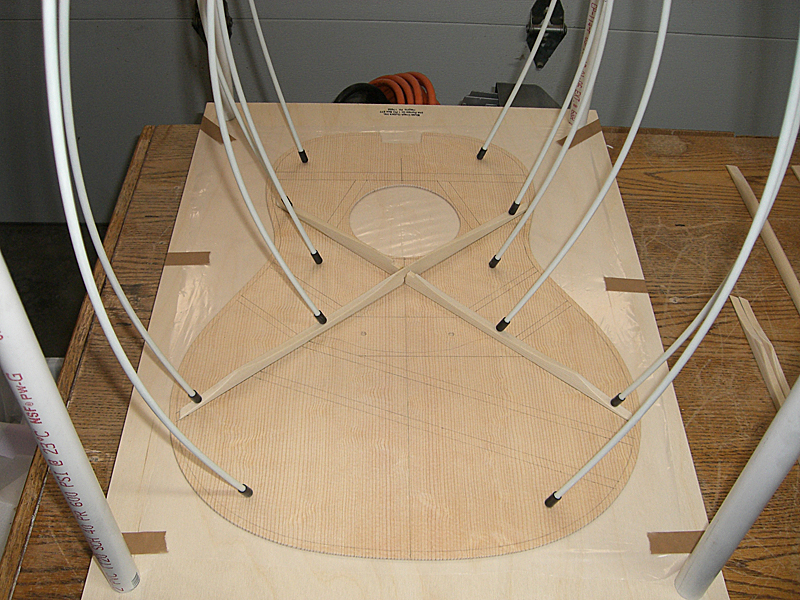
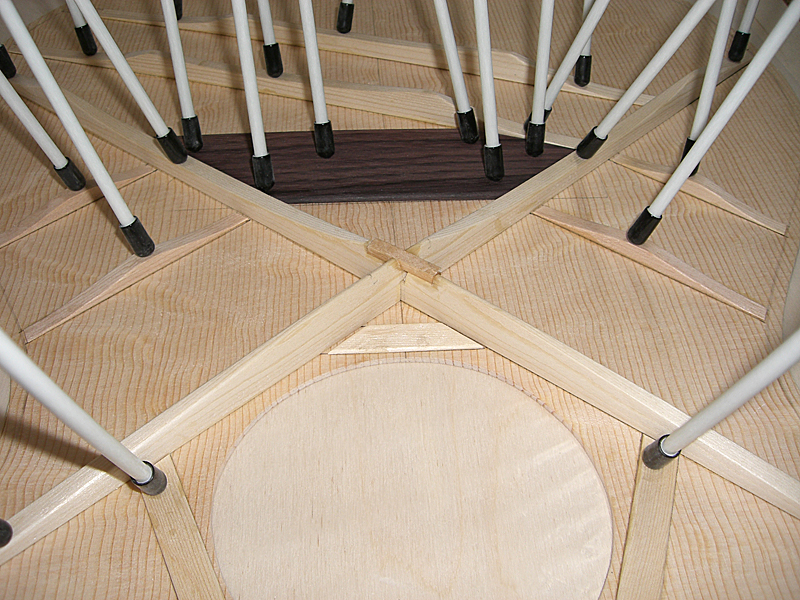
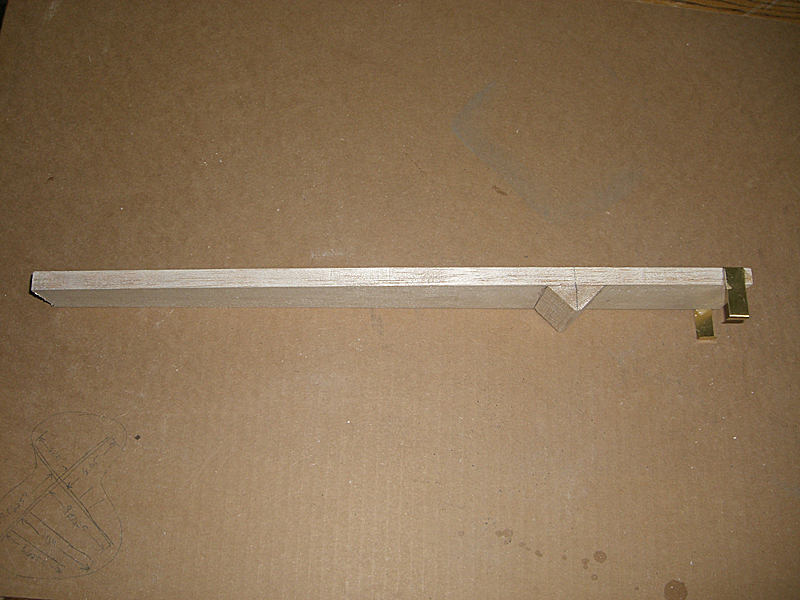
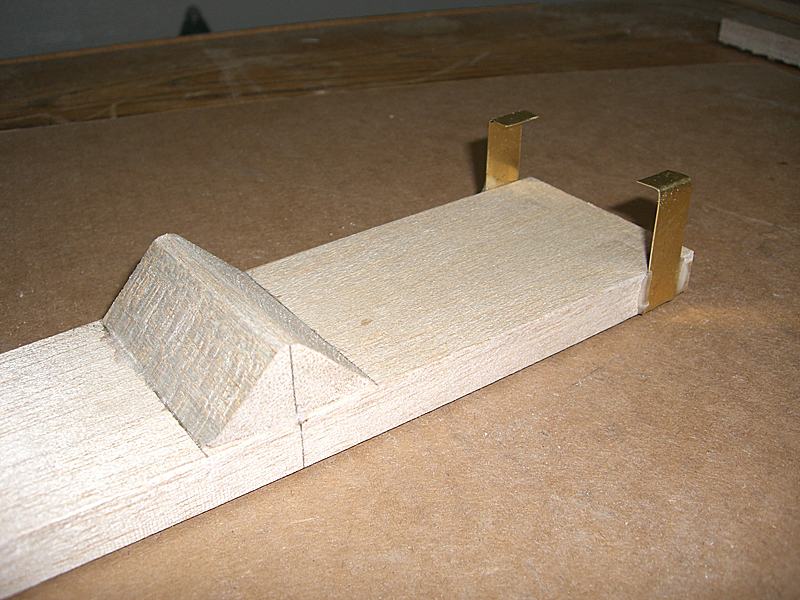
Joined: June 2012 Posts: 2303 Location: Lake Forest, CA | I've finished the braces for the top. I'm also including the LX brace photo I posted previously for comparison. The primary difference between the Ovation LX braces and the braces I'm using is that while the Ovation braces are scalloped, they are square in cross-section. The braces I'm using are scalloped and tapered to a parabolic cross-section. I laid out the pattern on my cardboard template for sizing, spacing, etc. I was going to use a cloth patch over the X braces, but after some thought I've decided to make an X-shaped patch out of birch ply and notch the tops of the braces, like what Ovation does on their LX braces. Once that's done, I'm going to draw the pattern onto the back of my top wood, then start gluing tomorrow. Progress pics to follow.
Edited by DanSavage 2014-06-13 10:32 AM | ||
| |||
| DanSavage |
| ||
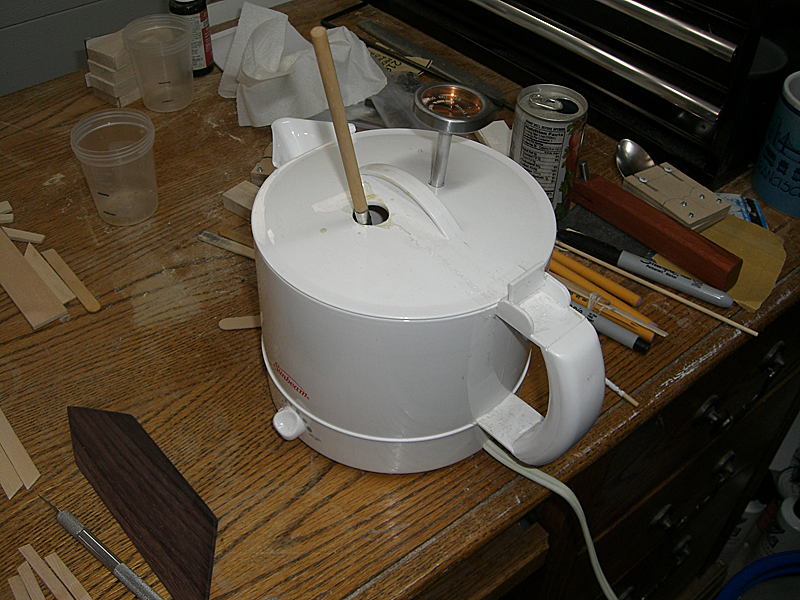
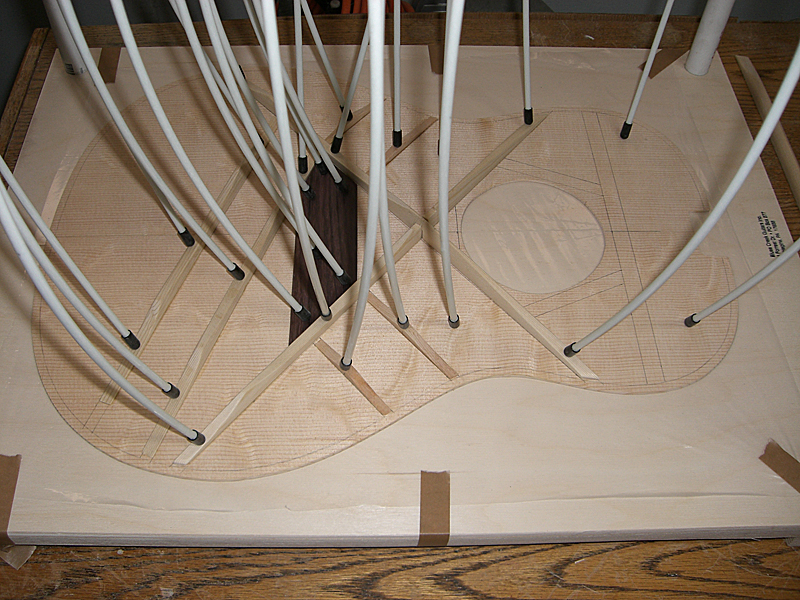
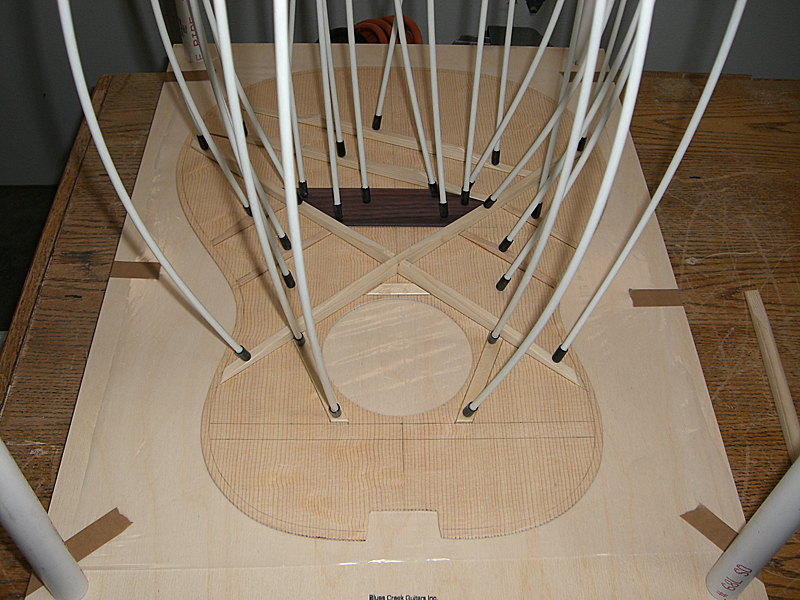
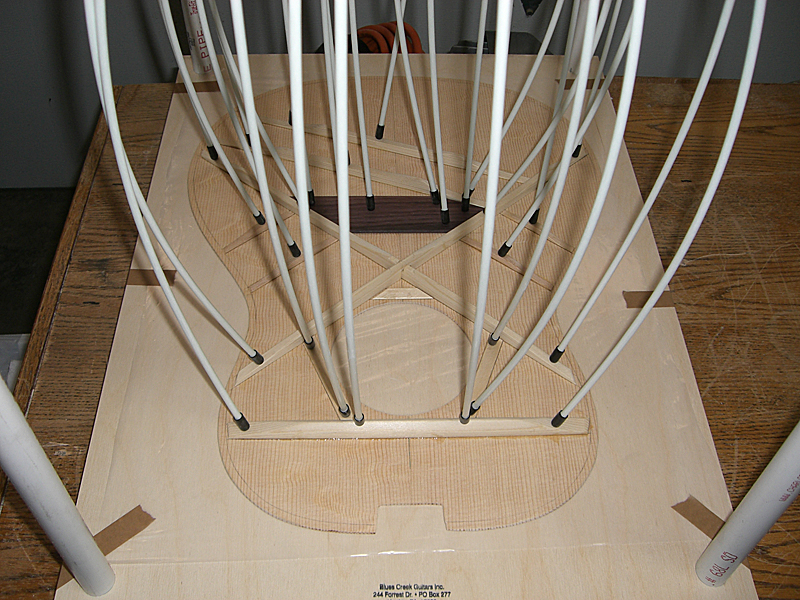
Joined: June 2012 Posts: 2303 Location: Lake Forest, CA | I glued the braces to the top wood today. First, get the glue pot started.
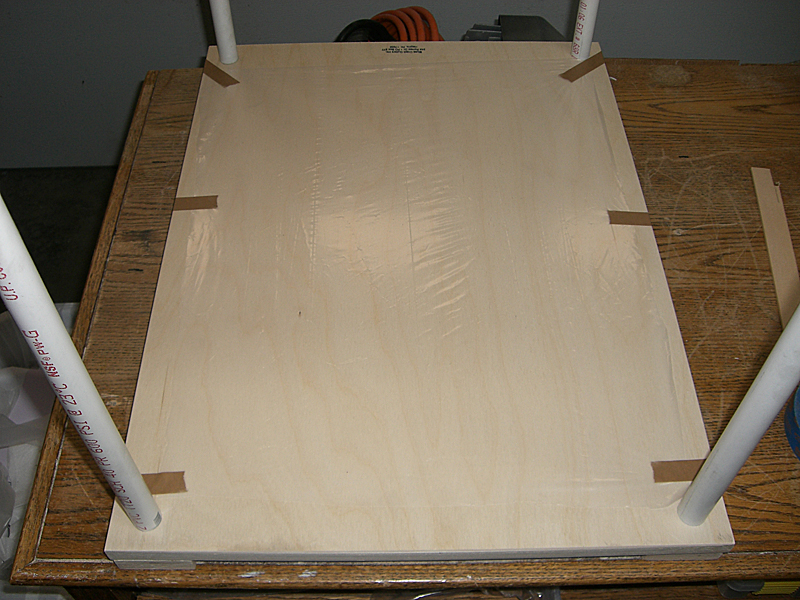
Set up the GoBar deck.
Tape visqueen to the base to prevent any accidental gluing of the top to the base.
Clamp the top wood temporarily. These will get removed as I add braces.
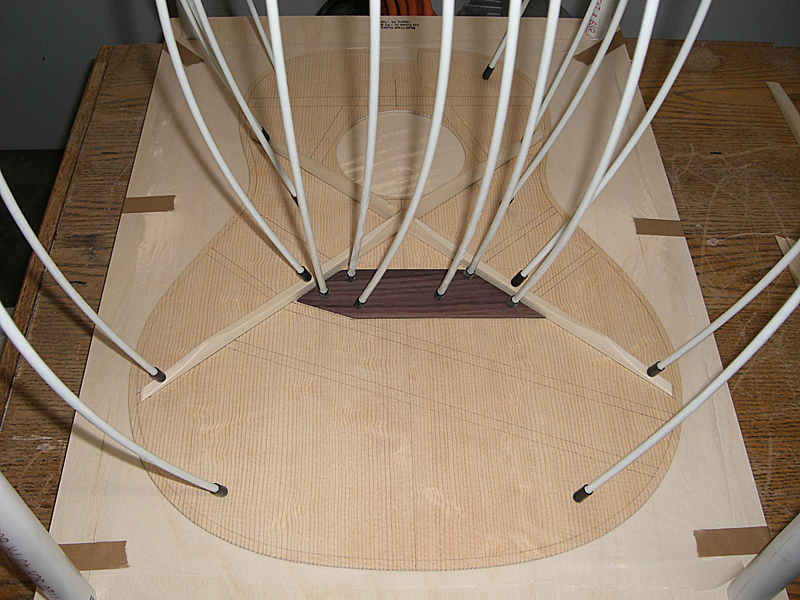
I figured it would be best to work from the center outwards. As I add more and more GoBars, they would get in the way of later clamping. First, the X braces.
Rosewood bridge plate.
Tone bars.
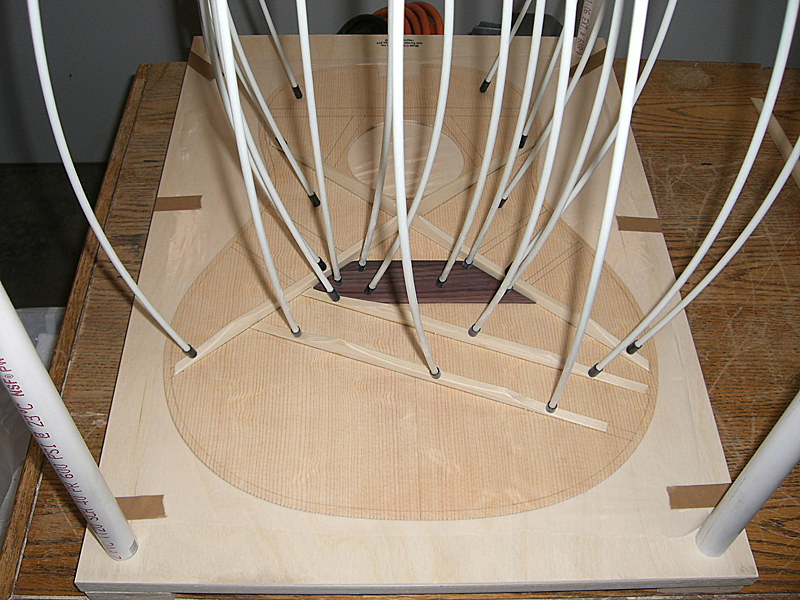
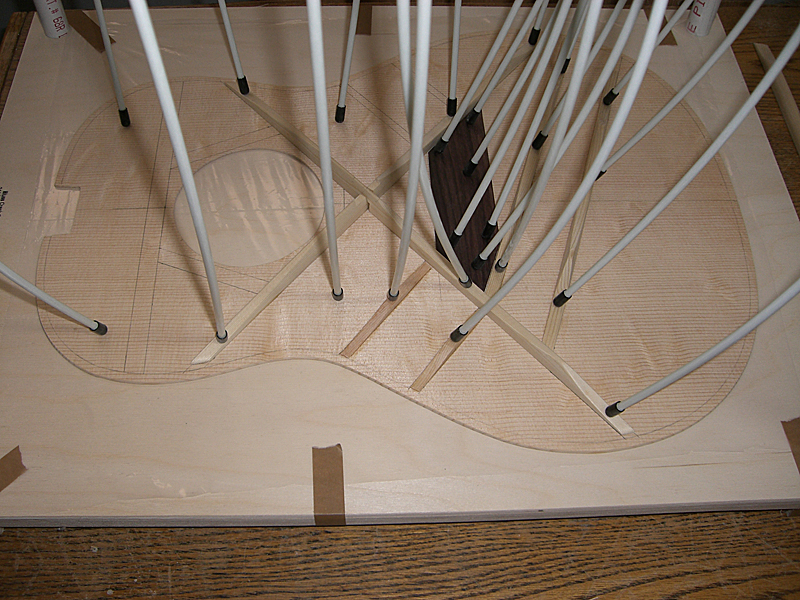
Treble finger braces.
Bass finger braces.
Reinforcement strips.
Transverse brace.
Lastly, the reinforcement strip for the X braces. I was going to use a x-shaped plywood piece, but I did a little reading on the subject and a lot of builders just use a simple strip like this. Once the glue has dried, I'll shape it to match the cross-section of the braces.
| ||
| |||
| MWoody |
| ||
Joined: December 2003 Posts: 13983 Location: Upper Left USA | Very nice! Is the bottom plate flat or concave? I'll have to find more tent poles... | ||
| |||
| DanSavage |
| ||
Joined: June 2012 Posts: 2303 Location: Lake Forest, CA | Thanks! The bottom plate is flat, though I did buy a 28' radius concave plate when I bought the GoBar deck. I was originally going to use the concave plate, but I discovered that would have raised the bridge too much and put it out of alignment with the neck. I checked my other Ovations and found they started out with true flat tops. If you watch the factory tour video you'll see the worker cutting the binding groove with the body upside-down against the table. If the top had any sort of radius, then this would not work out because the body would rock back and forth. So, once I remembered seeing this in the video, I felt more comfortable building my top flat, too. I ended up buying the GoBar deck and bars from Blues Creek guitars because they had the lowest price around for the deck, bars and plates. Edited by DanSavage 2014-06-14 4:00 PM | ||
| |||
| TJR |
| ||
Joined: July 2002 Posts: 288 Location: Maine | Again. Great progress ! And you kept glue off your fingers to take step by step camera shots Was the Hide glue already in liquid form? What is the working time of the glue? It will be interesting to see how well the top "slips " in now. I was imagining that you would have a vacuum diaphram to hold the braces down. You went modern old school. Talbot | ||
| |||
| DanSavage |
| ||
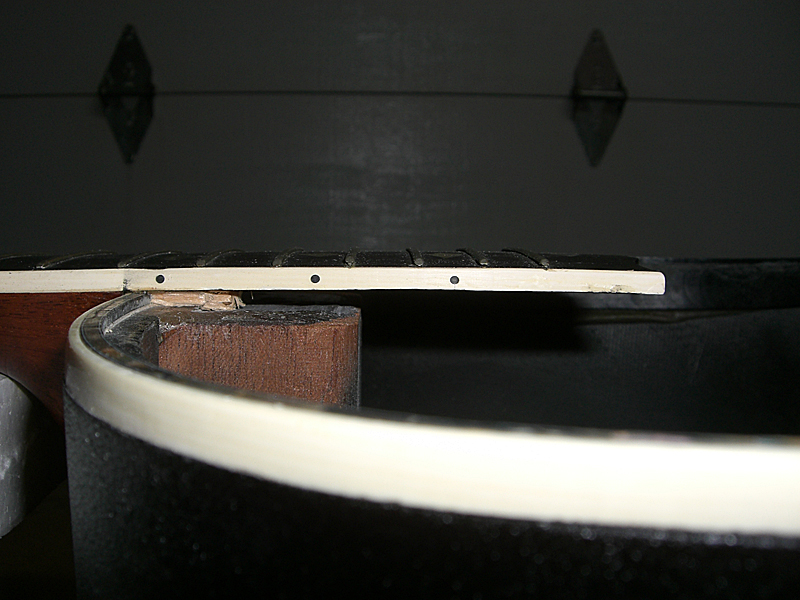
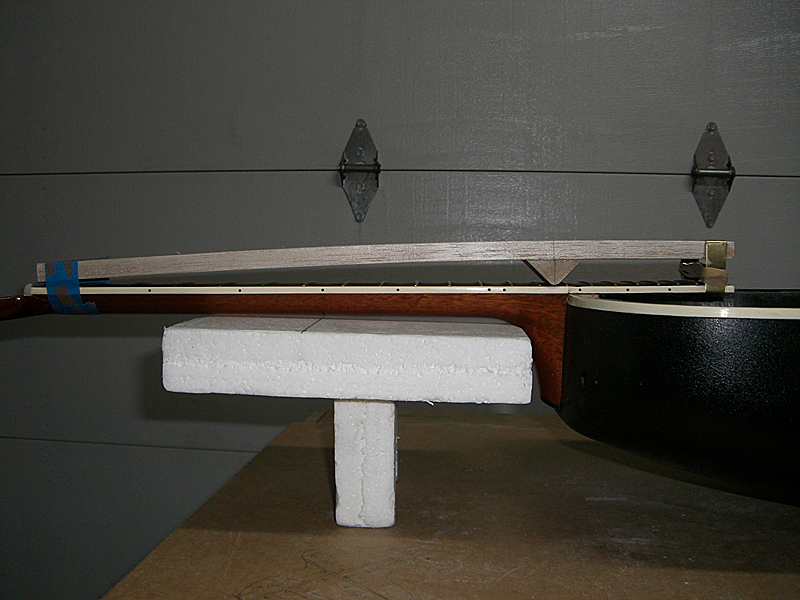
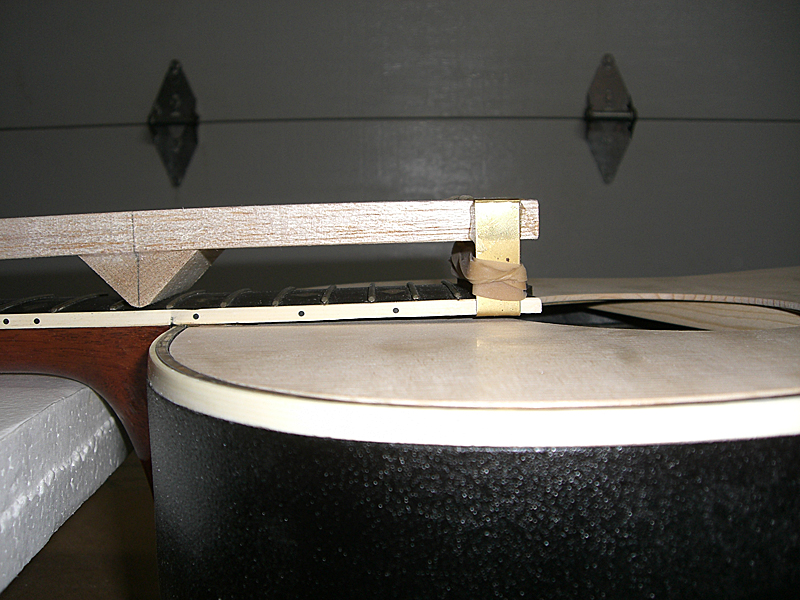
Joined: June 2012 Posts: 2303 Location: Lake Forest, CA | Thanks, TJ. Yeah, the glue does get sticky as it starts to set up. I had to re-glue the X reinforcement strip a couple of times because it stayed stuck to my fingers and pulled away when I tried to let go of it. No, I bought 192-gram hide glue in granulated form. I mixed it 2:1 with distilled water, then heated it up in the glue pot to ~145-degrees. The glue itself stays in liquid form for quite a while, actually. But, once you brush it on, then stick it down it will grab within a few seconds which is enough time to put the clamps on. I did put the top into place to make sure the neck geometry was still in good shape. (it is) But, because the fretboard extension is warped downward, it quite a bit tighter with the braces than it was without them. I probably won't put it back into place again so I don't risk gouging the top. I'm not sure how those guys who use a vacuum diaphragm get all the braces down before the glue starts to set up. I'm pretty happy with how the GoBar deck worked. | ||
| |||
| DanSavage |
| ||
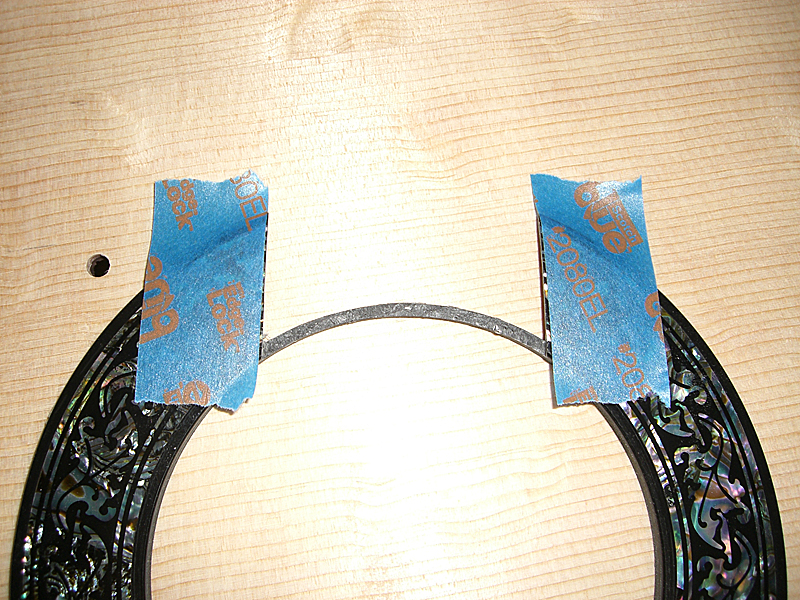
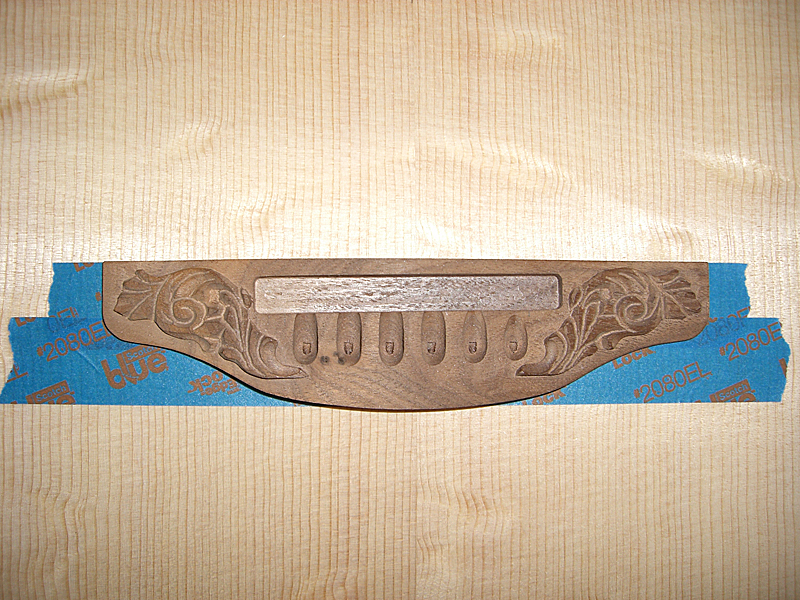
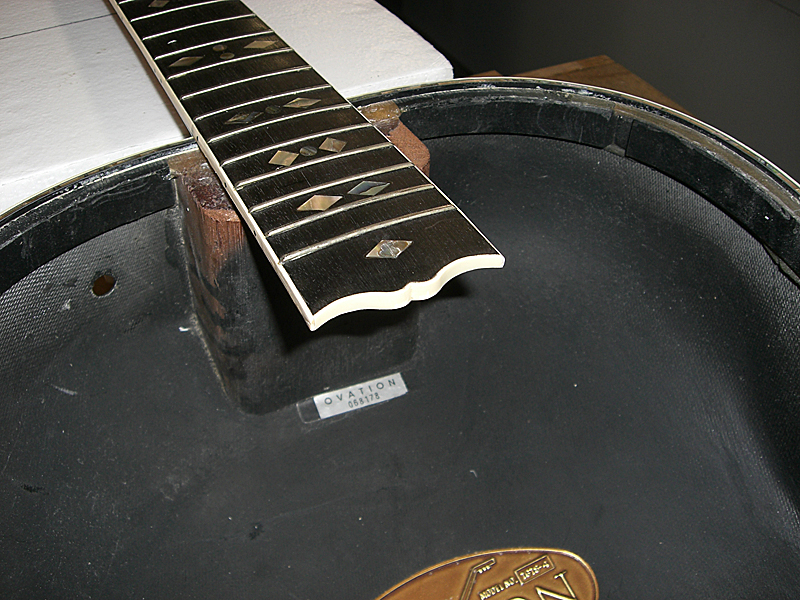
Joined: June 2012 Posts: 2303 Location: Lake Forest, CA | Progress continues. The reason for the spaces of time between my posts is that I need to gather either tools, materials or both.
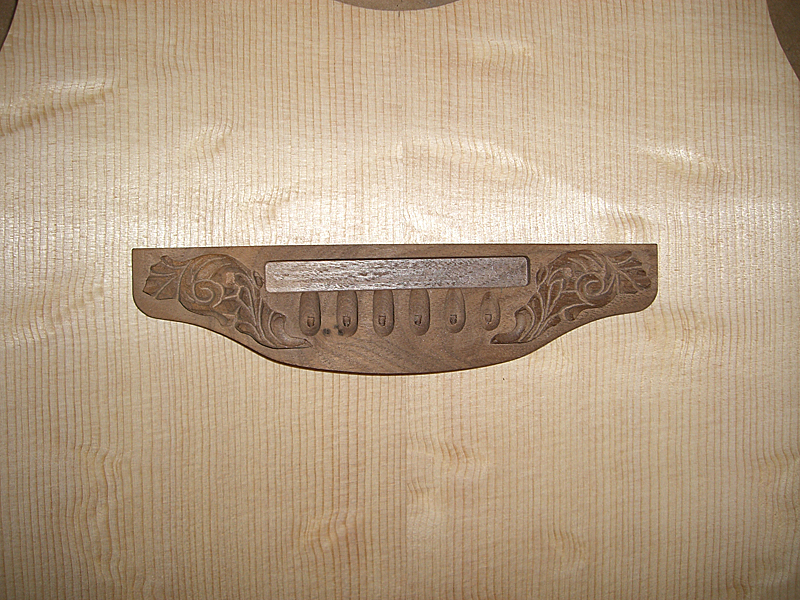
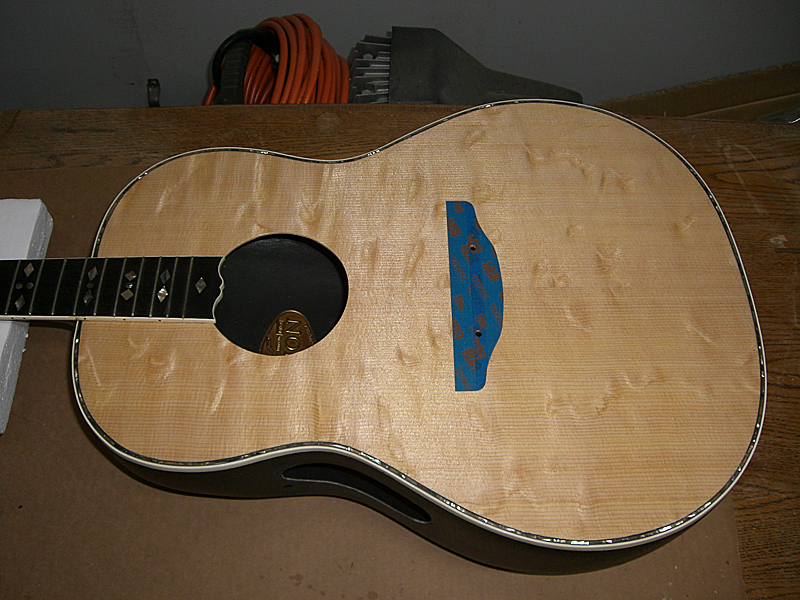
The rosette is not an exact fit to the extension, so I put it into place and used masking tape to mark where I'm going to need to trim it.
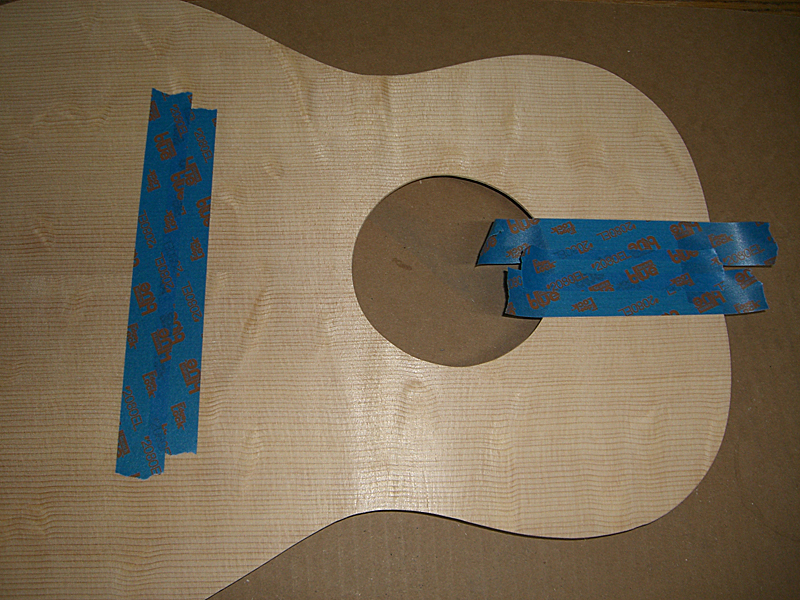
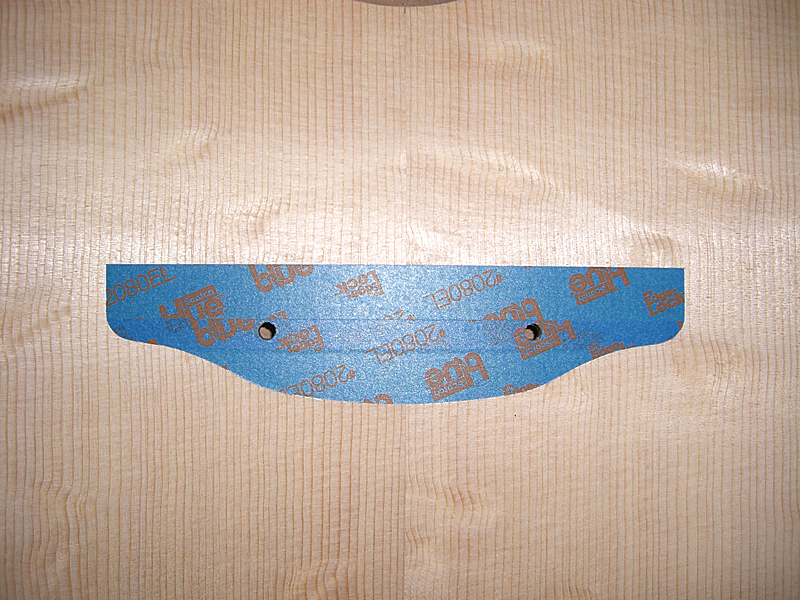
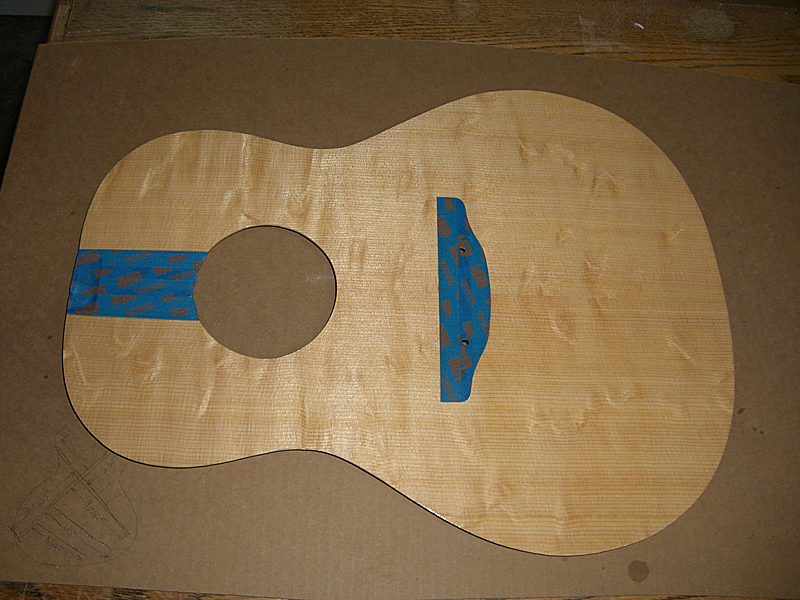
Before gluing the top, I need to seal the wood to prevent the glue squeeze-out from staining the edges. Because I'm planning to use hide glue for the bridge and extension, so these areas need to remain bare wood. First, use tape to mark the boundaries of these areas.
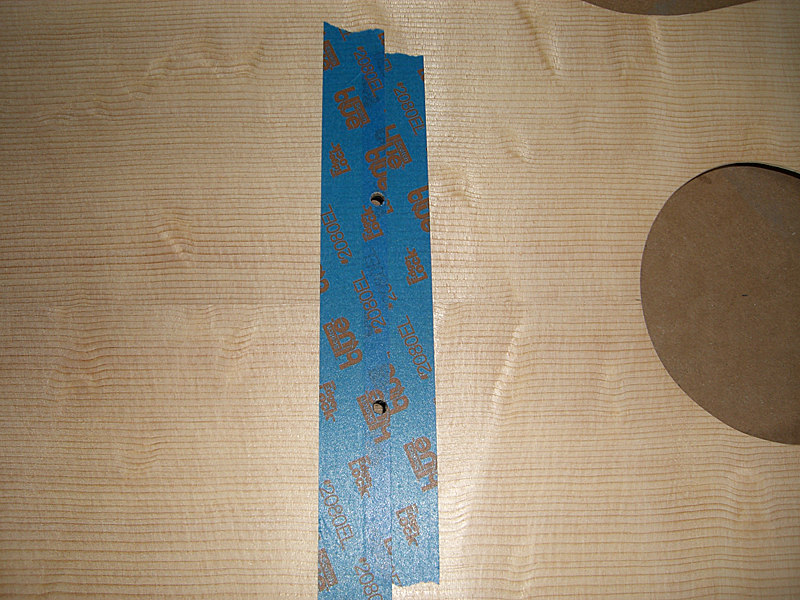
Fill the area inside with tape and remove the boundary areas.
Open up the bridge alignment pin holes.
Put the bridge into place. Carefully cut through the tape around the bridge making sure to not cut too deep.. Perfect bridge mask. This next photo deserves a little explanation. I'm using dewaxed shellac to seal the wood because it provides a barrior between the wood and the glue and is an excellent base for subsequent finish coats. It also provides a nice color to enhance the grain of the wood. I will be putting a lacquer finish onto the top. But, shortcomings of bare nitrocelluouse lacquer are well-documented. In short, it's delicate and requires careful handling. In the aviation world, nitrocelluouse lacquer is known as nitrate dope. It is an excellent base coat because it sticks to most anything, including wood, fabric and metal. And, everything used as a finish coat will stick to it. While it makes an excellent primer, it's never used as a finish coat because of its lack of chemical resistence. That's where butyrate dope comes in. It's extremely durable as a finish coat because it's resistent to most chemicals, including gasoline, oil, nitromentane, alcohols, etc. In fact, only extremely harsh chemicals like MEK, acetone, touluene, etc. will dissolve it. But, butyrate's shortcoming is that nothing else will stick to it, but more butyrate. So, it's a terrible primer, but a fantastic finish coat. In addition nitrate and butyrate are available in two formulations: tautening and non-tautening. Tautening dope is used on natural fabrics like linen, muslim, etc. to shrink the fabric. Non-tautening dope has plasticizers added to it which weaken the shrinking. They will still shrink over time, just not as much as tautening. Non-tautening is used on synthetic fabrics like polyster, which are shrunk with heat. So, I'll be usng the nitrate dope for the build layers. Then, once the top is smooth, I'll switch to butyrate for the finish layers. In the end, I'll have all the benefits of a lacquer finish and none of the shortcomings. I would love to use hide glue to fix the top to the body, but the kerfing is plastic and hide glue doesn't stick to plastic. So, I'm pretty much stuck with using epoxy. I did a quick review of the different formulations of Hysol and decided to use 0151. It's optically clear, but more importantly it's temperature range is -35°F - +160°F and it has a 60-minute working time. If ever the time comes where I need to remove the top, I just need to heat the glue to anything over 160°F and it'll soften enough to break the bond. Of course, this also means I'll need to take care not the leave the guitar in a hot car, but that's already a given with almost any guitar. I painted the top with a coat of shellac to start the process. I let this layer dry overnight. I sanded it with 180-grit, then 320-grit and applied a second layer. I will leave this layer alone until the top is glued into place, then I'll sand it smooth and start adding the nitrate build layers. Edited by DanSavage 2014-06-20 12:29 PM | ||
| |||
| MWoody |
| ||
Joined: December 2003 Posts: 13983 Location: Upper Left USA | It's looking better all the time Dan. | ||
| |||
| arumako |
| ||
Joined: October 2012 Posts: 1018 Location: Yokohama, Japan | Just incredibly informative stuff. Thanks a bunch. Getting all the background thoughts on the bracing, neck-jig, shellac and finish coats is so informative and fun to follow. Can't wait to see the progress...that top is looking just absolutely gorgeous. Makes me want to become a Luthier...perhaps in another life...just inspiring stuff DanSavage! | ||
| |||
| DanSavage |
| ||
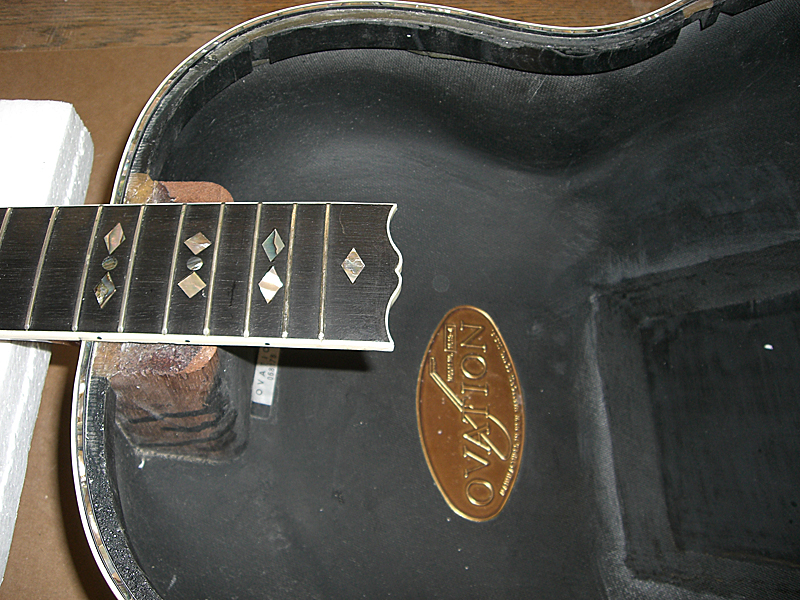
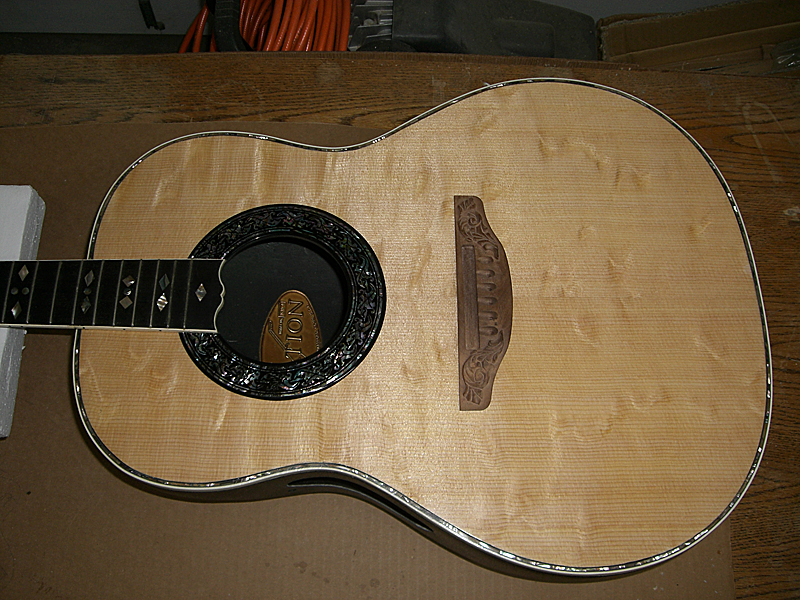
Joined: June 2012 Posts: 2303 Location: Lake Forest, CA | Thanks for the kind words, guys. I've learned a lot about guitars while working on this project. My background in model aviation has definitely helped because a lot of the materials and tools are the same in both areas. I'me really close to gluing the top into place. One of the small jobs that needed to be done is replace the missing binding from the end of the fretboard extension. I ordered some 'cream' colored binding from StewMac, but it was too dark. I found all kinds of ivoroid binding online, but I didn't want to use that because ivoroid has 'grain' molded in and it wouldn't match the binding already on the guitar. I ordered some 'cream' colored binding from allparts.com and it's almost a perfect match. I molded it using the binding tool I made and my heat gun. I glued it on yesterday with 5-minute epoxy, then scraped it down. It's not 100% perfect, but I'm very happy with the results.
| ||
| |||
| marenostrum |
| ||
Joined: August 2007 Posts: 1008 Location: Tuscany, Italy | DanSavage - 2014-06-20 4:30 PM "....My background in model aviation has definitely helped because a lot of the materials and tools are the same in both areas..." This remind me something about aviation and guitars .... Congratulation Dan. Very nice and informative job. We can not wait to see the finished guitar.... | ||
| |||
| tpa |
| ||
Joined: December 2004 Posts: 555 Location: Denmark | What a documentary. Thanks for sharing. Have you thoughts on coating the back surface of the top and bacings as well? | ||
| |||
| DanSavage |
| ||
Joined: June 2012 Posts: 2303 Location: Lake Forest, CA | maremagnum - 2014-06-21 10:51 AM This remind me something about aviation and guitars .... Congratulation Dan. Very nice and informative job. We can not wait to see the finished guitar.... Yes, who else do we all know that was involved with aviation and guitars? Hmmm... Let me think... Thanks! I know the guitar will look pretty when I'm done. But, it's all for naught if it doesn't sound as good as it looks. Know what I mean? | ||
| |||
| DanSavage |
| ||
Joined: June 2012 Posts: 2303 Location: Lake Forest, CA | tpa - 2014-06-21 4:12 PM What a documentary. Thanks for sharing. Have you thoughts on coating the back surface of the top and bracings as well? Thanks and you're welcome. Yes, I have thought about it and I'm probably going to leave it bare wood. If I ever need to make a repair to the braces or a crack in the top having finish on the back will really complicate the process. | ||
| |||
| BanjoJ |
| ||
Joined: September 2012 Posts: 809 Location: Thredbo, NSW, Australia | DanSavage - 2014-06-22 12:55 PM Thanks! I know the guitar will look pretty when I'm done. But, it's all for naught if it doesn't sound as good as it looks. Know what I mean? I know what you mean Dan. I bought a 1981 Folklore 1614 last year with both of the main braces in the X brace broken. I spent a couple of months deciding what to do and then planning how to do a repair. Long story short - I made two new braces that I glued on top off the original broken braces. The end result was a great sounding guitar that was previously a wall-hanger. But the time after the repair, and then from when I put some strings on it and then played it was very tense indeed. I continue to be over the moon with how good it sounds, and this old Folklore has a special place in my heart; nevertheless, I would like to compare it to Muzza's Folklore - just to see if I did a good job on the repair. Thanks so much Dan for your ongoing documentary. You epitomise what this site is about! | ||
| |||
| DanSavage |
| ||
Joined: June 2012 Posts: 2303 Location: Lake Forest, CA | BanjoJ - 2014-06-22 3:06 AM I know what you mean Dan. I bought a 1981 Folklore 1614 last year with both of the main braces in the X brace broken. I spent a couple of months deciding what to do and then planning how to do a repair. Long story short - I made two new braces that I glued on top off the original broken braces. The end result was a great sounding guitar that was previously a wall-hanger. ... Thanks so much Dan for your ongoing documentary. You epitome what this site is about! Thanks for the kind words and you're welcome. Yes, it's always best to spend time planning rather than just jumping in with both feet. | ||
| |||
| DanSavage |
| ||
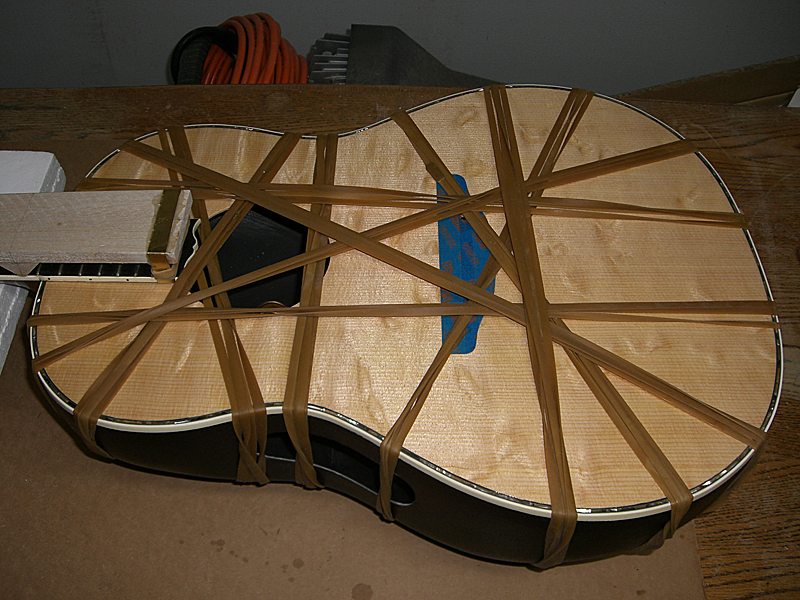
Joined: June 2012 Posts: 2303 Location: Lake Forest, CA | Well, the top is on.
Dropped the top wood into place and wrap the rubber bands around the bowl. Each wrap is a single rubber band looped either two or three times, depending on the location. Lengthwise wraps got two loops and spanwise wraps got three.
Tap tests show the top is very resonant. I almost want to glue the bridge down and string it up to hear what it sounds like, but I will resist the temptation and finish it first so that once I finally get the bridge glued down I can just enjoy it from then on. Edited by DanSavage 2014-06-28 9:51 AM | ||
| |||
| Mark in Boise |
| ||
Joined: March 2005 Posts: 12750 Location: Boise, Idaho | Wow, this is looking very professional! Banjo's comment reminded me of one of my very meager successes at guitar repairs. I bought my Folklore as the only bidder off ebay, which should say something. The prior owner had tried to string it with nylon's and gave up. When I put steel strings on it, it had a wicked buzz, which turned out to be a broken brace right under the bridge. I was surprised that the hole for the pickup wire went right through the brace, which led to the broken brace. The pieces were still hanging there, so I just glued them back together with carpenter's glue. Years later, it's still sounding fantastic. | ||
| |||


| Jump to page : < 1 2 3 4 5 6 7 > Now viewing page 3 [25 messages per page] |
| Search this forum Printer friendly version E-mail a link to this thread |
| This message board and website is not sponsored or affiliated with Ovation® Guitars in any way. | |
| (Delete all cookies set by this site) | |