| The Ovation Fan Club | ||
| ||
| Random quote: "There are more love songs than anything else. If songs could make you do something we'd all love one another." -Frank Zappa |
 1990 Elite 1868 Project 1990 Elite 1868 Project
| View previous thread :: View next thread | |
| Member Communities -> Bottom Feeding Luthiery Guild | Message format | |
| arumako |
| ||
Joined: October 2012 Posts: 1079 Location: Yokohama, Japan | tpa - 2025-04-19 6:58 PM Nice, really nice. And as you mentioned before sometimes a bolt on neck is handy. Thanks TPA! Really appreciate the encouragement. I have nothing against glued on necks, but I really like bolt-on necks just for long-term maintenance sake. The K-bar was such a great design; however the aluminum core and bolts do tend to add weight to the neck throwing some Os (and other brands that use bolt-on construction) just a bit off-balance. Some time ago, I read that guitars without truss rods and bolts - meaning glued on necks with excellent joints and reinforcements - (like carbon fiber, exotic woods or metals) resonate better and have considerably better sustain. That makes sense to me, but when a neck needs to be reset? I'm all for bolt-ons! My nitrocellulose application has slowed to a crawl of late because of humidity and rain. After my 9th coat, I waited 24 hours and wet sanded with 360 grit paper. Then progress came to a screeching halt! Gave me time to continue with my 1115 restoration; but things cleared up yesterday and today so I went ahead and applied my 10~12 coat of clear nitro!
At this point, most irregularities in the finish have disappeared. Gonna wet sand with 360 grit one more time and go upto 15 coats. Then I'll let the lacquer gas-off for 4 to 6 weeks and start the final phase of sanding, polishing and buffing to a high-gloss finish! Should be done by July or so! | ||
| |||
| Love O Fair |
| ||
Joined: February 2016 Posts: 1846 Location: When?? | Looking really nice, Ken. All around. Especially considering the man-handling it took to get this started. And sorry.. but too lazy to backtrack in the event that you have been specific with it already.. but curious to what type of applicator you are using for the nitro finish. Is it rattle can like Eastwood, or are you using your own system like airbrush or spray rig? Also curious to the width and volume of the spray per pass over the surface. PS: Or are you going to take me by total surprise and say that you are brushing it on. Edited by Love O Fair 2025-04-30 7:20 AM | ||
| |||
| arumako |
| ||
Joined: October 2012 Posts: 1079 Location: Yokohama, Japan | Love O Fair - 2025-04-29 9:12 PM Looking really nice, Ken. All around. Especially considering the man-handling it took to get this started. And sorry.. but too lazy to backtrack in the event that you have been specific with it already.. but curious to what type of applicator you are using for the nitro finish. Is it rattle can like Eastwood, or are you using your own system like airbrush or spray rig? Also curious to the width and volume of the spray per pass over the surface. PS: Or are you going to take me by total surprise and say that you are brushing it on. Hey Al! Thanks for the encouragement! I've been trying a variety of Japanese nitro products with different catalyzers in them. For my first six coats (after the sanding sealer), I used a well known finish used in the furniture industry over here. The SDS data lists an unidentified catalyzer mixture of synthetic and natural resins. These were applied using my trusty model paint air brush and compressor which sprays at about 10 psi (0.07 Mpa). The compressor needle was set to about medium spread and sprayed at 5 to 7 cm distance.  From there, I tried a different applicator (for coats 7 to 9) that uses computer air duster cans and a non-adjustable plastic airbrush applicator. According to the spec sheet, the air duster sprays at about 70 to 80 psi. My paint container could only hold about 12mL of nitro which is about one coat worth. Pretty inefficient, and a bit intense with the air pressure; however, the clear coat went on quite nicely.
For coats 10 to 12, I decided to just try a rattle can nitro that used a synthetic resin called Alkyd as the catalyzer. This nitro's rattle can is spec'd to spray at about 80 to 100 psi. I was worried that that would mean too much nitro flow; and I must admit, it took a bit of practice to settle at a distance of 10 to 12 cm away (that's why painting on windy days is a definite 'No, no' for my situation) from the woods blanks that I practiced on. To my great surprise, the stuff worked really well encouraging me to use the same for coats 13 to 15. This is how she looks now...
What you're seeing there is my painting station, LOL! It was pretty warm today, so there were too many bugs flying around, and I had to move my painting area to my outdoor/unroofed concrete parking slot. Fortunately, the final three coats went on really clean, and I am now a believer in rattle can finishing products for guitars! Now, I'll let this baby gas-off for 6 weeks and finish her off starting with a 1000 grit wet sand and proceed through to polishing and buffing before final assembly. Swap out the electrolytic capacitors in the pre-amp and she'll be done! Looking to wrap this 1868 by the end of June! YES! Edited by arumako 2025-05-11 5:22 AM | ||
| |||
| Love O Fair |
| ||
Joined: February 2016 Posts: 1846 Location: When?? | @Ken - >>>and I am now a believer in rattle can finishing products for guitars!<<< My my.. looking great!! And thank you for the detailed explanations! I am glad to hear that the above is a good choice, since my attempts at such would surely be limited in scope to your extended woodworking tool array in that I would hesitate to purchase anything too elaborate just to have it sit afterward and do little or nothing for the rest of my life. As for the neck crack, would it be possible to slightly.. oh-so-slightly.. open the crack with pressure and flood the gap with adhesive, then release the pressure back onto the crack to set up? Would that method be strong enough and provide enough longevity? And again, this thought comes from my 'haphazard and lazy' approach to all-things-wood... and probably why your stuff turns out nice while mine eventually draws laughs from onlookers or goes into the trash. That's why I like this forum so much. So that I can at least say, "Yeah, I know those guys." Edited by Love O Fair 2025-05-11 11:31 PM | ||
| |||
| Love O Fair |
| ||
Joined: February 2016 Posts: 1846 Location: When?? | PS: Sorry.. the second paragraph above should have gone into the 1115 Pacemaker thread.. but there was a quagmire occurrence here involving dogs, cats and sprinkler valves during the writing and 30-minute-limit edit process. Suburban life at its finest. And now I am STILL trying to edit on THIS one! Arrrgh! That's it! I'm done! Oyasumi-nasai! Edited by Love O Fair 2025-05-12 12:02 AM | ||
| |||
| arumako |
| ||
Joined: October 2012 Posts: 1079 Location: Yokohama, Japan | Love O Fair - 2025-05-11 1:04 PM My my.. looking great!! And thank you for the detailed explanations! I am glad to hear that the above is a good choice, since my attempts at such would surely be limited in scope to your extended woodworking tool array in that I would hesitate to purchase anything too elaborate just to have it sit afterward and do little or nothing for the rest of my life. Thanks Al! It's still hard to beat an air brush with a good compressor, but these modern day rattle can finishes (even nitrocellulose) have really consistent spraying characteristics and are really cost effective. Had I skipped the experimentation and just used the rattle can clear coat, the paint cost would have been no more than 12 bucks! Of course, I'm still looking forward to the day when a product like the Eastwood 2K poly finish shows up over here, but the Mothership used a nitro finish on my 1678AV50 so if you can live with the long curing time, nitro isn't too bad. Love O Fair - 2025-05-11 1:48 PM PS: Sorry.. the second paragraph above should have gone into the 1115 Pacemaker thread.. but there was a quagmire occurrence here involving dogs, cats and sprinkler valves during the writing and 30-minute-limit edit process. Suburban life at its finest. And now I am STILL trying to edit on THIS one! Arrrgh! That's it! I'm done! Oyasumi-nasai! Lol. No problem! I get it. Suburban life can get out of control! Will cut and paste the related post onto the Pacemaker thread! | ||
| |||
| arumako |
| ||
Joined: October 2012 Posts: 1079 Location: Yokohama, Japan | Hey OFC/BFLG! Gotta tell ya, retirement life ain't all it's cracked up to be! Blissfully leisurely retirement dreams blew out the window over the past few weeks; however, I have been making slow slow progress on my projects! Been sanding and sanding and sanding the poly finish off of the 1115 neck while waiting for this 1868 nitro to gas off...
Each polishing compound needs its own unique foam sponge. The compound is applied directly to the surface of the instrument (about one drop per 7 square inches or so) and lightly polished in circular strokes. Each compound session is ended with strokes in line with the grain of the wood. Compound 9800 is applied to the drill foam pad and the face of the guitar is held lightly to the pad for application. Once a nice scratchless shine is achieved, 9800 is applied by hand and finished with strokes in line with the wood grain. At this point the guitar is really shiny, but one last light application of Holt's Plastic Polish (again, strokes in line with the grain) gave this guitar a "store display" sparkle.
I finished the cosmetics off by adding an arm rest to give this a DetlefMichel kind of flair. Yes! I like it! This top hasn't had to resonate since August of 2021, but it is a 1990 sound board so the assumption was an immediate resonant response once string tension was added, but to my surprise it's taken a whole day for the sound board to start opening up again... really interesting. I do love the voice of this 1868 with light gauge PB strings! Wish I could say I'm done, but I went ahead and opened up the pre-amp as the final chapter of this 10 year long project. As mentioned in this thread, the assumption was that I would discover a bunch of cheap Aluminum Electrolytic Capacitors that need to be replaced. NOT! Not a single Aluminum Electrolytic Capacitors! Instead, the more expensive and long lasting Tantalum Capacitors were used. I may be wrong, but it looks like some of these electronic parts maybe military grade! In either case, I found two burned capacitors and one resistor on its way out! The picture below shows the location of the resistor and one of the burned caps. Can you see the discoloration?
Here's a closer look at the two caps. One is a 472uF and the other a 222pF(?). The resistor is a 4.7M Ohm +/-5%
I can't find any OP24 schematics anywhere on the net so not sure if I should verify my values based on the FET3 or OP24+ preamp. Even if I map out the PCB and component values for the OP24, I'll still have an issue verifying the value of some of the caps! In any case, a few solders more and this 1868 will be in full working condition! YES! | ||
| |||
| Love O Fair |
| ||
Joined: February 2016 Posts: 1846 Location: When?? | Well now I'm just jealous. So very nice! And quite a combo of materials and labor process to achieve the finish. Much more than spit and a rag, for sure. Too bad you didn't get the same photo shot on the stand when it was wrecked so we could see the side-by-side and nod our heads in your glory. I, too, went looking for the plain OP24 schematic just in case you missed one.. but yeah.. none. Go figure. Not that I know diddly about capacitors any smaller than the ones that fire up an air conditioner-- I just always assumed that the number on those tiny little dudes denote the values in regard to what you would purchase as a replacement.. but apparently not. Albeit in the end, congratulations on your fine project! No one would ever assume anything less from the mighty works of KenCo! | ||
| |||
| Patch |
| ||
Joined: May 2006 Posts: 4231 Location: Steeler Nation, Hudson Valley Contingent | Beatiful job! I sent my 90's 1868 project to the factory way back in the day. They sent me back a mandocello! | ||
| |||
| numbfingers |
| ||
Joined: January 2006 Posts: 1128 Location: NW Washington State | Have you tested the components you removed? I wonder if the marks on them are from the original assembler bumping them with the soldering iron. I haven't seen components that smoked with only a 9 volt battery powering them. I guess it would be possible if they were internally shorted. -Steve W. | ||
| |||
| tpa |
| ||
Joined: December 2004 Posts: 572 Location: Denmark | >> "but it looks like some of these electronic parts maybe military grade! " It started with helicopters, didn't it? ;-) | ||
| |||
| Mike S. |
| ||
Joined: August 2002 Posts: 633 Location: Ottawa, Ontario, CANADA | Hey, Arumako, Mike S here. One of my nephews was/is a CAFSAR helicopter pilot, and one of my former guitar students is a CAF helicopter gunner who was in Afghanistan. MIL SPECS are the way to go with this project. Correct me if I'm wrong here, but KAMAN got military contracts for helicopters before BELL and BOEING back in the day, and the HUEY and CHINOOK got all the press later. Mike S. Ottawa, ON. CANADA | ||
| |||
| arumako |
| ||
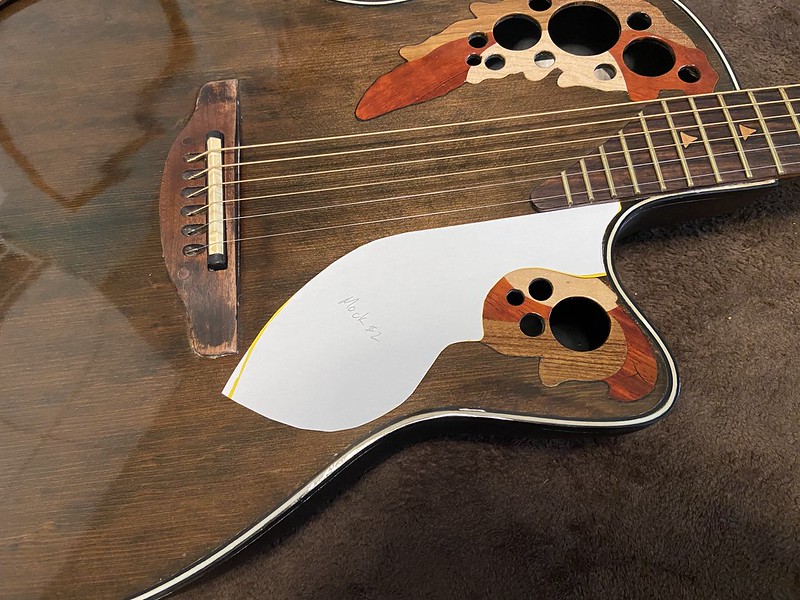
Joined: October 2012 Posts: 1079 Location: Yokohama, Japan | Love O Fair - 2025-06-28 1:38 AM ...I, too, went looking for the plain OP24 schematic just in case you missed one.. but yeah.. none. Go figure. Not that I know diddly about capacitors any smaller than the ones that fire up an air conditioner-- I just always assumed that the number on those tiny little dudes denote the values in regard to what you would purchase as a replacement.. but apparently not. Thanks for going through the trouble Al! It doesn't make sense that an OP24 schematic is not readily available. I suspect somebody probably has a hard copy laying around somewhere. The Tribute site has PCB layout diagrams for the FET 3 preamp and it looks identical to the OP24; however, the preamps use different chips (FET vs. Op amps) so the parts don't seem to match up. As far as the numbers on the tiny "little dudes" are concerned, they do denote the value! I was misreading the capacitor values and thus misleading you! Sorry! So a 222 = .0022uF capacitor (2200 pico farad) and a 472 = .0047uF (4700 pico farad)! numbfingers - 2025-06-28 4:21 AM Have you tested the components you removed? I wonder if the marks on them are from the original assembler bumping them with the soldering iron. I haven't seen components that smoked with only a 9 volt battery powering them. I guess it would be possible if they were internally shorted. -Steve W. Thanks for chiming in Steve. I did, BUT... it turns out my multimeter was broken! Was getting some strange readings after I removed the first two caps, that's why I didn't remove the resistor. The resistor is fine and the 472 cap is good also. The 222 cap was burned all the way through the cover; so I'm gonna swap it out. What's really weird is that many of the legs of the resistors/capacitors have been clipped and re-soldered as if they'd been tested in-circuit. Doesn't affect functionality in anyway, but I wonder if maybe this OP24 was refurbed (in-house) or repaired. That would explain the outter burn marks on some of the parts. Interesting stuff! @tpa & Mike S. Thanks for commenting! It makes a lot of sense that mil spec parts were used since Kaman built helicopters and were a military contractor! I just never made the connection until you all mentioned it! Made me re-think my repair of this pre-amp so I ordered milspec 222 and 472 capacitors. Gonna re-install the original 472 and replace the 222 with a new milspec part from the USA. Should arrive in a week or two. Then I'll REALLY be done with this project! Patch - 2025-06-28 1:59 AM Beatiful job! I sent my 90's 1868 project to the factory way back in the day. They sent me back a mandocello! Thanks Patch, That Sunburst Mandocello is beautiful (check out Patch's collection here)! Seeing your mandocello and seesquare's recent OMA is giving me the itch to hear what a Mandocello sounds like. The 5-string Cello-guitar I built some years ago was such an interesting and amazing sounding guitar... Oh, itchy, itchy, itchy; but I gotta clear out my project shelf before I take on anymore, LOL! I've really been enjoying playing this 1868 (while neglecting my 1115 project for a week or so), and noticed that the nitrocellulose finish scratches easily when compared to a poly finish so I decided to make a clear pickguard for her. Started with a few mock ups loosely based on the Adamas 1581 pickguard...
Decided to go with mock-up #2...
Hmmm... Yup, I like it. Feels good to have that protection...
The pickguard is thin and does not hinder the guitar's voice and it's transparent nature keeps the cosmetic beauty of the Elite intact! Also, fairly easy to remove with the heat of a hair dryer. Highly recommended! Now, just gotta wait for the caps to arrive! Oh yeah, can't forget to finish the 1115! Thanks for letting me share OFC/BFLG! Edited by arumako 2025-07-08 10:36 PM | ||
| |||


| Jump to page : 1 2 3 4 5 6 Now viewing page 6 [25 messages per page] |
| Search this forum Printer friendly version E-mail a link to this thread |
| This message board and website is not sponsored or affiliated with Ovation® Guitars in any way. | |
| (Delete all cookies set by this site) | |