| The Ovation Fan Club | ||
| ||
| Random quote: "It's much too late to do anything about rock & roll now ..." - Jerry Garcia / Grateful Dead |
 Patch's Parlor Build... Patch's Parlor Build...
| View previous thread :: View next thread | |
| Member Communities -> Bottom Feeding Luthiery Guild | Message format | |
| tpa |
| ||
Joined: December 2004 Posts: 554 Location: Denmark | Thank you for the answer. Nice work. You really master a lot ... | ||
| |||
| DarenSavage |
| ||
Joined: December 2016 Posts: 128 | DanSavage - 2017-12-05 8:42 AM Thanks, Daren. We've been down this molding road a couple of times, haven't we? Yup. Lots of pieces, parts, and heartbreak. So long as it's with my brah, it's all good.  Edited by DarenSavage 2017-12-05 6:28 PM | ||
| |||
| DanSavage |
| ||
Joined: June 2012 Posts: 2303 Location: Lake Forest, CA | tpa - 2017-12-05 1:22 PM Thank you for the answer. Nice work. You really master a lot ... You're welcome and thanks for the kind words. | ||
| |||
| DanSavage |
| ||
Joined: June 2012 Posts: 2303 Location: Lake Forest, CA | DarenSavage - 2017-12-05 4:26 PM Yup. Lots of pieces, parts, and heartbreak. So long as it's with my brah, it's all good. Even now, the days of heartbreak have fond memories for me because my brah was a part of the process. | ||
| |||
| DarenSavage |
| ||
Joined: December 2016 Posts: 128 | DanSavage - 2017-12-04 8:03 PM This is why I built the plug to be disassembled and with the hole in the insert. I've had too many plugs stuck inside the mold. I unscrewed the parting plate from the bowl/insert which gave me access to the bowl/insert. I had to pretty much destroy the MDC insert to separate it from the bowl. This would allow the bowl to flex enough for me to pour water down in the gap between the bowl and the mold.
I just reread this. Question, since it seems the surface of the hollowed MDC has less adhesion to the parting plate than the bowl does inside the mold, have you thought about temporarily attaching the insert to the parting plate with screws, then separate the bowl/mold as you did before, but mostly pre-cut the insert as a disposable part of the molding process? While it was probably a RPIN to destroy the MDC, it's a fair trade-off. Oooh! High-end stuff!  Edited by DarenSavage 2017-12-05 7:17 PM | ||
| |||
| DarenSavage |
| ||
Joined: December 2016 Posts: 128 | DanSavage - 2017-12-05 6:48 PM Even now, the days of heartbreak have fond memories for me because my brah was a part of the process. Yah, man! What a great bunch of memories. Triumph, heartbreak, long late hours and early mornings on the road. Edited by DarenSavage 2017-12-05 8:01 PM | ||
| |||
| DanSavage |
| ||
Joined: June 2012 Posts: 2303 Location: Lake Forest, CA | DarenSavage - 2017-12-05 5:13 PM I just reread this. Question, since it seems the surface of the hollowed MDC has less adhesion to the parting plate than the bowl does inside the mold, have you thought about temporarily attaching the insert to the parting plate with screws, then separate the bowl/mold as you did before, but mostly pre-cut the insert as a disposable part of the molding process? While it was probably a RPIN to destroy the MDC, it's a fair trade-off. Oooh! High-end stuff! I got it wrong, sorry. It's MDF, not MDC. (medium density fiberboard) Yes, I agree. You and I have been down this road too many times for me to think that the plug and mold would separate cleanly. (it didn't) So, I designed this with the worst-case scenario in mind. LOL! Actually, I just used a pair of water-pumps (channel lock pliers) to destroy the insert. It went pretty fast once the first section was broken away. That's also why I 'glued' the bowl and insert using silicone. The insert and the parting plate were screwed together with four screws. When I pushed the wedges between the mold and the parting plate, the plate flexed because there were too few screws to keep the plate from flexing, even though it was 3/4" thick. But, the mold flange was also flexing and even cracked in a couple of spots. More screws may or may not have kept the insert and flange from flexing. In this case, the only thing that saved the day was that the bowl was pretty flexible, so I was able to force the wedges between the bowl and the mold after I'd pulled the insert from inside the bowl. As I forced the wedges between the bowl and the mold I poured water into the gap to soften the PVA. Eventually, as the perimeter of the bowl was able to be pulled away from the mold I got to the point where I used the water-pumps to grab onto the bowl and was able to work the bowl out of the mold. In retrospect, I did the right thing by molding my bowl first. This has me re-thinking how I'm going to mold Patch's bowl. The SMC is not nearly as flexible as the woven cloth deep bowl, so I won't be able to use the same technique I did on the deep bowl. In the past, I've read that some modeling guys (on RCGroups) like to make their molds flexible so that it makes it easier to de-mold the plugs, and eventually the molded fuselages. So, I'm thinking of going down this route. Instead of making a completely rigid mold like I did with the deep bowl, I'm thinking about ditching the surface coat and instead laying up the mold like I used to lay up the fiberglass parts so the mold will be flexible enough to be pulled away from the plug. This will entail laying up a 1-3/4-oz layer, then a 5-oz. layer. This will prevent any print-through of the cloth into the mold. I'm even thinking of ditching the flange in the initial lay-up. Once the mold is separated from the SMC bowl, I'll reinforce it with additional layers of the 17-oz. tooling cloth I used on the deep bowl mold to make it completely rigid. To this end, I'm thinking of applying some dacron peel ply fabric to the top of the 5-oz cloth so that the 17-oz tooling layer will have complete adhesion. This is the same stuff we used to use on the seam of the Su-27 inlet duct seams. It will allow good adhesion without sanding. Then, once bowl and the mold is separated, I'll add the flange. | ||
| |||
| marenostrum |
| ||
Joined: August 2007 Posts: 1008 Location: Tuscany, Italy | Super DAN ! As always, very informative post. I can't wait to see how it ends up ... | ||
| |||
| DanSavage |
| ||
Joined: June 2012 Posts: 2303 Location: Lake Forest, CA | Thanks, Riccardo. Me, too! :D | ||
| |||
| Love O Fair |
| ||
Joined: February 2016 Posts: 1769 Location: When?? | Reading above, it sounds like the Savage brothers are buttering each other up for premium Christmas presents this year.. so we'll expect a full report on the results of that afterward. Oh, and please don't forget this year's family photo, including Greta! please-thank-you Edited by Love O Fair 2017-12-06 12:21 PM | ||
| |||
| DarenSavage |
| ||
Joined: December 2016 Posts: 128 | DanSavage - 2017-12-05 8:44 PM I got it wrong, sorry. It's MDF, not MDC. (medium density fiberboard) Yes, I agree. You and I have been down this road too many times for me to think that the plug and mold would separate cleanly. (it didn't) So, I designed this with the worst-case scenario in mind. LOL! Ahh, the heartbreak part. Instead of making a completely rigid mold like I did with the deep bowl, I'm thinking about ditching the surface coat and instead laying up the mold like I used to lay up the fiberglass parts so the mold will be flexible enough to be pulled away from the plug. This will entail laying up a 1-3/4-oz layer, then a 5-oz. layer. This will prevent any print-through of the cloth into the mold. I'm even thinking of ditching the flange in the initial lay-up. Once the mold is separated from the SMC bowl, I'll reinforce it with additional layers of the 17-oz. tooling cloth I used on the deep bowl mold to make it completely rigid. To this end, I'm thinking of applying some dacron peel ply fabric to the top of the 5-oz cloth so that the 17-oz tooling layer will have complete adhesion. This is the same stuff we used to use on the seam of the Su-27 inlet duct seams. It will allow good adhesion without sanding. Then, once bowl and the mold is separated, I'll add the flange. I think all of this is a great idea. I'll just throw out another one. You have a perfect test bed in your deep bowl. You don't have to go through the complete flange adding and strengthening process for this test. Once the plug is pulled out of the mold, you'll know if the technique will work and then move onto Patch's bowl. You already have a rigid deep bowl mold, so the test is really to see if the flexible mold will work. This would ensure that the technique will work without risking Patch's bowl (you can thank me later, monetarily Patch ).Edited by DarenSavage 2017-12-06 9:09 PM | ||
| |||
| DarenSavage |
| ||
Joined: December 2016 Posts: 128 | Love O Fair - 2017-12-06 12:12 PM Reading above, it sounds like the Savage brothers are buttering each other up for premium Christmas presents this year.. so we'll expect a full report on the results of that afterward. Oh, and please don't forget this year's family photo, including Greta! please-thank-you No, mon, I already have my dream guitar. While a parlor might be nice, my Custom Ultra sounds so sweet when played lightly that it's perfect for my parlor. Happily, Greta is waiting with her sis Frannie for me at the Rainbow Bridge. I'll collect them on my way to heaven. Edited by DarenSavage 2017-12-06 11:29 PM | ||
| |||
| Love O Fair |
| ||
Joined: February 2016 Posts: 1769 Location: When?? | Daren... my sincere condolences. I'm sure they'll both be happy to see you.. but we all rather hope it's later than sooner. And yes, your beautiful Custom Ultra still stirs envy in me.. no doubt.. and I don't even have a proper parlor to play in. I used to, but my wife stole it for a sewing room! So I one-upped her and turned the den into a studio... and I can say with certainty she's not going to be happy when I convert the kitchen into a shop like Dan's! That's what she gets for turning the garage into a workout room. It's a constant battle around here, I tell ya! | ||
| |||
| DarenSavage |
| ||
Joined: December 2016 Posts: 128 | Thanks LOF. The Jr. B Girls and I had a great run together, pun intended. Greta and Frannie were littermates and remembered each other from puppyhood. There were a couple of initial squabbles like any siblings who get back together after being apart, but they learned pretty quickly he who buys the food makes the rules. The first rule is everyone has to get along. I don't have video of Frannie racing, but I was able to download Greta's first 16 races at Bluff's Run in Iowa. Here's a video of her winning her second Maiden (training) race. Here's a video of Greta racing on 06/06/06. Seriously. Back on topic. My Custom Ultra means a lot to me on several levels; spiritually, brotherly, and musically. I appreciate your kind words. I don't have a parlor, unless you want to count my living room. Ha ha! Enjoy the couch. I hope it's a comfy one. Edited by DarenSavage 2017-12-07 11:28 PM | ||
| |||
| Love O Fair |
| ||
Joined: February 2016 Posts: 1769 Location: When?? | Awesome videos. It's nice that you are able to have the keepsake footage. And speaking of nights on the couch.. I think I'm going to try out your line, "He who buys the food makes the rules" on my wife. See if I can get my "parlor" back. Wish me luck. | ||
| |||
| DanSavage |
| ||
Joined: June 2012 Posts: 2303 Location: Lake Forest, CA | When my wife and I have a disagreement, I always get in the last word -- it's usually, "Yes, dear"... Edited by DanSavage 2017-12-08 7:09 PM | ||
| |||
| DarenSavage |
| ||
Joined: December 2016 Posts: 128 | Love O Fair - 2017-12-08 2:41 PM Good luck, but I'm not laying any money on your outcome. She'll probably come back with something like, "She who cooks the food makes the rules."And speaking of nights on the couch.. I think I'm going to try out your line, "He who buys the food makes the rules" on my wife. See if I can get my "parlor" back. Wish me luck. This is why I recommend every man tests a new couch to see how comfy it is in case you have to sleep on it for a night or three.  Edited by DarenSavage 2017-12-09 2:53 AM | ||
| |||
| DanSavage |
| ||
Joined: June 2012 Posts: 2303 Location: Lake Forest, CA | DarenSavage - 2017-12-06 7:06 PM Ahh, the heartbreak part. I think all of this is a great idea. I'll just throw out another one. You have a perfect test bed in your deep bowl. You don't have to go through the complete flange adding and strengthening process for this test. Once the plug is pulled out of the mold, you'll know if the technique will work and then move onto Patch's bowl. You already have a rigid deep bowl mold, so the test is really to see if the flexible mold will work. This would ensure that the technique will work without risking Patch's bowl (you can thank me later, monetarily Patch ).That's a fair suggestion. If I make a flexible mold on the outside of the parlor bowl with no flange, it'll be much easier to remove, so I don't think there will be any risk to Patch's bowl. Also, since the MDF insert is no longer inside, the deep bowl is really too flexible to make a flange-less mold and there's no way to mount the bowl for the lay-up. Plus, I really don't want to make another insert. | ||
| |||
| DarenSavage |
| ||
Joined: December 2016 Posts: 128 | Thanks for the explanation. All of that makes perfect sense. I'm looking forward to see how it turns out. | ||
| |||
| DanSavage |
| ||
Joined: June 2012 Posts: 2303 Location: Lake Forest, CA | So, it's been a couple of weeks.
Now, this is ready to mold deep bowls. I've got some 8.5-oz 2x2 twill cloth on order, so I will probably mold a test bowl in the next couple of weeks or so.
I would have been done with the parlor bowl mold a few days ago, but I ran into a problem of my own making. Read on.
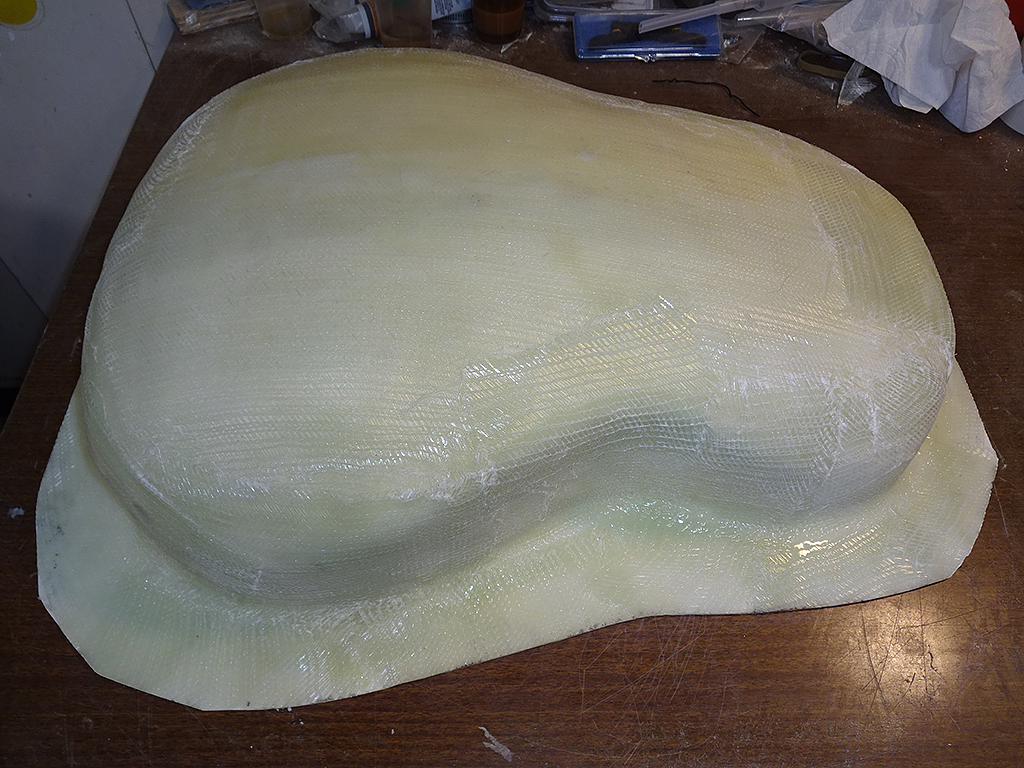
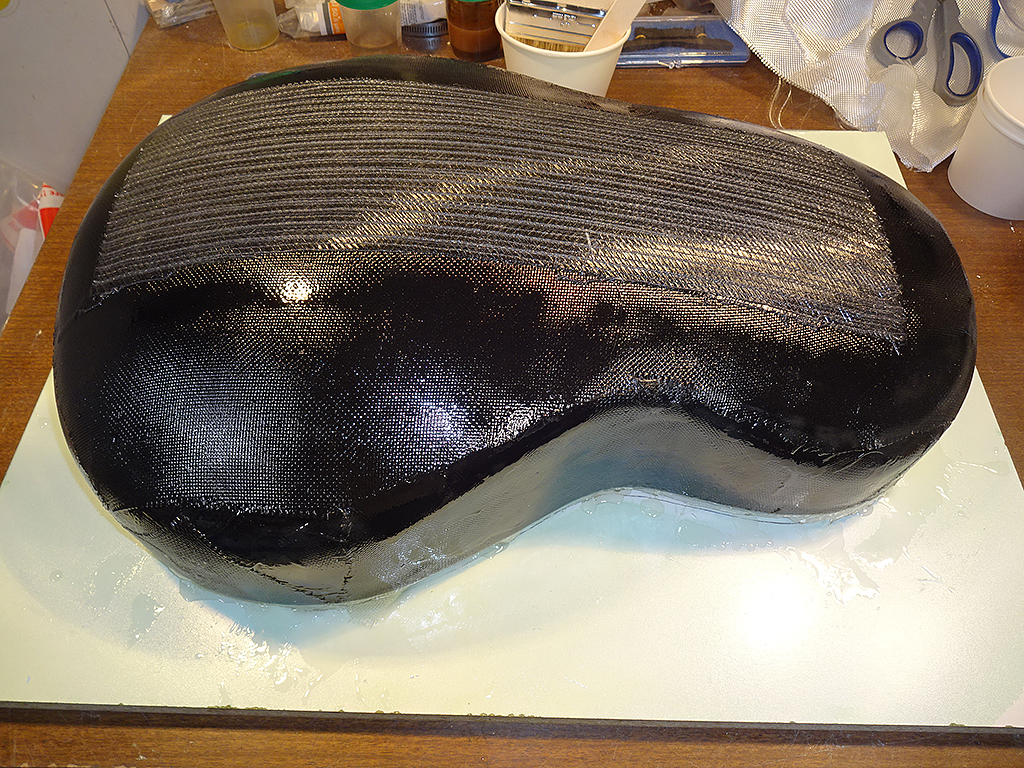
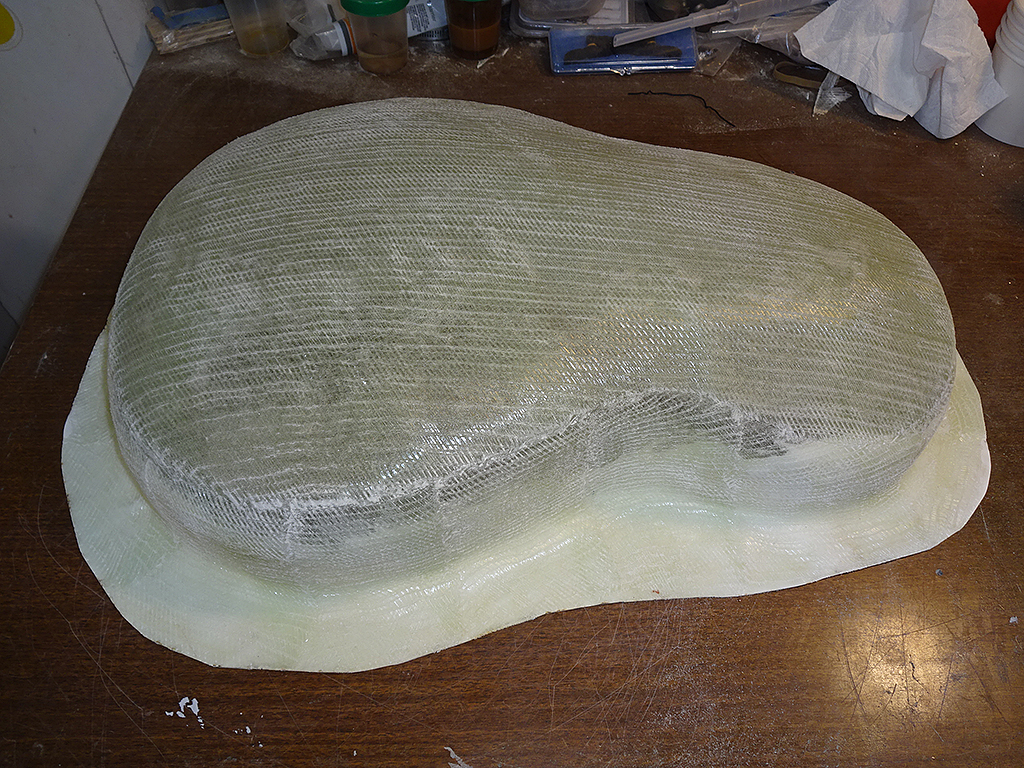
I let this cure until it was green, then trimmed the lay-up so it was flush with the top of the bowl and let it cure for 24 hours.
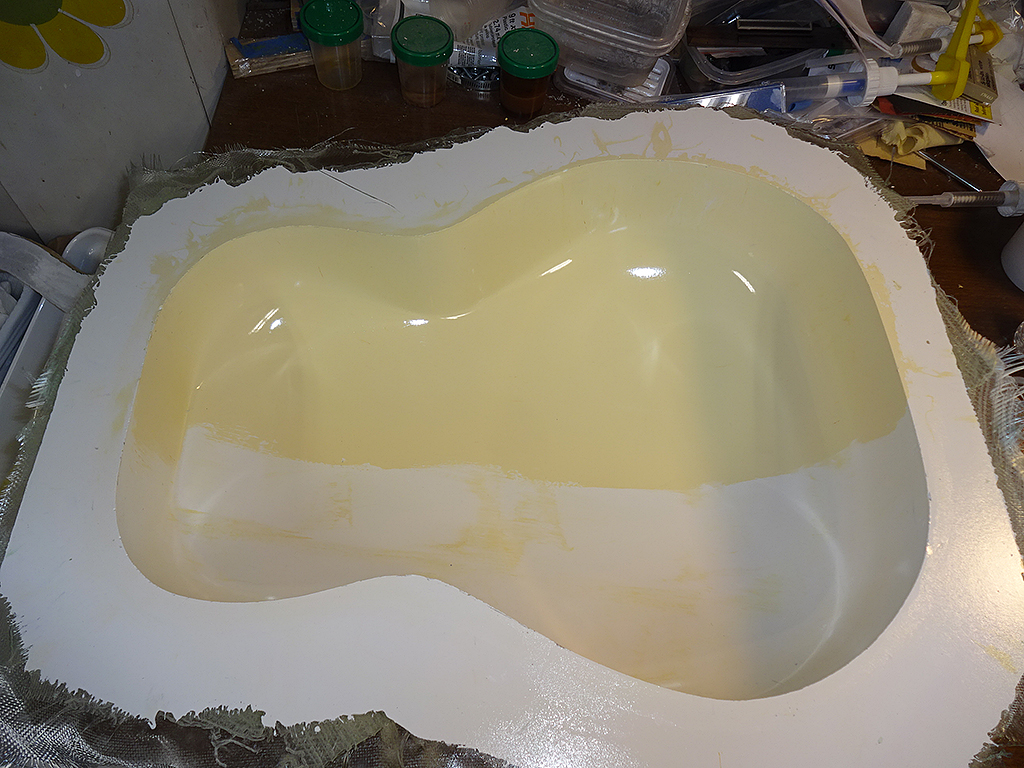
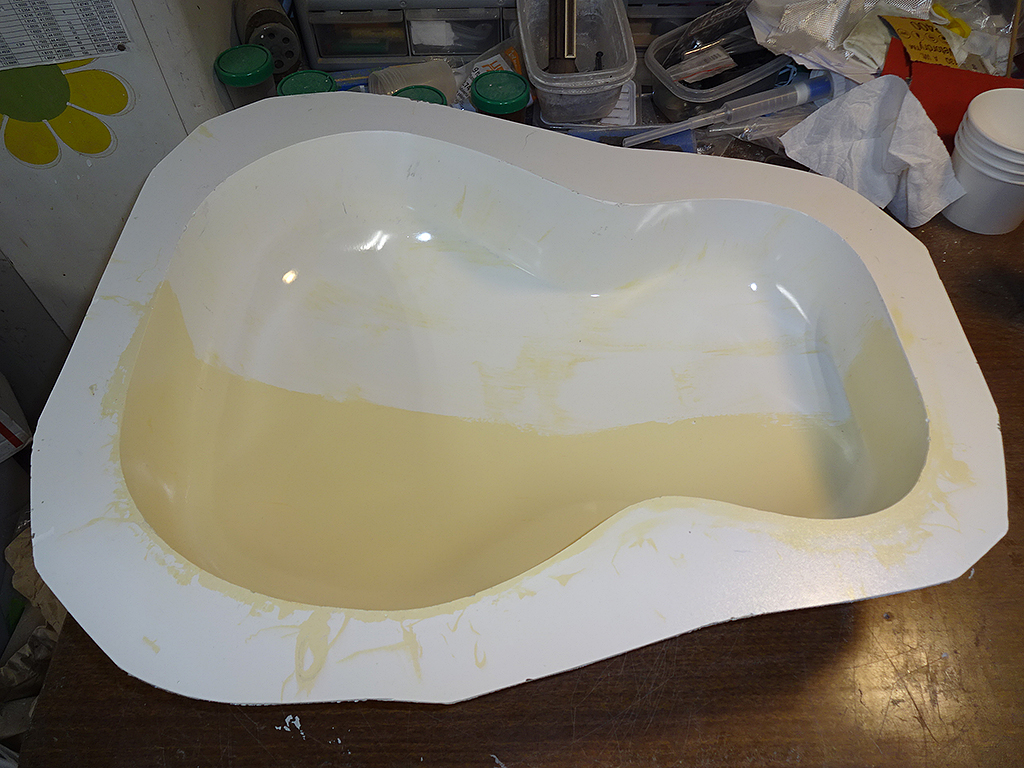
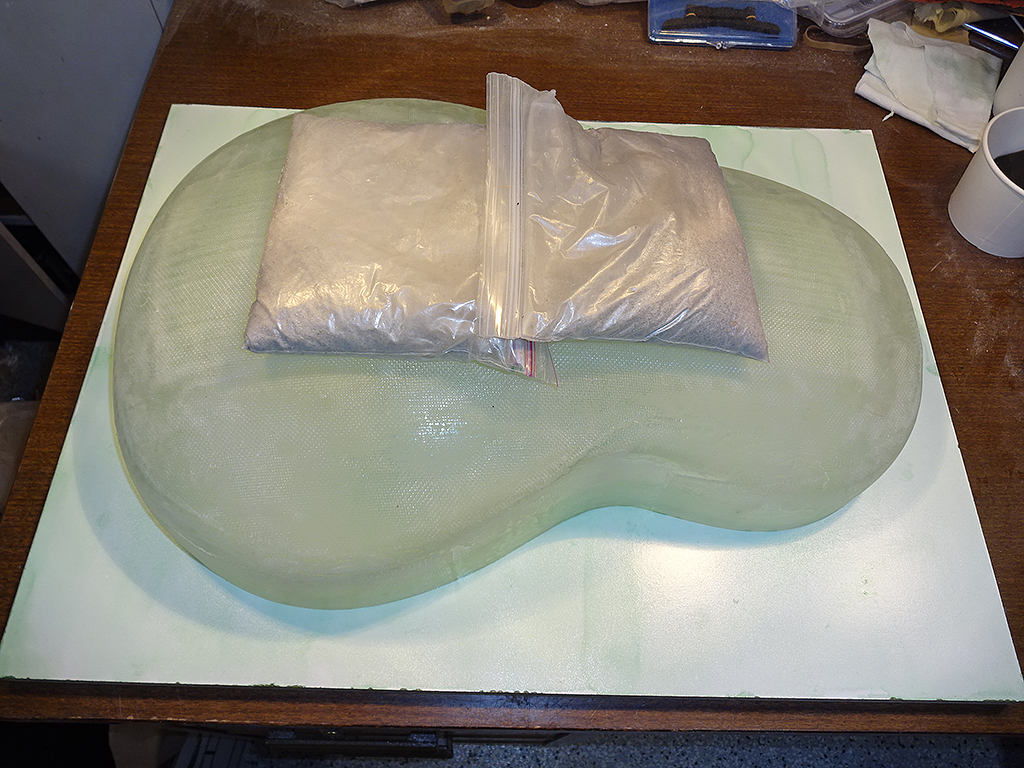
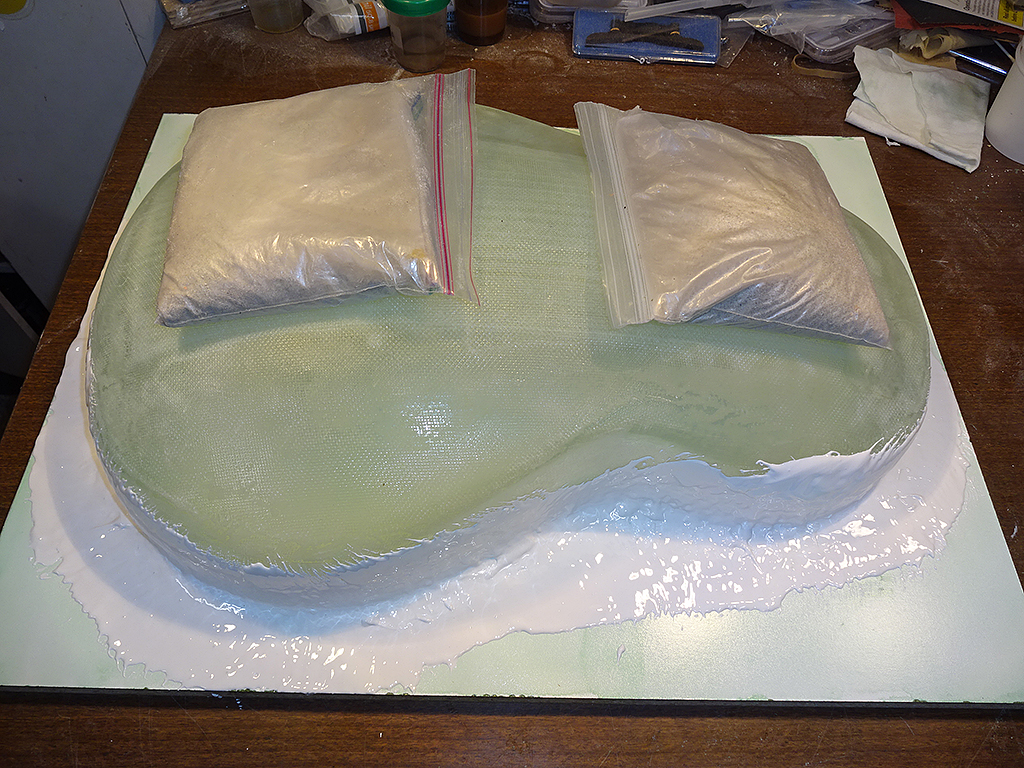
I cleaned up the parting plate, waxed it and added a fresh layer of PVA. I set the bowl onto the parting plate, then put a couple of small sand baggies on it to keep it from moving while I built up the flange.
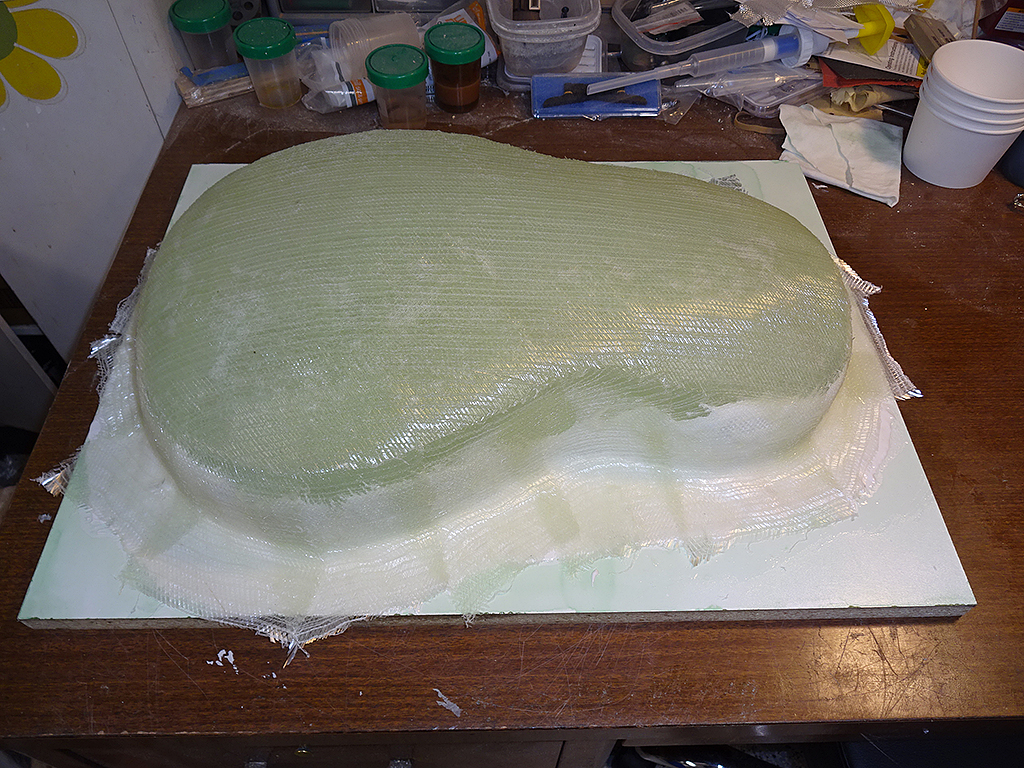
Surface coat has been added to make the flange and to build up the fillet area between the bowl and flange.
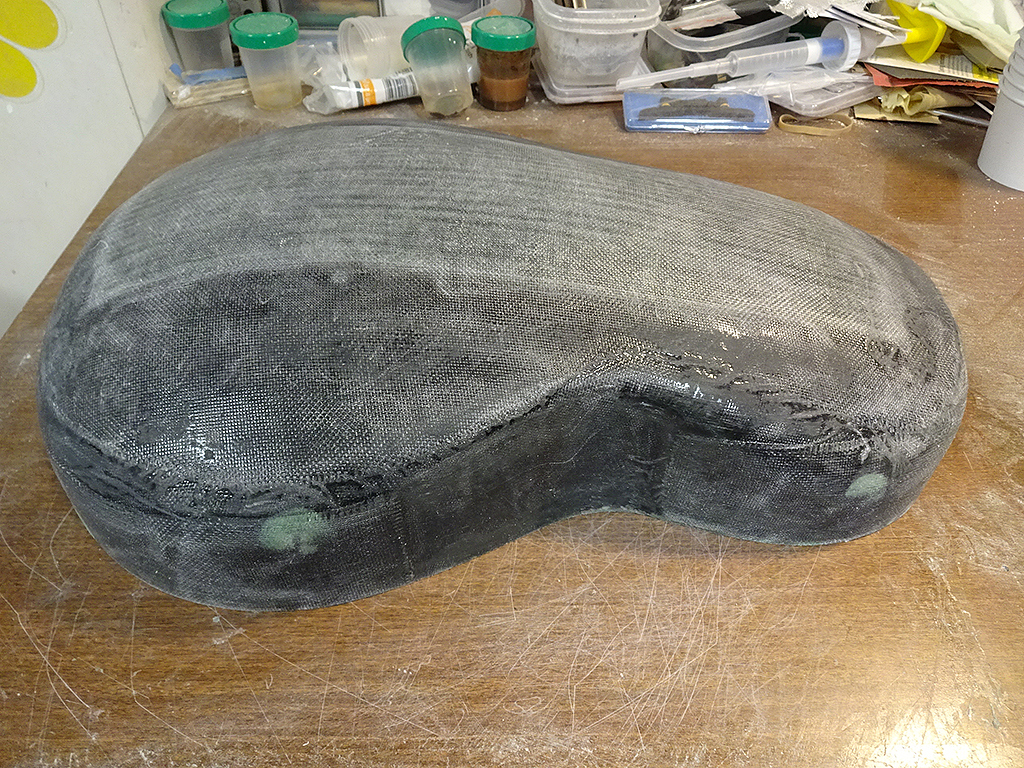
Once the surface coat had kicked over to the green state, I removed the sand baggies and added tooling cloth to the sides and flange, then a final layer of tooling cloth to the bottom of the bowl. I turned on the heat lamps and left it to cure overnight.
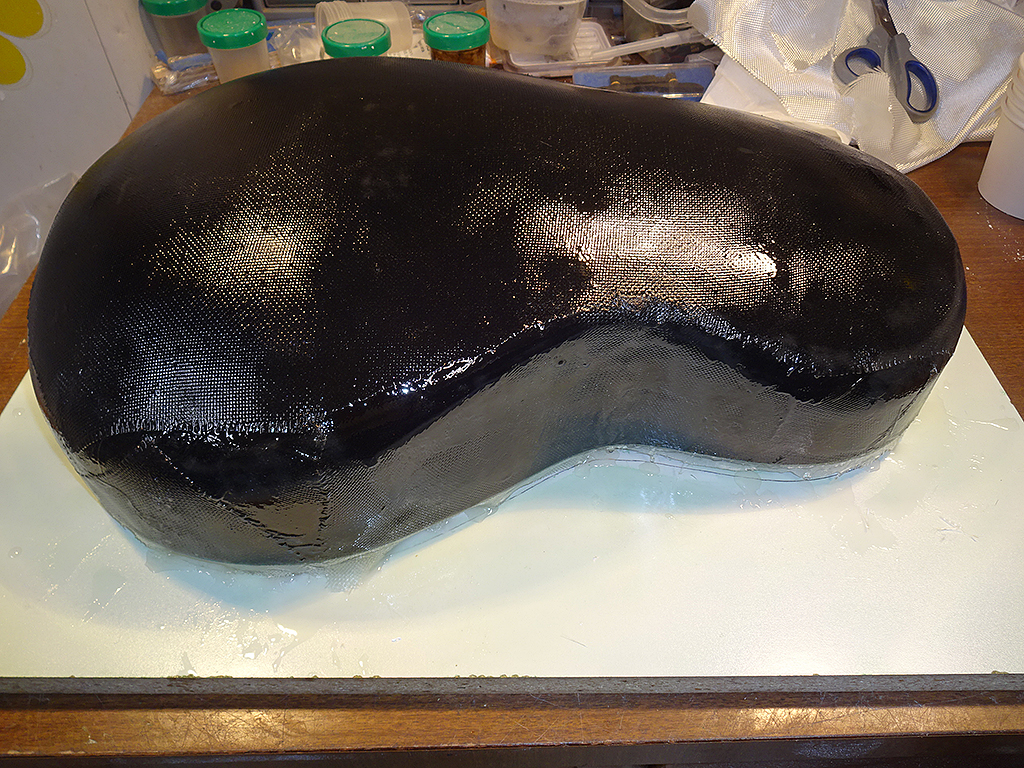
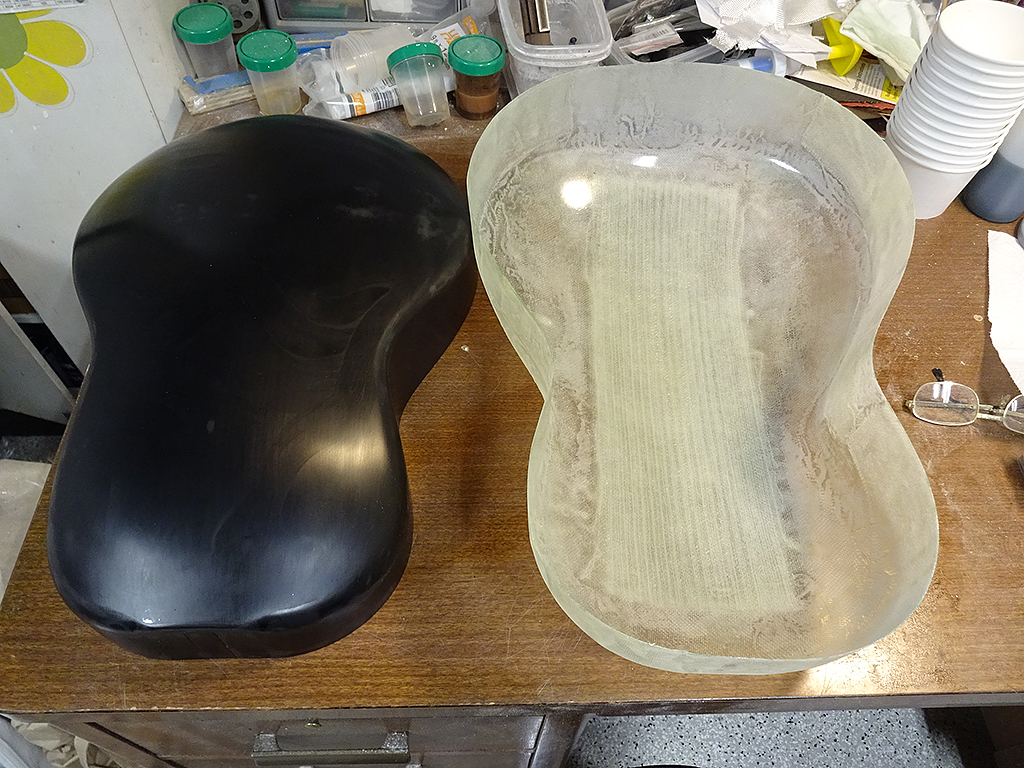
Success! I removed the mold from the parting plate, trimmed the flange, sanded the outside so I don't cut up my hands and trimmed the flange.
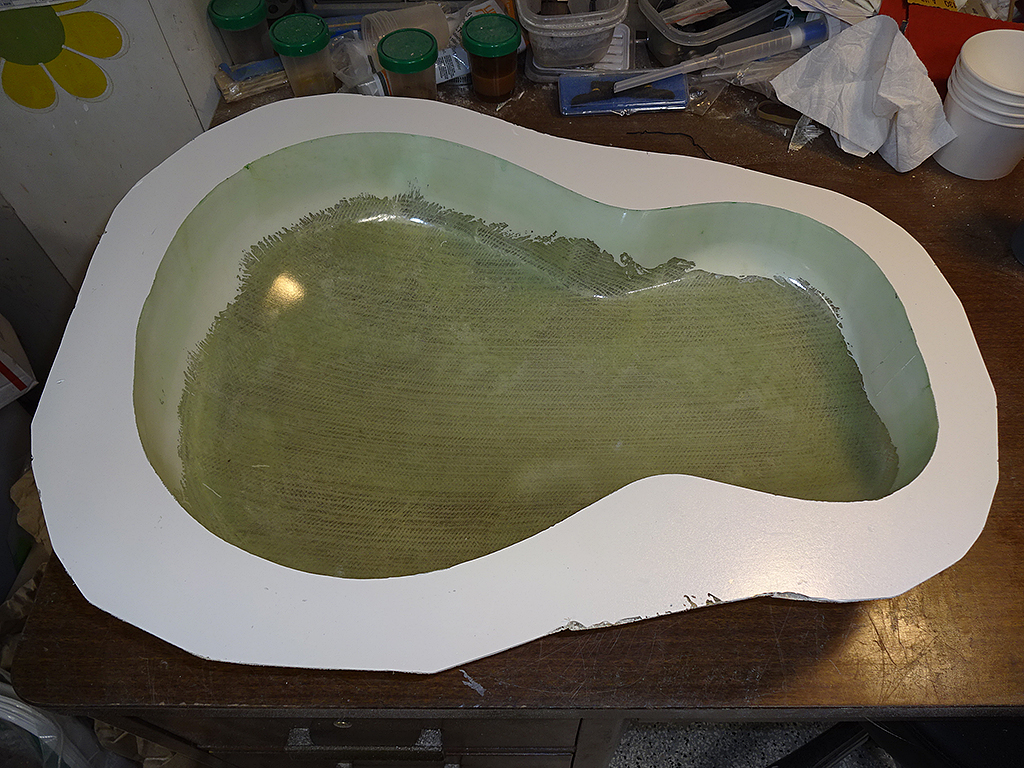
I washed off the PVA and it is now ready to mold parlor bowls.
Edited by DanSavage 2017-12-15 1:03 AM | ||
| |||
| Old Man Arthur |
| ||
Joined: September 2006 Posts: 10777 Location: Keepin' It Weird in Portland, OR | Fun, fun, FUN! And very educational. | ||
| |||
| DanSavage |
| ||
Joined: June 2012 Posts: 2303 Location: Lake Forest, CA | Thanks, Art. The only thing left on these molds is to glue on a couple of legs to the upper bout area of the flanges so they sit level. I'll do that when I get ready to lay up the test bowls in a couple of weeks. Right now, I'd rather step away from the molding process and build Patch's guitar. | ||
| |||
| Jonmark Stone |
| ||
Joined: May 2008 Posts: 1553 Location: Indiana | Great stuff Dan. Thanks for taking us along. | ||
| |||
| Patch |
| ||
Joined: May 2006 Posts: 4221 Location: Steeler Nation, Hudson Valley Contingent | DanSavage - 2017-12-15 9:40 AM Right now, I'd rather step away from the molding process and build Patch's guitar. I LOVE YA MAN!!!! | ||
| |||
| DetlefMichel |
| ||
Joined: May 2011 Posts: 751 Location: Muenster/Germany | Again very exciting , almost incredible. How will you manage to build the structural reinforcements neccessary where the neck is going to be mounted? Do you want to copy the inside of the original bowls or do you have even better ideas? | ||
| |||


| Jump to page : < 1 2 3 4 5 6 7 > Now viewing page 2 [25 messages per page] |
| Search this forum Printer friendly version E-mail a link to this thread |
| This message board and website is not sponsored or affiliated with Ovation® Guitars in any way. | |
| (Delete all cookies set by this site) | |